PlayStation 4 Slim Optical Disc Drive Replacement
ID: 103397
Description: Use this guide to remove or replace your...
Steps:
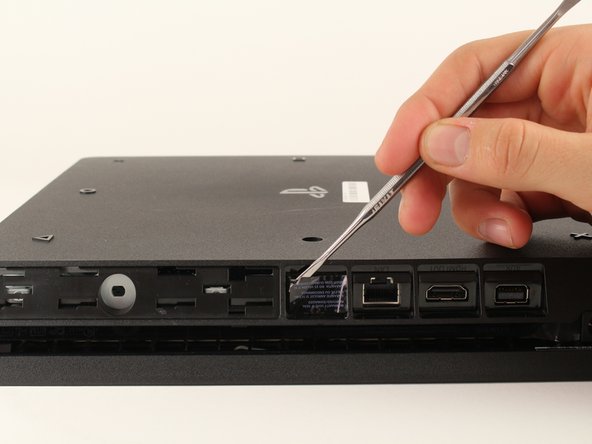
- Locate the plastic warranty sticker next to the three ports on the side of the console.
- Remove the warranty sticker by peeling it off with any kind of spudger.
- Removing the warranty sticker will NOT cause your warranty to be null and void.
- Unscrew and remove the now exposed 5.0mm screw using a TR8 security Torx screwdriver with a counter-clockwise motion.
- Place the Playstation 4 Slim upside down with the side of the screw you just removed facing you.
- Pry up on the two corners that are facing you with your fingers.
- This may take a bit of force to open up and you will hear a fairly loud click when the bottom cover detaches.
- Remove the bottom cover by sliding it towards the back corners and lifting up.
- Place the Playstation 4 Slim right side up, with the PS logo on top and the side with the words "SONY" and "PS4" facing you.
- Pry up on the two corners that are facing you with your fingers.
- This may take a bit of force to open and you will hear a fairly loud click when the top cover detaches.
- Remove the top cover by sliding it towards the back corners and lifting up.
- Unscrew and remove the two screws (left one 31.0mm and right one 24.0mm) using a T8 screwdriver with a counter-clockwise motion.
- Unscrew and remove the 3.0mm screw using a Phillips #1 screwdriver with a counter-clockwise motion.
- Remove the four 16mm Philips screws holding the power supply in place.
- Remove the metal sheet from the top of the power supply by grabbing and lifting up with your hands.
- Remove the antenna from the top of the power supply by guiding the wire with your fingers through the groves underneath the metal panel.
- Flip the Playstation 4 Slim onto its back.
- Unscrew and remove the 4.0mm screw using a Phillips #1 screwdriver with a counter-clockwise motion.
- Use a plastic opening tool to make space between the power supply and console by wedging and wiggling it in-between the two.
- Lift the power supply up and onto its back on the metal sheet using your hands.
- Disconnect the wire connection from the power supply by firmly gripping it with your fingers or tweezers and pulling out.
- Remove the power supply completely by grabbing and lifting up with your hands.
- Unscrew and remove the 31.0mm screw using a T8 screwdriver with a counter-clockwise motion.
- Unscrew and remove the 10x 5.0mm screws using a Phillips #1 screwdriver with a counter-clockwise motion.
- If there are black plastic rivets in place of some screws, pull them out using pliers. They aren't necessary.
- Remove the metal plate by grabbing the edges and lifting up with your hands.
- Unscrew and remove the two 3.0mm screws using a PH000 screwdriver with a counter-clockwise motion.
- Remove the disk drive out by pinching on either side of the two black plastic "claws" and lifting up with your hand.


