HP Pavilion HDX9000 Motherboard Replacement
ID: 105124
Description: Follow this guide to replace the motherboard...
Steps:
- Slide battery latch to the right as pictured to release the battery.
- Remove the single screw securing the disc drive.
- Pull on the disc drive faceplate to remove the disc drive.
- Unscrew the six captive screws securing the hard drive door to the base.
- Unscrew the captive screw securing each hard drive.
- Slide each caddy by its tab away from its SATA connector, and pull the caddy out of the computer.
- Remove the two M2.5x8 screws securing the keyboard.
- Remove the four M2.5x5 screws securing the keyboard.
- Remove the two captive screws securing the TV card door to the base.
- Remove the cover to reveal one more long keyboard screw.
- Flip the computer over and open it. Then, lightly pry the keyboard off from the front (below the keyboard). Beware of adhesive.
- Remove the keyboard connector.
- Remove the four screw covers, and then each of the M3x8 screws under them. Beware, these are different from the others.
- The hinge cover then slides back and off.
- Remove the seven M2.5x8 screws securing the palmrest panel. These screws all have arrows pointing to them.
- Remove the four oddball M2.5x4 broad-head screws under where the battery was.
- There is also another screw, under where the disc drive faceplate was, which has a screw cover on top of it. This screw has an arrow pointing to it, too. This screw is of an M2.5x4 size.
- Remove the four M3x12 screws. These, too, are different from the others, so keep them separate.
- Flip the laptop over, open it, and pull up on the palmrest panel (or use a plastic spudger).
- Flip the laptop upside-down again, and remove the ten M2.5x8 screws securing the palmrest to the base.
- Remove the two screw covers on the screws under where the disc drive faceplate was, and then remove each M2.5x4 screw.
- Remove the four M2.5x5 screws securing the palmrest to the base.
- Remove the two M2.5x11 screws securing the palmrest to the base.
- Flip the laptop over, and...
- ...wait, don't pull the palmrest off yet!
- Disconnect each cable.
- Remove the two M2.5x5 screws, and now you may go around with a plastic spudger and separate the palmrest from the base.
- Remove the subwoofer and CPU fan cables.
- Remove the three M2.5x8 screws securing the subwoofer to the base.
- Don't over-tighten these screws when reinstalling the subwoofer!
- Flip the laptop over and unscrew the captive screw securing the Wi-Fi door to the base.
- Remove each antenna from the Wi-Fi card by pulling up on its connector.
- Remove the two M2.5x5 screws securing the Wi-Fi card, and remove the card.
- Remove the two M2.5x5 screws securing the TV tuner card, and remove the card.
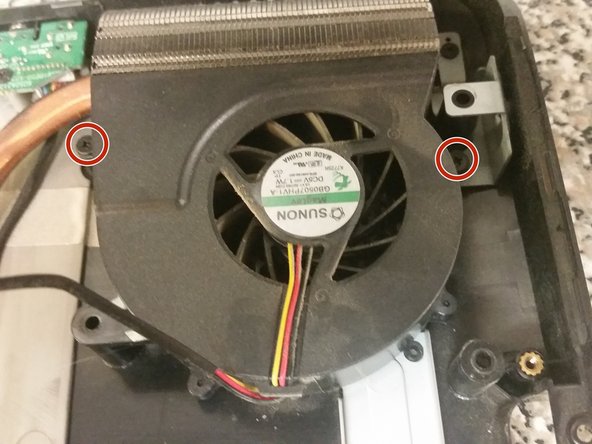
- Remove the two M2.5x8 screws securing the CPU fan to the base, and remove the fan.
- Pull the power connector up and out.
- Pull all four antennas out from under the motherboard.
- Remove all cable connectors from the motherboard.
- Remove the two M1.5x9 screws on each side of the Expansion Port connector.
- Remove the four M2.5x4 screws securing the motherboard to the base.
- Unscrew the single captive screw securing the video card fan to the base.
- Pull up on the motherboard's right side slowly, and then it will come out.
- Congratulations, you have survived! Now you just need to transfer the coolers, CPU, and video card to the new motherboard.