Siemens Surpresso drainage valve gaskets
ID: 113134
Description: These instructions may also help with other...
Steps:
- Unplug your coffee maker!
- Remove the water container, the brew group and the drip tray with pomace container.
- Using a spoon, remove as much of the coffee beans as possible from the coffee bean container.
- Depending on the model, additional sensors with cables may be installed on the top and side panels. You have to remove these before you can completely remove the housing parts.
- Remove the two Torx T10 screws on the top.
- Remove seven T10 Torx screws on the back.
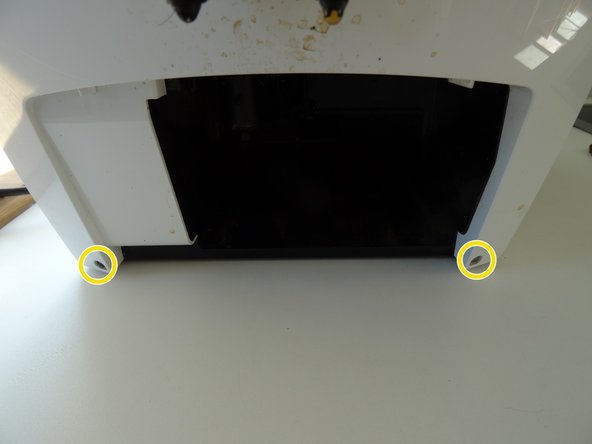
- The two screws at the bottom of the front can remain.
- Press with a flat-head screwdriver into the openings on the side with the water tank. This releases the latches on the top.
- Press the flat-head screwdriver into the opening on the side with the brew group. This will release the last notch on the top.
- Lift the top off.
- On some models, a cable leads to the sensor on the powder tray. Unplug the connector on this cable first.
- Slide the side section of the brewing unit about 2 cm to the rear. This sometimes gets stuck and may require some force to remove.
- Remove the two tabs from the power switch.
- Take off the side panel with the brew group.
- Do the same with the panel on the other side.
- To remove the water tank hose simply pull it of the pump.
- Remove the side panel.
- Rotate clockwise the expansion box about 60 degrees and pull it out.
- The expansion box is frequently filled with coffee oils or grounds. Clean it from time to time. It can easily be separated into two halves.
- The drainage valve is directly plugged to the gear drive. The drive is fixed with five Torx T10 screws on the center panel behind the brew group.
- Remove the five Torx T10 screws holding the gear drive in place.
- Push the gear drive outwards to the left. Pay attention, several cables might get caught.
- Lay the gear drive on its side. Loosen the upper water connector by pulling the clamp and than sliding off the hose. Mind the O-ring on the end of the hose, replace it if necessary.
- The drainage valve is exposed.
- Remove the spring on the lower end of the valve.
- Lift the upper gray part of the valve. Push the lower part of the valve a little bit downwards und lift it out.
- There are different versions of this valve. The tappet can be different, the valve stem can only be a ball, one or two seals are used. However, all valves function in the same way.
- Pull the cap of the grey upper valve body. Use pliers, if it is stuck.
- There are two gaskets, the flat side pointing outwards.
- Newer valves have only one gasket
- Plunger and downholder
- Piston and spring
- Replace the gaskets and reassemble the valve.