Left Joy-Con Joystick Replacement
ID: 113182
Description: The Nintendo Switch comes with two Joy-Con...
Steps:
- Remove the four Tri-Point Y00 screws from the back panel of the Joy-Con.
- These screws are each 6.2 mm long, but it's still a good idea to keep them organized and make sure they go back in their proper places!
- Insert an opening pick into the seam at the bottom edge of the controller (opposite the L and ZL buttons).
- Slowly slide the flat edge of your opening pick up the side of the Joy-Con.
- Be careful not to slide the opening pick too far inside the Joy-Con. This may damage the inner components. The back panel loosens fairly easily, so not much pressure is needed.
- With the charging rail facing away from you, open the the Joy-Con like a book.
- Don’t try to fully remove the back panel yet. There are still two cables connecting the charging rail to the motherboard.
- During reassembly, make sure the SL/SR cable is lightly bent under the battery compartment before clipping the two halves of the joy‑con together. Otherwise, you might crease the cable and damage it.
- Use a spudger to gently pry the battery connector straight up from its socket on the motherboard. This will keep the Joy-Con from powering on during the repair.
- Be very careful as you pry up the connector—if it doesn't come up with the spudger, try gently pulling the cables straight up from the board to disconnect it.
- During reassembly, press the connector straight down into its socket on the board to reconnect the battery.
- Insert an opening pick between the battery and the Joy-Con housing.
- Gently pry out the battery, which is lightly taped in place.
- Be careful not to deform or puncture the battery—it can catch fire or explode if damaged.
- Remove the three 3.5 mm golden Phillips #00 screws from the midframe.
- Do not attempt to remove the midframe yet. There is a fragile cable that still connects the ZL button on the midframe to the motherboard underneath.
- Carefully flip the midframe over, away from the motherboard, as if you were turning the page of a book.
- Do your best not to stress the thin ribbon cable attached to the ZL button during this step.
- The ZL button cable is locked in place by a small ZIF connector on the motherboard. Use tweezers or a spudger to flip up the ZIF connector lock opposite the cable.
- Use tweezers to gently pull the ZL button flex cable out of the ZIF connector socket. The midframe is now disconnected and can be removed.
- The ribbon cable connecting the minus button of the Joy-Con to the motherboard runs over the back of the joystick. It is possible to remove the joystick without disconnecting this cable, but it's much easier to do so when it is disconnected and out of the way.
- Unlock the minus button’s ZIF connector and disconnect the cable.
- Finally, the joystick is locked into place by one last ZIF connector. Carefully flip the ZIF lock upward and disconnect the cable.
- Remove the two 3.5 mm Phillips #00 screws from the joystick.
- Carefully remove the joystick from its housing.
- There is a thin black gasket around the hole where the joystick pokes through the Joy-Con. Do your best not to disturb this gasket as you remove the joystick!
- Once the Joy-Con is fully reassembled, connect it to your Nintendo Switch and calibrate the new joystick. Additionally, you may need to power cycle your Switch by holding down the power button for 10-15 seconds until it turns off, then turning it back on.
- If you've replaced the joystick with a Gulikit module and it came with a joystick ring sticker, follow the next two steps to install it.
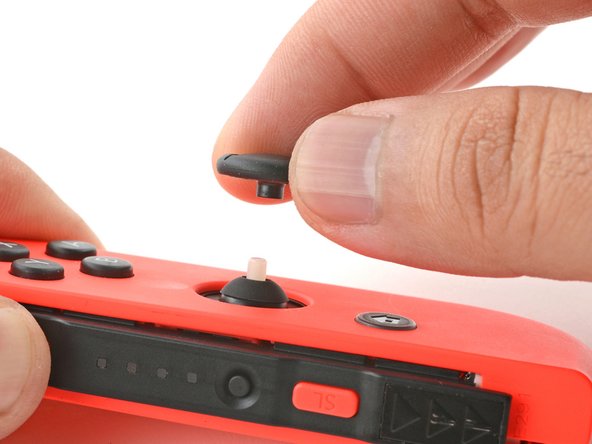
- Use your fingers to pull the thumbstick off of the Gulikit joystick module.
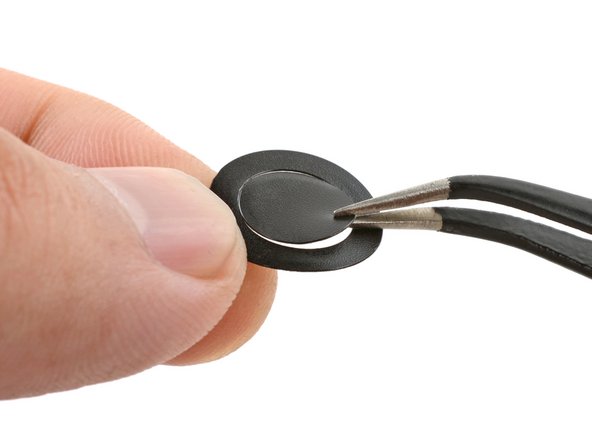
- Peel the ring sticker from its liner.
- If the sticker center is still attached, separate and remove it from the ring.
- Set the ring sticker in the joystick recess and press it with your fingers for a few seconds to attach it.