Installing the Kyocera FS-1010 driver on various MacOS current versions of macOS
ID: 113660
Description: Kyocera only provides drivers for Mac OS 9 and...
Steps:
- Visit https://www.kyoceradocumentsolutions.de
- Click on the Category "Support & Download" at the top of the site
- Note for readers from Englisch-speaking countries: I wasn't able to locate the drivers for the FS-1010 on the site for the USA. Also, I wasn't able to obtain screenshots which show the englisch version of the menus, buttons etc. If you are able to obtain fitting screenshots or if you are able to correct the translations, feel free to edit the guide
- On the opening web page, scroll down until you get to the Download-Center.
- Choose "Drucken" under Produkt Funktion and "FS-1010" under Produkt.
- Click on >Go afterwards.
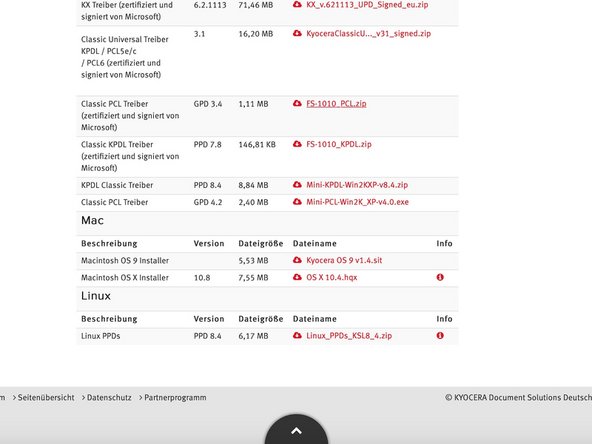
- Scroll all the way down until you get to the drivers for Linux and Mac.
- If you use Mac OS 9 oder Mac OS X 10.4, you should use the official Mac-Drivers provided by Kyocera, since those are optimized for use with the Mac. For everyone who uses a newer version of macOS, the drivers are not usable. Continue with this guide to still install drivers for macOS.
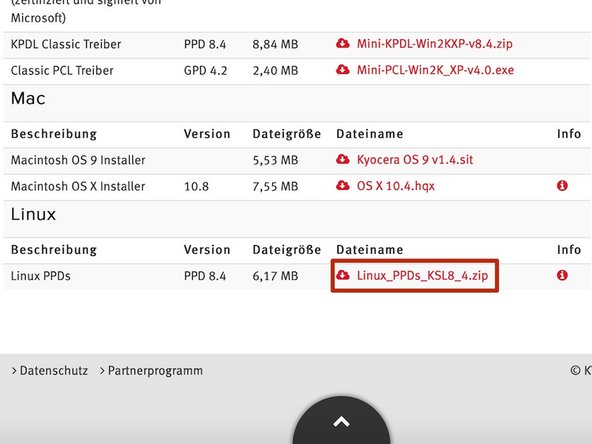
- Download the Linux-Drivers (Linux PPDs) by clicking the fitting link.
- Connect the printer via USB with your Mac or use a LAN-Cable to connect the printer to your local network.
- For connecting the printer to a local network you need a separately available network card, which you need to add to your printer.
- Turn on the printer by flicking the switch on the back side. Wait until only the first Status LED is light up.
- Click on the Apple-Logo in the top left corner and then open "System Preferences".
- Click on the Icon for "Printers & Scanners", after the system preferences we're opened.
- Afterswards click in the opening window on the small + in the down left corner.
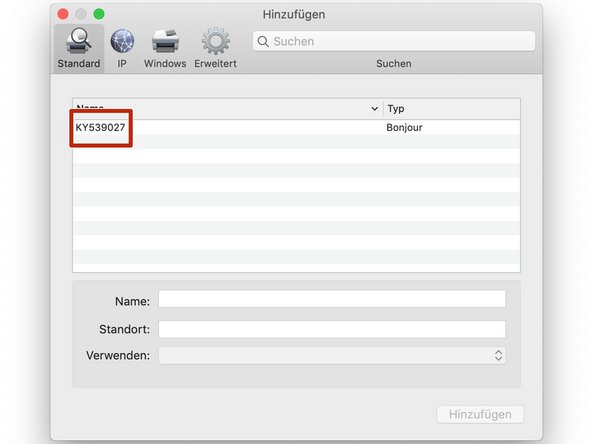
- Choose your printer in the list to configure it.
- Give the printer a name and a location (optional).
- If your printer doesn't show up in the list and it is connected via LAN, click on "IP" at the top of the windows and enter the IP-Adress manually (Picture 3). You can find out the IP Adress by printing a test page (hold the start-button for five seconds).
- Don't click on "Add" just now, otherwise it will use the standard-driver.
- Open the menu next to the line "Use" and choose "Other file...".
- When the option "Other file..." is missing, follow step 8 und 9. If the option is there, continue with this step and skip step 8 und 9.
- Navigate to the Downloads-folder and then into the folder you just downloaded (PPD's_KSL_8.4).
- The driver gets delivered in a .zip format. Normally, macOS automatically unpacks a zipped folder. If that's not the case, you need to unzip it first.
- Navigate to the sub-directory "English" and choose the file "Kyocera_Mita_FS-1010_en.ppd".
- Afterwards click on the button "Open" in the down right corner.
- Only follow this step when there was no option labeled "Choose File" in step 7.
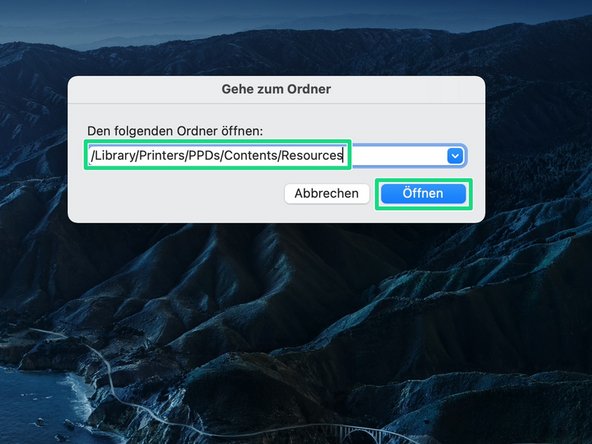
- Open a new Finder window and click on "Go to" -> "Open Folder..." in the menu bar.
- In the appearing window, type in the directory /Library/Printers/PPDs/Contents/Resources and click on "Open".
- Navigate to your Downloads folder and the folder we downloaded earlier (PPD's_KSL_8.4). Open the sub-directory "English" and copy the file "Kyocera_Mita_FS-1010_en.ppd" to /Library/Printers/PPDs/Contents/Resources.
- Only follow this step when there was no option labeled "Choose File" in step 7.
- As described in step 4-6, open System Preferences and the menu "Printers".
- Under "Use" select the option "Choose Software".
- In the appearing list, choose the software for the FS-1010 and click "OK".
- Now the name of the driver should show up under "Use". Now you can click on "Add".
- The printer now gets configured.
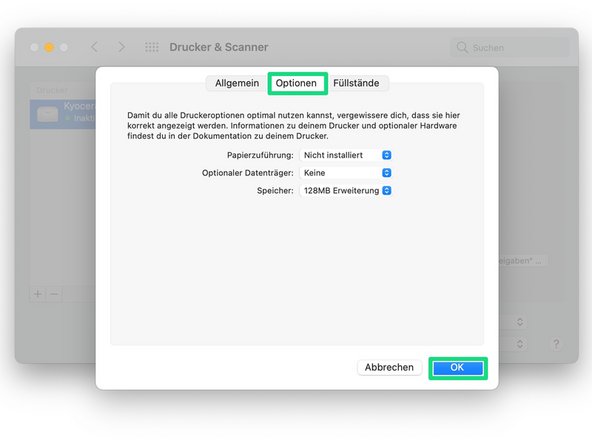
- In the now opening window you need to select the options that are available in your printer. If your done, press "OK" in den down right corner.
- If there is no window to configure the options of your printer, go to the next step.
- Only follow this step if you couldn't configure the options of your printer in the last step. Otherwise you can skip this step.
- Choose the printer we just added in the list on the left side and click on "Options & Ink Level...".
- Click on "Options" and set up the options according to those that are available in your printer. If you are done, click "OK".
- After the installation is completed, the printer and the correct driver should show up in the list.
- To print a test page, click on "Open printer wait list...".
- Afterwards, click on Printer -> print test page.
- If the test page gets printed without any problems, the installation was successful. The printer now gets used with the fitting Kyocera driver.
- With the Kyocera-driver you can use all the accessories in the printer in macOS. Additionally, the speed gets improved.
- Even though this guide was specifically written for the FS-1010, you can adapt the guide to other Kyocera printers or even printers from different manufacturers, as long as they provide a PPD for Linux.