How To Replace the Left Barn Door Lock On The 2008–2014 Clubman
ID: 124824
Description: A common failure condition of the 2007–2014...
Steps:
- Fold the folding "flat-load floor" of the trunk (boot) back out of the way.
- Remove anything you have stored under it, as you’ll need to lift the actual bottom floor panel later.
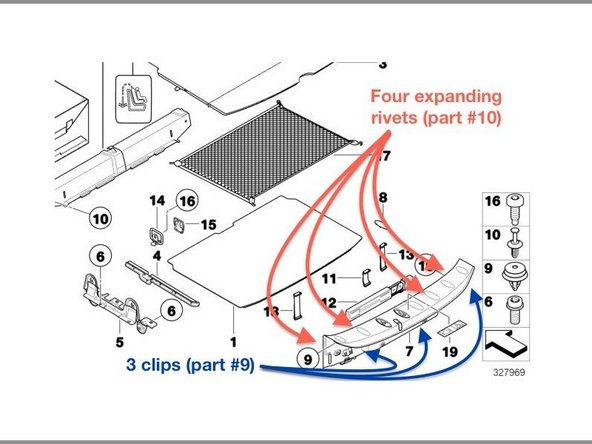
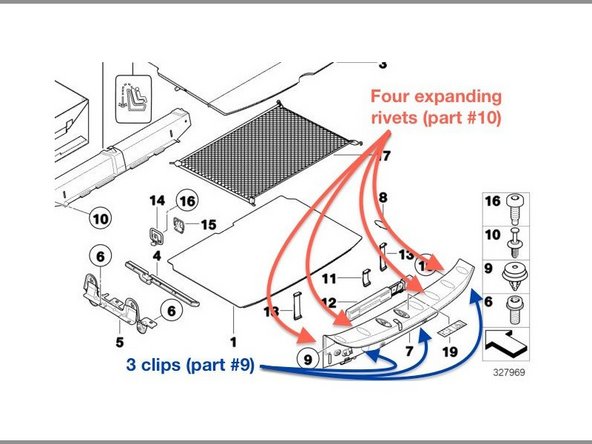
- You're going to remove part #9 on this diagram. It’s held in place with four plastic expanding rivets on the inside of the luggage compartment, and three plastic clips that we’ll just pull out.
- Remove the expanding rivets. Use your flathead screwdriver (or trim tool) to carefully pull out the center pin. (This will allow the shaft of the rivet to un-spread itself, so you can pop it out.)
- Then use the flathead screwdriver to pry underneath the edge of the rivet and work it out. This will require some force.
- You'll have to bend over to look inside the boot to see the rivets. A flashlight will help a lot.
- Remove the bottom floor panel (part number 9 on the diagram)
- Use your fingers to pull the bottom edge of the Loading Sill Cover (part number 7) forward the front of the car.
- (That's away from you if you are standing outside the back of the car. I can't imagine where else you would be standing.)
- You’ll need to clear the metal tie-downs that are secured to the car’s body.
- The cover is stiff but somewhat flexible; you won’t break it and you will need to use some force.
- As soon as you have cleared the tie-downs, pull straight up on the Loading Sill Cover.
- Pull hard. No, harder. Yes, that hard. Keep pulling. You won't break it.
- The three plastic clips that hold the sill in position should pop free.
- Sometimes the clips come loose from the cover and stay in the car! Pry them out with a screwdriver or trim too. Slide them back into their slots on the Loading Sill Cover.
- The hard part is now done!
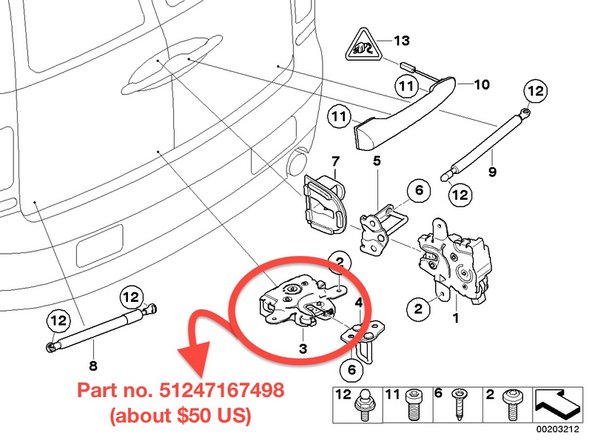
- Here’s a fresh diagram for you!
- Unscrew the two Torx bolts (part number 2 on this diagram). They’re slightly stiff but shouldn’t be too hard to remove.
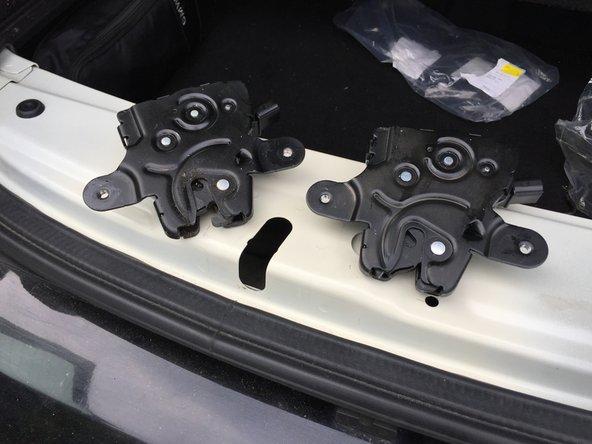
- The lock mechanism is now free.
- Reach into the body through an opening right behind it, and pull it out!
- Disconnect the wire harness connector.
- Throw out the P.O.S. lock mechanism that failed on you.
- Plug the new lock into the wire harness.
- Screw the lock mechanism back in; there is some side-to-side adjustability but I found just putting it dead center had it lined up correctly with the door.
- Tighten the bolts very firmly.
- Don't strip the threads. You're putting steel bolts into steel threads so that's not likely, but these aren’t wheel bolts, so take it easy.
- Ensure the split door is correctly caught and locks, and that it unlocks when you squeeze the handle
- Re-install the Loading Sill Cover.
- Make sure the three white plastic clips are slid into their slots inside the Loading Sill Cover.
- Put in position, line them up into their holes and press down.
- Tip: To make the clips pop into position, you’ll probably have to give them each a good, solid whack with your hand. (The clips rarely break; if they do, they cost about $0.70 each.)
- Re-install the four expanding rivets
- Remove the center pins from the expanding rivets.
- Push each rivet back into position, then insert the center pin and push it down.
- Check the rubber weather seal
- Make sure the rubber weather seal is OVER the Loading Sill Cover
- Put the floors back
- This is ludicrously simple, so I’m not describing it.