Canon PowerShot SX60 HS LCD Screen Replacement
ID: 124838
Description: If either your screen is damaged or you cannot...
Steps:
- Make sure to power off the device before completing any more steps.
- Remove the battery by releasing the orange clip in the battery compartment.
- Remove the rubber eye piece by pulling it back.
- Use the Phillips #00 screwdriver to remove the two 5mm #00 screws located on the side of the viewfinder.
- Use the Phillips #00 screwdriver to remove the 4mm #00 screw located on the bottom left of the device.
- Use the Phillips #00 screwdriver to remove the 5mm #00 screw located on the bottom center of the device.
- Use the Phillips #00 screwdriver to remove the 7mm #00 screw on the right top corner of the camera, just above the media ports.
- Use the Phillips #00 screwdriver to remove the two 5mm #00 screws located on the right side, under the media port dust cover.
- Ensure the LCD screen is swung fully to the left before taking off the back panel.
- Use the iFixit opening tool to pry off the back panel.
- Don't completely pull off the back panel because there is still a ribbon attached.
- Use the black spudger to unclip the ribbon located behind the battery compartment. Then remove it using the nylon tipped tweezers.
- Once the ribbon is unplugged, remove the back panel from the camera body.
- Remove the sunshade located on the front of the lens by twisting it 90 degrees in either direction, then pull straight off the lens.
- Remove the 5mm Phillips #00 screw located on the left side below the microphone connection.
- Remove the 4mm Phillips #00 screw located on the bottom left of the camera.
- Remove the 5mm Phillips #00 screw located on the bottom center of the camera.
- Pop open the flash and remove the 5mm Phillips #00 screw located under the flash.
- Remove the front cover by pulling along the lens housing while holding the body of the camera.
- Remove the 4mm #00 Philips screw located on the top left corner beneath the front panel.
- Remove the 5mm #00 Philips screw located on the top left corner beneath the front panel.
- Remove the 5mm #00 Philips screw located on the top of the left side panel near the microphone connection.
- Remove the 4mm #00 Philips screw located on the bottom left corner beneath the front panel.
- Using a black spudger, unclip the orange wire ribbon on the lower left corner of the motherboard and then remove it using the nylon tipped tweezers.
- The side panel is now free and can be removed by pulling the panel to the left.
- Remove two 4mm #00 Philips screws located at the hinge of the LCD Screen.
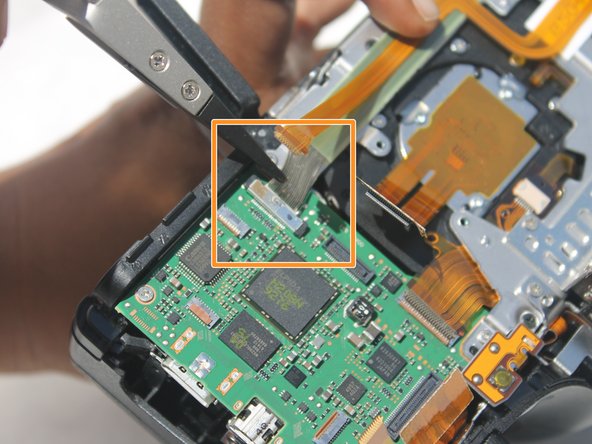
- Unclip the green ribbon using the nylon tipped tweezers.
- Be careful when removing this plug. The wires in the green ribbon are not connected together and can easily be damaged.
- Once the ribbon is unclipped, remove the LCD screen.