Huawei Honor 10 Screen Replacement
ID: 125182
Description: Use this guide to remove a broken or defective...
Steps:
- Before you begin, switch off your phone.
- Apply a heated iOpener to a long edge of the phone to loosen the adhesive beneath the rear glass. Apply the iOpener for at least two minutes.
- If the phone's rear glass is cracked, the suction cup may not stick. Try lifting it with strong tape, or superglue the suction cup in place and allow it to cure so you can proceed.
- Press a suction cup onto the back cover.
- Lift the back cover's right edge with your suction cup, opening a slight gap between the back cover and the frame.
- Insert the tip of an opening pick in the gap you created and slide it to the bottom right corner.
- Apply more heat if the adhesive becomes hard to cut. During the removal process, the back cover is under tension all the time and is likely to break if the adhesive isn't softened enough.
- Insert a second opening pick at the bottom right corner of the rear glass.
- Slide the opening pick along the bottom edge of the rear glass to cut the adhesive and leave it in the bottom left corner.
- Insert a third opening pick at the bottom left corner of the rear glass.
- Slide the opening pick along the left edge of the rear glass to cut the adhesive.
- Leave the opening pick at the top left corner of the rear glass.
- Insert a fourth opening pick at the top left corner of the rear glass.
- Slide the opening along the top edge of the rear glass and cut the remaining adhesive with it.
- Carefully lift the rear glass of the Huawei Honor 10 and remove it.
- Use a pair of tweezer to carefully peel the black foil off the loudspeaker and daughterboard cover.
- Remove the foil completely.
- Remove the three Phillips #00 screws (2.9 mm length) that secure the metal bracket on top of the battery, interconnect, and display flex cable.
- Use a pair of tweezers to remove the metal shield that covers the connectors of the interconnect cable, the battery and the display flex cable.
- Use a spudger to pry up and disconnect the battery flex cable.
- Remove the seven Phillips screws securing the loudspeaker unit:
- Three silver 2.9 mm long screws
- Four black 3.4 mm long screws
- There's a little bit of adhesive under the loudspeaker. It's possible to remove the loudspeaker without heating the adhesive but if you're having a hard time removing it, you can use an iOpener to soften the adhesive.
- Slide the flat end of a spudger under the right side of the loudspeaker unit.
- Pry up the loudspeaker unit until you can get a good grip.
- Remove the loudspeaker unit.
- Use a spudger to pry up and disconnect the display flex cable.
- Use a spudger to pry up and disconnect the home button flex cable.
- Apply a heated iOpener to the screen to loosen the adhesive beneath. Apply the iOpener for at least two minutes.
- You might need to reheat and reapply the iOpener several times during the removal procedure to keep the adhesive warm enough to cut.
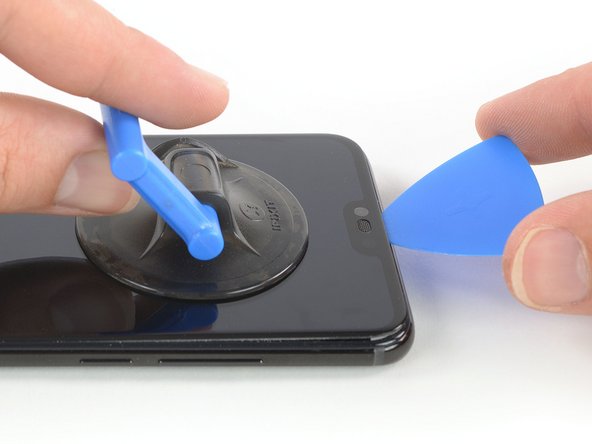
- Once the screen is warm to the touch, apply a suction cup near the top edge of the phone right under the earpiece speaker.
- If the phone's screen is cracked, the suction cup may not stick. Try lifting it with strong tape, or superglue the suction cup in place and allow it to cure so you can proceed.
- Only insert the tip of the opening pick under the screen (about 1/8 of an inch) to prevent damage to components underneath, such as the front facing camera and the earpiece speaker.
- Pull up the suction cup, and insert the tip of an opening pick under the display where the earpiece speaker is located.
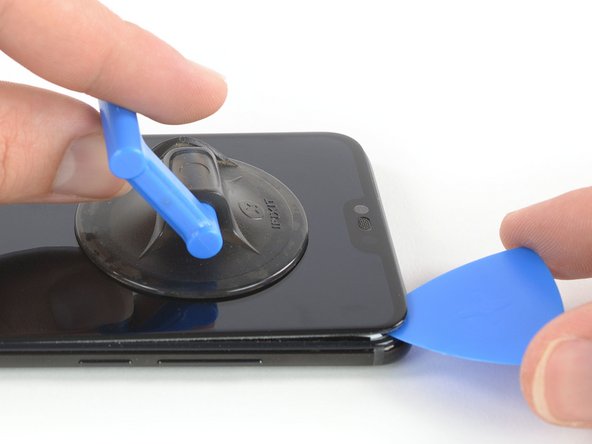
- Slide the opening pick to the top right corner of the phone to cut the adhesive.
- While cutting, make sure the pick slides under the display panel and not just between the display and the front glass.
- Slide the opening pick from the top right corner down the edge of the phone to cut the adhesive.
- Leave the opening pick at the bottom right corner of the screen to keep the adhesive from resealing
- Pull up on the suction cup, and insert the tip of a second opening pick under the display where the earpiece speaker is located.
- Slide the tip of the opening pick to the top left corner of the phone to cut the adhesive.
- Slide the opening pick from the top left corner down the edge of the phone to cut the remaining adhesive.
- Try not to remove the display all the way yet. The home button and display flex cables are still threaded through the midframe.
- Make sure the flex cable does not stick to the frame and carefully thread it through its gap.
- Remove the screen.
- Remove any remaining adhesive from the midframe, and clean the glued areas with isopropyl alcohol and a lint-free cloth.