MSI GS65 Stealth Thin 8RE Fan Assembly Replacement
ID: 130584
Description: Use this guide to replace a faulty fan in your...
Steps:
- Remove the fifteen black 6.0 mm Phillips #00 screws from the back cover.
- Carefully remove the back cover by prying up the case with a plastic opening tool, starting at the opening end and finishing at the hinge.
- It may be easiest to start at the Ethernet port and run a fingernail, or something else thin, along the side until the panel pops off.
- When putting this cover back on later, it should "click" back into place.
- Remove the three silver 4.0 mm Phillips #00 screws holding in the battery.
- Carefully lift the battery, partially, out.
- The battery will still be connected to the motherboard, so be sure not to pull excessively on the cables.
- Unplug the battery connector by pinching and wiggling the white cable end out.
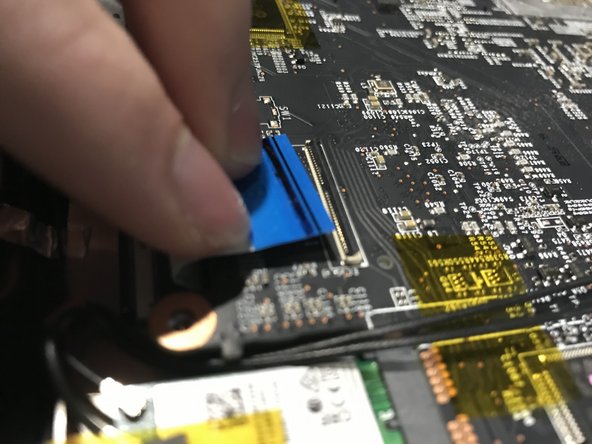
- Unclasp and unplug the various white and blue ribbon cables from the motherboard by lifting the black locking tabs of the ZIF connectors with a spudger.
- Then, gently pull the ribbon cables out.
- When reassembling, make sure each ribbon is completely in before setting the black tab back down.
- There are 4 of these ribbons in this step.
- Unscrew the 4.0mm Phillips #00 screw holding down the WiFi card.
- Be extra careful as to not unplug the tiny wires when lifting out the WiFi card, as it may be quite difficult to plug them back in.
- Slightly lift and slide out the card towards you to remove it.
- Using tweezers or careful manipulation with your hand, unplug the cable just beside the WiFi card.
- Remove the last 2 ribbon cables connected to the motherboard in a similar manner to the ones earlier.
- Slowly peel the large black ribbon cable off the fan, as it is lightly adhered.
- Unscrew the two black 6.0mm Phillips #00 screws below each fan.
- Double check that everything connected to the motherboard in the previous steps have been removed.
- Carefully lift the motherboard out.
- The easiest method seemed to be by using the grip as seen in the first image.
- Thread the Wi-Fi card through the slot in the motherboard between the circuit board and the GPU fans.
- Don't forget to thread the WiFi card back through this hole while reassembling!
- Flip the motherboard over.
- Be EXTRA careful to not strip the screws in this step! If you are doing this for the first time they may be very tight, so figure out a way to remove them without stripping them. Extra pressure may help for more grip, but proceed with caution as to not damage the board with too much force. These screws are the same the battery uses.
- Each of the screws may have a number next to it on the black metal, unscrew them in that order for both disassembly and reassembly (i.e. don't reverse the order on reassembly). If you are uncertain of the order, it should be as follows:
- First screw: red
- Second screw: orange
- Third screw: yellow
- Fourth and fifth screws: green in either order
- Unplug the wires connected to each fan: 2 for the GPU fan and 1 for the CPU fan. One of the GPU fan wires is under a black piece of tape.
- Carefully separate the two components.
- The old thermal paste may add a viscous resistance to the removal of the cooling system, but still make sure you have removed all of the screws in the previous steps.
- Clean off the old thermal paste using a cloth, of some sort, dipped in isopropyl alcohol.
- Make sure all of the old thermal paste is removed before proceeding to the next step.
- On reassembly, you should only need a small dab of thermal paste in the center of each marked region as it should spread out when you place the component back on.
- Be extra careful as to not get any thermal paste on any circuits.
- For a CPU fan replacement, which is the most common replacement, remove the three black 3.0 mm Phillips #000 screws from the singular fan.
- For a GPU fan replacement, remove the 5 black 3.0 mm Phillips #000 screws from the twin fan setup.
- Then peel off the very strong tape that seals the fan vents.
- After removing the fan and inserting the new one, follow all of the steps in the guide again in reverse order.
- While following the steps in reverse order, make sure not to forget details such as the replacing the thermal paste and reconnecting all of the wires and ribbons.