Dell Inspiron 15-5567 Motherboard Replacement
ID: 130589
Description: The motherboard connects all the parts on one...
Steps:
- Orient the laptop with the back cover facing upward and the INSPIRON engraving reads legible (not flipped).
- Remove 13 M2.5x8mm screws using a Philips #0 screwdriver.
- Remove two M2x4mm screws using the same screwdriver.
- Insert the blue plastic opening tool into the crease of the CD driver, and pop it open.
- Slide the rest of it out with your hand.
- Remove three M2x2mm screws underneath the CD driver with the same Philips #0 screwdriver.
- Place the blue plastic opening tool in the crease of the cover and push it upward to open the back cover.
- Grab the corners of the cover firmly and lift it up.
- Some parts are weaker than others; open it gently from corners.
- WARNING: Before working inside your computer, read the safety information that shipped with your computer and follow the steps in Before Working Inside Your Computer. After working inside your computer, follow the instructions in After Working Inside Your Computer.
- Remove the screws that secure the battery bracket to the system board and palm rest and keyboard assembly.
- Lift and remove the battery bracket.
- Remove the screw that secures the battery to the palm rest and keyboard assembly.
- Note the location of the screw that secures the battery to the palm rest and keyboard assembly.
- Lift the battery off the palm rest and keyboard assembly.
- Remove four M2.5x5mm screws from the fan using a Philips #0 screwdriver.
- The four screws over the processor will not come off all the way, they'll just loosen up.
- Remove the other four M2x3mm screws using a Philips #0 screwdriver.
- Gently disconnect the fan cable from the motherboard using the blue plastic opening tool.
- Lift the fan and its components up and remove it.
- Remove one M2x3mm screw from the bracket holding the card using a Phillips #0 screwdriver.
- Lift and remove the bracket with your hand.
- Disconnect the antennae cables connected to the card using the opening tool.
- Slide the wireless card off of its socket and lift it with your hand and remove it.
- Remove two M2.5x5mm screws holding the hinge using a Phillips #0 screwdriver.
- Lift the hinge up with your hand to free it from the motherboard.
- Remove one M2.5x5 screw holding the motherboard, using a Phillips #0.
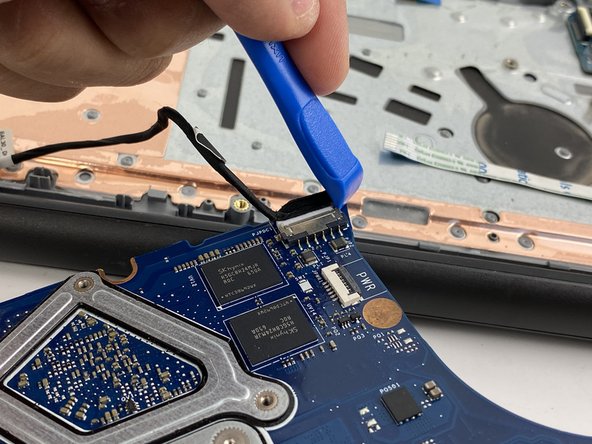
- Disconnect two cables connected to the motherboard using the blue plastic opening tool.
- Open eight latches for the cables using the blue opening tool by placing under the latch (like in the third picture) and lifting it upward.
- Slide the cables out by pulling on the blue tabs connected to the cables.
- Don't pull on the cable itself, your hand could damage the cable, use the blue tap.
- Some of the latches might be harder to open than the others
- Lift the motherboard up carefully.
- Don't lift the motherboard aggressively because it still has some cables that need to be disconnected on the bottom.
- Gently flip the motherboard over.
- Disconnect the two cables by placing the blue opening tool on one edge of the cable (like in the third picture) and pushing it outward.
- Lift and remove the motherboard.