Oontz Angle 3 ULTRA Battery Replacement
ID: 132270
Description: If your device is not charging properly or not...
Steps:
- Remove the two black rubber sheaths around the edges of the speaker.
- Under the symbol-marked sheath there is a white rubber covering for the buttons. Peel this away to reveal the panel underneath.
- On two corners of its triangular face there is a small divot, which allows you to use your fingernails or a pair of tweezers to grip and peel away the covering.
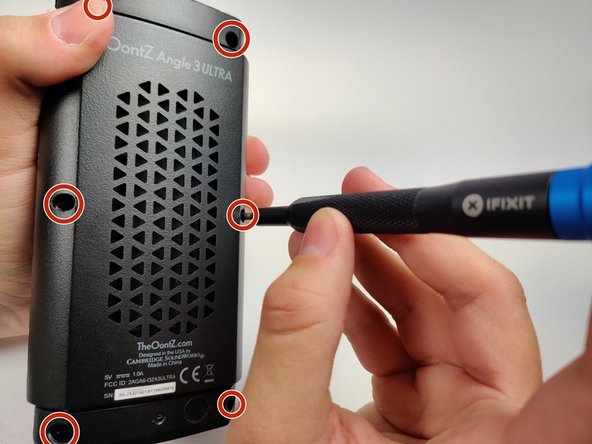
- Use a JIS #0 screwdriver to remove the six screws to expose the motherboard.
- Using a pair of tweezers, pinch and pull the rubber fillings obstructing the screws.
- Using a JIS #0 screwdriver, remove the 6 screws holding the backplate in.
- Remove the back panel off of the device.
- Make sure that the device is OFF before operating here, as an electrical spark may occur if the device is operating.
- Once the motherboard is exposed after disassembly, follow the thick black and red cords from the battery pack to their attachments to the board.
- Use the soldering iron to melt the positive and negative connections.
- For more information on soldering and desoldering connections, please read the How to Solder and Desolder Connections Guide.
- After you have disconnected the battery from the motherboard, use a box cutter or exacto knife to carefully cut the blue wrapping around the battery.
- Aligning the edge of the knife tangent to the battery works best for avoiding a cut to the electrolyte itself.
- Please take extreme caution with this step. You may remove the blue tape with another method but if you do use an exacto knife, please do not cut into the battery.
- Once cut, it should require no more than your fingers to peel away the blue wrapping around the battery, and expose the terminal.
- Finally, use the soldering Iron on the two terminals of the battery connection to disconnect it from the wire.
- To reconnect the battery, solder the two terminal connections, or use the replacement battery's wires to reattach to the motherboard