Karcher Pressure Washers 11073080 2017 Pump Rebuild
ID: 133000
Description: Use this guide to rebuild a worn pump on a...
Steps:
- Before you begin, be sure that the engine is powered off and is cool to the touch.
- Grab the plastic housing at the end of the spark plug wire.
- Pull firmly to disconnect the wire from the spark plug.
- Use a 24 mm socket to remove one of the manifold cap bolts on the pump manifold.
- These bolts are easy to strip—be careful during removal.
- Some of these bolts may be seized and could require a breaker bar to assist in removal.
- During reassembly, tighten the manifold cap bolts to 90 Nm (65 ft-lbs).
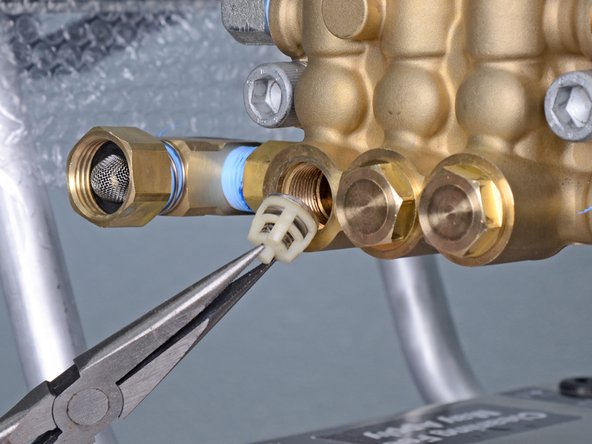
- Use a pair of needle-nose pliers to pull the check valves straight out of the pump manifold.
- During reassembly, this can be replaced if your rebuild kit includes a new one.
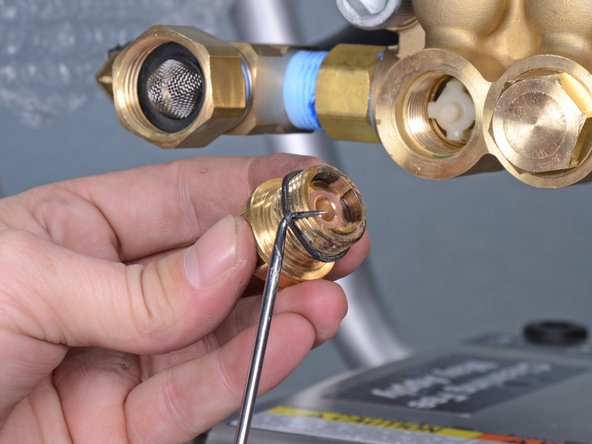
- Use an angled pick or tweezers to pull out and remove the O-ring inside the pump manifold.
- During reassembly, this can be replaced if your rebuild kit includes a new one.
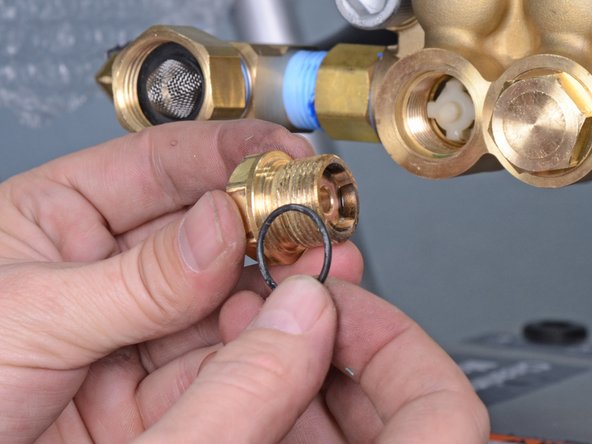
- Use a pick or tweezers to slide the O-ring off of the manifold cap bolt.
- During reassembly, this can be replaced if your rebuild kit includes a new one.
- Repeat the last four steps for each of the manifold cap bolts to replace the rest of the check valves and O-rings.
- Reassemble the manifold cap bolts before continuing to the next step.
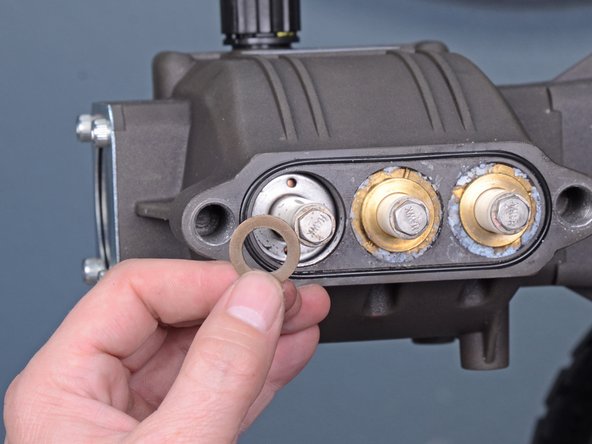
- Use a 12 mm hex key to remove the two manifold stud bolts.
- During reassembly, tighten the manifold stud bolts to 90 Nm (65 ft-lbs).
- During reassembly, these can be replaced if your rebuild kit includes new ones.
- During reassembly, replace the lock washers on the stud bolts with new lock washers.
- Remove the pump manifold.
- Use a pick or tweezers to pry out and remove the high pressure seal.
- During reassembly, this can be replaced if your rebuild kit includes a new one.
- Use a pick to pry out and remove the inner high pressure seal.
- During reassembly, this can be replaced if your rebuild kit includes a new one.
- The inner high pressure seals come in two pieces. You may need to separate the pieces if your rebuild kit doesn't come with both.
- Repeat the last three steps for the other two cylinders to replace the remaining seals.
- Use a pick or tweezers to lift the manifold O-ring out of its groove in the crankcase.
- During reassembly, this can be replaced if your rebuild kit includes a new one.
- During reassembly, reapply grease to the manifold O-ring groove.
- Use a pick or flathead screwdriver to gently pry the pressure ring out of the crankcase.
- If you use a pick, there are two small holes on either side of the pressure ring that a pick can fit into to aid with prying.
- Be very careful not to mar the crankcase. It may be necessary to put a cloth or other padding between your tool and the crankcase while prying.
- Use a pick or tweezers to slide the O-ring off of the pressure ring.
- During reassembly, the O-ring can be replaced if your rebuild kit includes a new one.
- Use a pick to pry out and remove the low pressure seal from inside the pressure ring.
- During reassembly, this can be replaced if your rebuild kit includes a new one.
- The low pressure seals come in two pieces. You may need to separate the pieces if your rebuild kit doesn't come with both.
- Use a pick or tweezers to pry out and remove the smaller washer sitting around the piston.
- Use an angled pick or tweezers to pull out the larger washer sitting around the piston.
- There are two small holes in this washer that can aid in removal.
- Use a 10 mm socket to remove the plunger bolt.
- During reassembly, the plunger and bolt can be replaced if your rebuild kit includes new ones.
- During reassembly, tighten the manifold stud bolts to 13 Nm (9 ft-lbs).
- Your rebuild kit may not include the plunger bolt. If not, pull the bolt and the washer out of the plunger and transfer them to the new plunger.
- Use an angled pick or tweezers to remove the inner-most washer.
- During reassembly, this can be replaced if your rebuild kit includes a new one.
- During reassembly, apply grease to the plungers.
- Repeat the previous nine steps for the other two cylinders to replace the remaining seals, washers, and plungers.