Toro Cement Mixer 68009HD 2018 Driveshaft Bearings Replacement
ID: 139208
Description: This guide shows how to remove and replace the...
Steps:
- Before you begin, press the engine-stop switch to turn off the engine.
- Unlatch the three rubber straps securing the cowl.
- Swing the cowl up until it rests securely on the frame.
- Slide the fuel cutoff lever to the left to cut the fuel supply to the engine.
- Grab the plastic housing at the end of the spark plug wire.
- Pull firmly to disconnect the wire from the spark plug.
- Pull up on the brake lever to disengage the brake.
- Rotate the tub until the yoke and dish assembly sit directly below the tub.
- Push down on the brake lever to re-engage the brake.
- Make sure that the brake is fully engaged.
- Use a 3/4 inch socket to remove the six nuts securing the tub to the dish.
- Remove the six drum clamp plates from the tub mounting points.
- Lift the tub up slightly by the gear ring to loosen the tub from the dish.
- The tub is extremely heavy and requires at least two people to lift it. Be sure to practice safe lifting techniques.
- Lift the tub straight up from the dish and remove it from the device.
- Remove the four fasteners securing the engine plate:
- Two 14 mm bolts
- Two 3/4 inch nuts
- Slide the engine plate up and out of the device to remove it.
- Use a 3/4 inch wrench to loosen the four bolts securing the engine to the frame.
- You don't need to fully remove these bolts—loosen them enough to create slack in order to remove and replace the belts.
- If you are replacing the belts, you can choose to cut the old ones to remove them.
- Slide the belts off from the pulleys and remove them.
- If you have trouble sliding the belts off, further loosen the four engine bolts to create more slack.
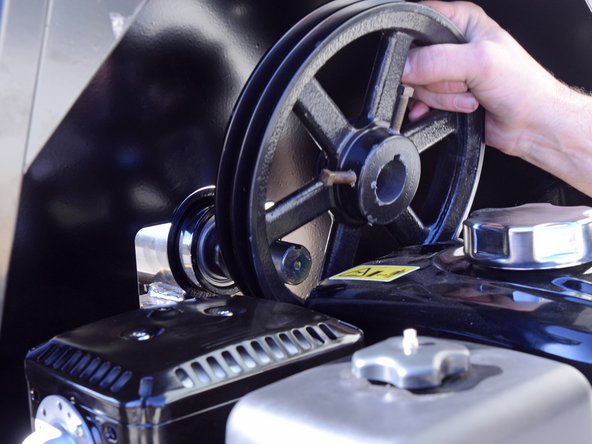
- Use a crescent wrench to loosen the two set screws on the pulley.
- Reassembly tip: The pulley is keyed to install in only one position.
- Slide the pulley off the axle and remove it.
- Remove the key from the axle.
- Use a 4 mm hex key to loosen the set screw securing the lock collar.
- There should only be one set screw. If the collar isn't loose, check the second hole for set screws.
- Use a screwdriver to pry and loosen the lock collar from the shaft.
- Slide the lock collar off the shaft and remove it.
- Pull the driveshaft from the gear end and remove it.
- Pull and remove the pulley-side bearing from its recess.
- During reinstallation, lubricate the bearing with some machine oil and tap it into place with a mallet.
- Pull and remove the gear-side bearing from its recess.
- To install the gear-side bearing:
- Lubricate the bearing with some machine oil and set it in place.
- Slide the driveshaft into the bearing and tap the gear with a mallet to press the bearing into place.