Samsung Galaxy A40 Battery Replacement
ID: 139364
Description: Use this guide to replace a worn-out or dead...
Steps:
- Insert a SIM card eject tool, a SIM eject bit or a straightened paper clip into the hole on the SIM tray located on the left side of the phone.
- Press your SIM card eject tool firmly into the hole in order to eject the SIM card tray.
- Remove the SIM card tray.
- When reinserting the cards, make sure to properly orient them in the tray.
- Apply a heated iOpener to the back cover to loosen the adhesive underneath. Apply the iOpener for at least two minutes.
- Secure a suction handle to the right edge of the back cover, as close to the edge as possible.
- If the phone's back cover is damaged, the suction handle may not stick. Try lifting it with strong tape, or superglue the suction handle in place and allow it to cure so you can proceed.
- Lift the back cover with the suction handle to create a small gap between the back cover and the frame.
- Insert an opening pick into the gap.
- In case you have trouble creating a gap, apply more heat to further soften the adhesive. Follow the iOpener instructions to avoid overheating.
- Slide the opening pick to the bottom right corner and leave it in place to prevent the adhesive from resealing.
- Insert a second opening pick at the bottom right corner.
- Slide the opening pick along the right edge of your phone to cut the adhesive beneath the back cover.
- Leave the opening pick in the top right corner.
- At this point of the back cover removal feel free to remove the suction cup or continue to use it for a better grip.
- Insert a third opening pick at the top right corner of your phone.
- Slide the opening pick along the top edge of your phone to cut the adhesive.
- Leave the opening pick in the top left corner to prevent the adhesive from resealing.
- If the adhesive becomes hard to cut, it has most likely cooled down. Use your iOpener to reheat it.
- Insert a fourth opening pick at the top left corner of your phone.
- Slide the opening pick along the left edge of your phone to cut the adhesive.
- Leave the opening pick in the bottom left corner.
- Insert a fifth opening pick to cut the remaining adhesive at the bottom edge of your phone.
- In order to cut all the adhesive at the bottom edge of the device, you need to insert the opening pick about 0.4 inch (1cm).
- To avoid tearing the fingerprint cable during the following step, make sure to gently press down the fingerprint reader while lifting the back cover.
- Fold the back cover upwards and remove it.
- Remove the thirteen 3.4 mm-long Phillips #00 screws.
- Insert an opening pick between the left edge of the phone assembly and the midframe.
- Slide the opening pick along the left edge of the phone to release the plastic clips holding the midframe in place.
- Slide the opening pick around the bottom right corner and release the plastic clips at the bottom edge of the phone assembly.
- Slide the opening pick along the right edge of the phone assembly to release the remaining plastic clips holding the midframe in place.
- Remove the midframe.
- Use the flat end of a spudger to pry up and disconnect the battery cable.
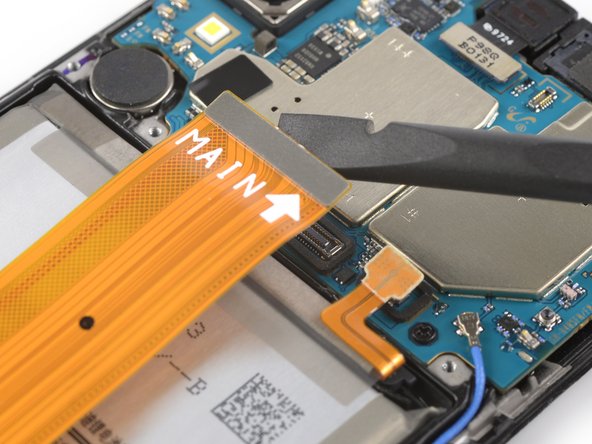
- Use a spudger to pry up and disconnect the upper end of the main flex cable.
- Use a spudger to pry up and disconnect the bottom end of the main flex cable.
- Remove the main flex cable.
- There's a small gap in the midframe beneath the battery, next to the display connector. Avoid applying adhesive remover in the bottom right corner of the battery to prevent the adhesive remover from loosening the display adhesive.
- If you're using adhesive remover, follow these preparation steps first.
- Lift the right edge of the phone assembly and tilt the phone at a 45° angle.
- Apply a few drops of adhesive remover or high-concentration (90% or higher) isopropyl alcohol into the gap at the bottom edge of the battery. Let the adhesive remover run down to the left edge of the battery but avoid the right edge.
- Tilt your phone in the direction of the rear facing camera to spread the adhesive remover beneath the battery.
- Let the adhesive remover penetrate the battery adhesive for at least 1 minute.
- Try your best not to deform the battery during the following removal process. Soft-shell lithium-ion batteries can leak dangerous chemicals, catch fire, or even explode if damaged. Do not use excessive force or pry at the battery with metal tools.
- Insert a spudger in the gap at the bottom left edge of the battery.
- Slide the spudger underneath the battery.
- Use the spudger to pry up the battery.
- The battery should come off easily. In case the battery is still sticky, repeat the previous adhesive remover procedure.
- Remove the battery.
- Do not reinstall a damaged or deformed battery, as doing so is a potential safety hazard.
- Before you adhere the battery during reassembly, temporarily reconnect the battery connector to help align it correctly. Adhere the aligned battery to the phone, disconnect it, and continue reassembling your phone.