Yamaha Reface CP Type Selector Rotary Switch Replacement
ID: 139523
Description: Yamaha has a hidden/secret piano sound that can...
Steps:
- The Yamaha CP and rotary switch we will be replacing (red).
- This process includes removing a mind-boggling 42 screws. Make sure you have the space to keep them all in order.
- Flip the CP over and unscrew the 17 screws from the bottom. Keep track of which was where as some are longer than others.
- Flip CP over and gently lift the front of the top cover.
- Unscrew ground cable (red circle). You may need to balance the cover in the air for this one as the cable is a bit short.
- Unplug cables (pink rectangle). I marked the bottom one with tape to not mix them up later.
- Remove top from bottom half. Store bottom half till the end as we no longer need it.
- Place top half knob side up and gently pull (with your fingers) the knobs and sliders off.
- Set flip switches to the middle position and unscrew the nuts with pliers.
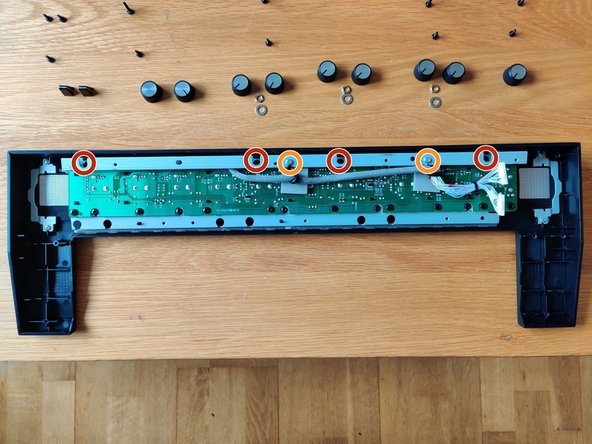
- Flip top cover over and remove the metal bar holding the PCB down by removing 4 screws (red) and 2 hooks (orange).
- Remove another 18 screws (red) to finally free the PCB from the case!
- Remove PCB from top cover and tie the cables back to make room for soldering (pink).
- Desolder the rotary switch (yellow) with the help of the desoldering pump. Or just chop off the switch with the flush pliers (like I did after struggiling with desoldering).
- Be careful not to damage the tiny SMD capacitor C110 (like I did) or diodes D104/D105 as they are very close to the switch.
- Rotary switch removed and scratches from the pliers on the top side of the PCB (green).
- Place the new rotary switch with the Alps text/logo (green) upside-down compared to the text on the PCB (orange).
- Solder the switch with ROHS compilant solder. Please forgive the shoddy work on the stabilizing legs and crushed C110 (it still works).
- Time to start putting it back together!