How to Fix Left Joystick Drift on a DualShock PS4 Controller Without Soldering
ID: 140074
Description: If your PS4 DualShock Controller is having the...
Steps:
- Remove the four 6.0 mm screws on the back shell of the PS4 controller using the Phillips #00 screwdriver.
- Detach the back shell from the rest of the body by pulling the front shell and back shell apart simultaneously.
- Be very gentle when completely detaching the back shell because the blue ribbon could be damaged.
- Lightly pull the blue ribbon to separate the back shell and the front shell.
- The front shell housing the circuit board will be dismantled further.
- Remove the battery connector from the motherboard by pressing the two sides and pulling on the connector in an upwards direction.
- Be careful not to rip the black or red cables from the connector while removing the cables.
- Use the Phillips #00 screwdriver to remove the single 6.0 mm screw attached to the circuit board.
- Once the screw is removed the battery holder is loosened, which allows for the holder to be removed by pulling it upwards.
- Remove the battery cable.
- Detach the cable from the circuit board by pulling upwards.
- Pull the circuit board away from the front shell so it is completely detached from all other parts.
- Remove the left joystick by pulling it upwards until it pops off.
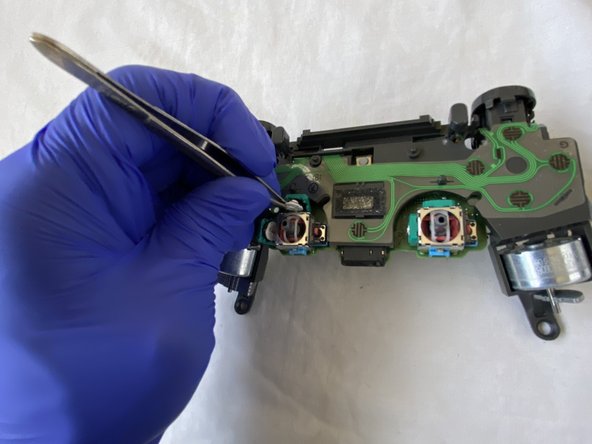
- On each of the green chambers, there is a gap that separates the sliver body and the green chambers.
- Use the flathead screwdriver to pry open the green chambers by sticking the tip of the flathead screwdriver in between the gap and pushing inwards.
- Pry open very gently so the green chambers do not snap/break away from the circuit board.
- Once the chambers are open, use tweezers to grab and remove the white disk from each of the chambers.
- Take a Q-tip and dip it in some 90% isopropyl alcohol.
- Use the soaked Q-tip to clean the chambers thoroughly.
- Let the green chambers dry for about 5-10 minutes before resuming the reassembly.
- Place the two white disks back into the green chamber using the tweezers.
- Close both chambers by pressing hard towards the sliver box until they click in.
- Take the left joystick and put it back on until the click is heard which confirms that the joystick is firmly held on.
- Loop the cable connecter into the circuit board hole from the front shell to attach both parts.
- I personally used tweezers to get the cable connecter from the front shell to the circuit board.
- Place the connecter into its socket and press downwards to connect it back.
- Take the battery holder and place the pegs into the hole for the proper alignment.
- Replace the 6.0 mm screw onto the battery holder back using the Phillips #00 screwdriver so the battery holder can be held firmly in place with the circuit board.
- Place the battery into the holder.
- Connect the red and black wire of the battery into the socket by pressing downwards.
- Place the ribbon attached to the back shell on the circuit board and press down so both compartments get attached.
- Snap the front shell and back shell together.
- Screw the four 6.0 mm Phillips screws on the back shell screw holders using the Phillips #00 screwdriver.
- Your controller should be all ready!