Sony DualSense Controller Battery Replacement
ID: 142053
Description: Follow this guide to replace the battery on a...
Steps:
- Disconnect and power down your controller before you begin.
- Insert an opening pick underneath the middle trim at the bottom-right corner of the controller to release the clips securing it to the case.
- Slide the opening pick along the lower-right edge of the middle trim to release the clips securing it to the case.
- Insert an opening pick underneath the middle trim at the bottom-left corner of the controller to release the clips securing it to the case.
- Slide the opening pick along the lower-left edge of the middle trim to release the clips securing it to the case.
- Use your fingers to lift up the bottom edge of the middle trim to release the remaining clips.
- Lift the middle trim over the joysticks to remove it.
- With one hand, grip the controller and use your thumb to hold down the left trigger.
- With your free hand, insert the flat end of a spudger between the L1 and L2 buttons.
- Use the spudger to gently pry the L1 button away from the controller and remove it, holding your finger over the button so it doesn't eject.
- Repeat the previous step to remove the R1 button.
- Use a Phillips screwdriver to remove the two 6.4 mm screws securing the bottom corners of the lower case.
- Use a Phillips screwdriver to remove the two 6.4 mm screws behind the L1 and R1 buttons.
- Be gentle when releasing the rear cover clips—they're delicate and can easily break.
- Use the point of a spudger to release the two clips on either side of the headset jack.
- Tight plastic clips secure the left and right edges of the rear case.
- Insert the flat end of a spudger between the front and rear shells near the bottom of the left edge.
- Slide the spudger along the left edge and gently pry the shells apart to release the clips.
- Repeat the previous step on the right edge to release its clips.
- Lay your controller upside down so the joysticks are on your work surface.
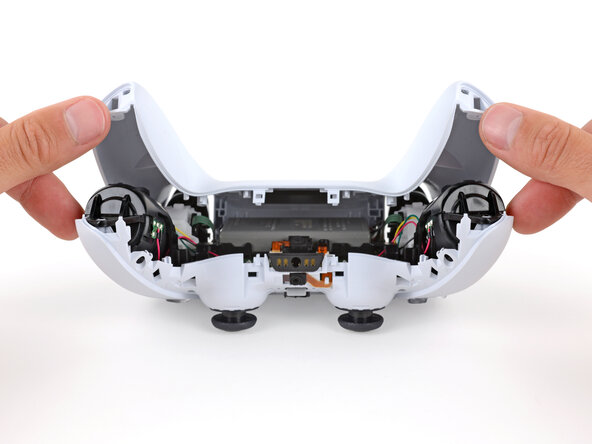
- Hold the controller down with your fingers and use your thumbs to lift the rear case away from the controller to fully separate it.
- Remove the rear case.
- Use a pair of tweezers or your fingers to disconnect the battery from the motherboard.
- Grip the connector, not the wires, when disconnecting.
- Lift the battery straight out of the battery bracket.