Samsung Galaxy Note20 Screen Replacement
ID: 142090
Description: Use this guide to replace the screen on your...
Steps:
- Completely power off your phone before you begin disassembly.
- Heat an iOpener and apply it to the left side of the rear cover for one minute.
- A hair dryer, heat gun, or hot plate may also be used, but be careful not to overheat the phone—the screen, internal battery, and the plastic rear cover are susceptible to heat damage.
- Apply a suction cup to the heated edge of the rear cover, as close to the edge as possible.
- Pull up on the suction cup with strong, steady force to create a gap between the rear cover and the frame.
- Depending on the age of your phone, this may be difficult. If you are having trouble, apply more heat to the edge and try again.
- Insert an opening pick into the gap.
- Don't insert the opening pick more than 5 mm into the phone or you risk damaging the internal components.
- As you cut through the adhesive around the perimeter of the phone, don't insert the pick more than 5 mm to avoid damaging internal components.
- Slide the opening pick along the left edge towards the bottom left corner to cut through the adhesive.
- Leave the pick inserted in the bottom left corner to prevent the adhesive from re-sealing.
- Repeat the process of heating and cutting the adhesive along the three remaining sides of the rear cover.
- You can insert each new opening pick in the gaps created by the opening picks left in each corner.
- As you proceed, leave an opening pick in each corner to prevent the adhesive from re-sealing.
- If the rear cover is still attached to the frame after cutting through all four sides, try slicing through the adhesive again with an opening pick.
- Lift the rear cover straight up to remove it.
- Use a Phillips screwdriver to remove the six 4.0 mm screws securing the motherboard shield.
- If these screws have not been removed before, they may be difficult to remove as they have threadlocker on their threads.
- Throughout this repair, keep track of each screw and make sure it goes back exactly where it came from.
- Use a pair of tweezers to lift up and flip back the motherboard shield.
- Be careful when handling the motherboard shield because its edges are thin and sharp.
- While using a pair of tweezers to hold the motherboard shield out of the way, use the pointed end of a spudger to pry up the battery press connector.
- Take care to pry only under the edge of the connector to prevent damaging the socket itself and surrounding components.
- To re-attach press connectors like this one, carefully align and press down on one side until it clicks into place, then repeat on the other side. Do not press down on the middle. If the connector is misaligned, the pins can bend, causing permanent damage.
- While using a pair of tweezers to hold the motherboard shield out of the way, use the pointed end of a spudger to pry up the wireless charging coil press connector.
- Grip the motherboard shield with your fingers.
- Peel the wireless charging coil up and away from the device.
- The wireless charging coil is secured to the device with light adhesive.
- Remove the wireless charging coil.
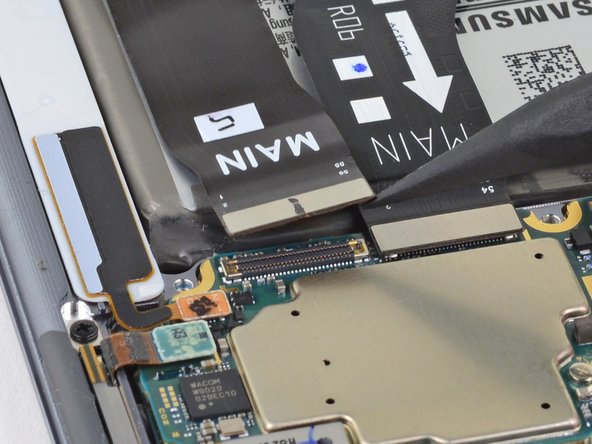
- Use the pointed end of a spudger to disconnect the display cable from the motherboard.
- Use the pointed end of a spudger to disconnect the touch layer cable connector from the motherboard.
- This image shows the phone with the screen removed.
- To remove the screen, you will need to weaken and cut through the adhesive securing the screen's perimeter to the frame.
- There is additional adhesive around the front-facing camera and the fingerprint sensor.
- Inserting opening picks beyond the adhesive may damage internal components.
- Heat an iOpener and apply it to the top of the screen for two minutes.
- A properly heated iOpener should stay warm for up to 10 minutes. Do not reheat the iOpener more than necessary.
- A hair dryer, heat gun, or hot plate may also be used, but be careful not to overheat the phone—the screen and internal battery are both susceptible to heat damage.
- Apply a suction cup to the heated top edge of the screen, as close to the edge as possible.
- If your screen is badly cracked, covering it with a layer of clear packing tape may allow the suction cup to adhere. Alternatively, very strong tape may be used instead of the suction cup. If all else fails, you can superglue the suction cup to the broken screen.
- Pull up on the suction cup with a steady force to create a gap between the screen and the frame.
- Depending on the age of your phone, this may be difficult. If you are having trouble creating a gap for the opening pick, apply more heat to the edge and try again. You may need to repeat this step multiple times.
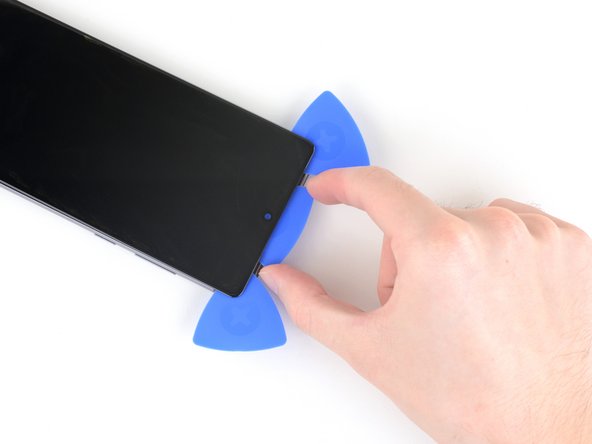
- Insert the tip of an opening pick into the gap at a steep angle. Push down the opening pick so that it is level with the screen.
- Make sure the opening pick slides over the front-facing camera and is not pushing against it.
- Leave the opening pick in the gap to prevent the adhesive from re-sealing.
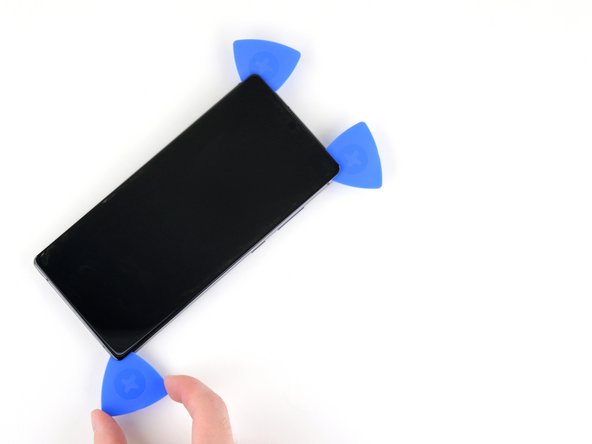
- Insert a second opening pick into the gap.
- Slide it to the top left corner of the screen to cut the adhesive.
- Leave the opening pick in the top left corner to prevent the adhesive from re-sealing.
- Insert a third opening pick into the initial gap.
- Slide it to the top right corner to cut the adhesive.
- Leave the opening pick in the top right corner to prevent the adhesive from re-sealing.
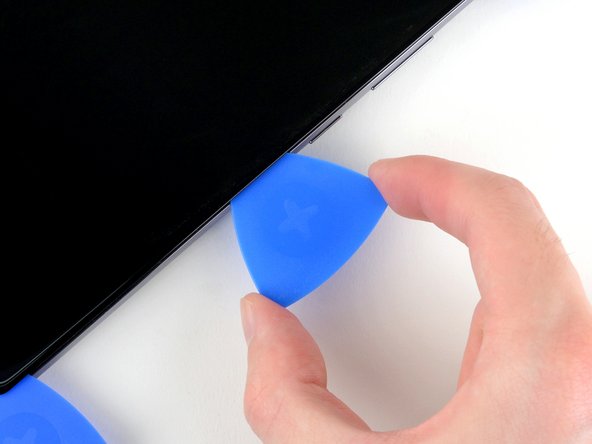
- Push the center opening pick farther into the phone to cut through the adhesive surrounding the earpiece speaker and front-facing camera.
- Don't insert the opening pick so far under the screen that you can't retrieve it.
- Remove the center opening pick.
- Apply a heated iOpener to the right edge of the screen for two minutes.
- Insert another opening pick into the gap in the top right corner of the screen.
- Slide the opening pick down to the bottom right corner to cut through the adhesive.
- Leave the opening pick in the bottom right corner to prevent the adhesive from re-sealing.
- Insert the tip of an opening pick under the center of the right edge of the screen at a steep angle.
- Push down the opening pick so that it is level with the screen.
- Leave the opening pick in the center of the right edge of the screen to prevent the adhesive from re-sealing.
- Apply a heated iOpener to the left edge of the screen for two minutes.
- Insert another opening pick into the gap in the top left corner of the screen.
- Slide the opening pick down to the bottom left corner to cut through the adhesive.
- Leave the opening pick in the bottom left corner to prevent the adhesive from re-sealing.
- Insert the tip of an opening pick under the center of the left edge of the screen at a steep angle.
- Push down the opening pick so that it is level with the screen.
- Leave the opening pick in the center of the left edge of the screen to prevent the adhesive from re-sealing.
- At this point, the perimeter of the screen should be separated from the frame. If there is still resistance around the edges of the screen, use an opening pick to cut the adhesive again.
- Apply a few drops of high-concentration (90% or higher) isopropyl alcohol under the right edge of the screen to weaken the inner adhesive near the fingerprint sensor.
- Insert the isopropyl alcohol applicator near the top of the inner adhesive area to avoid damaging the fingerprint sensor.
- You may apply the isopropyl alcohol without inserting the applicator into the phone if needed.
- Tilt the phone so that the isopropyl alcohol flows toward the inner adhesive.
- Wait two minutes for the alcohol to weaken the adhesive.
- Don't try to completely remove the screen yet. There are still two cables routed through the frame.
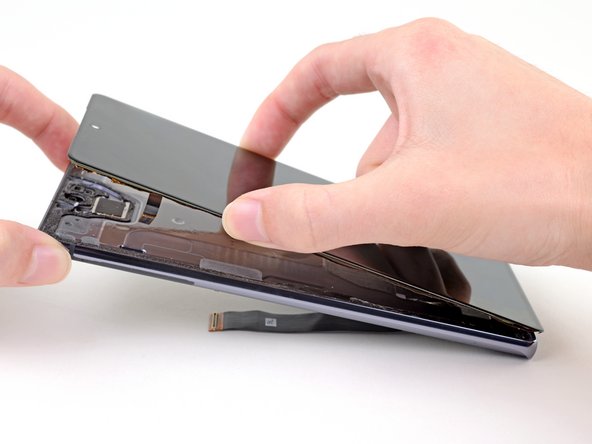
- Hold the top half of the frame up so that the touch layer cable can be threaded through its cutout.
- Lift the screen up from its top half while threading the touch layer cable through its cutout in the frame.
- Don't lift the screen higher than a 15 degree angle above the frame to avoid damaging the device.
- If the screen does not easily lift off the frame, you may need to cut through more of the perimeter adhesive or apply more isopropyl alcohol to the inner adhesive.
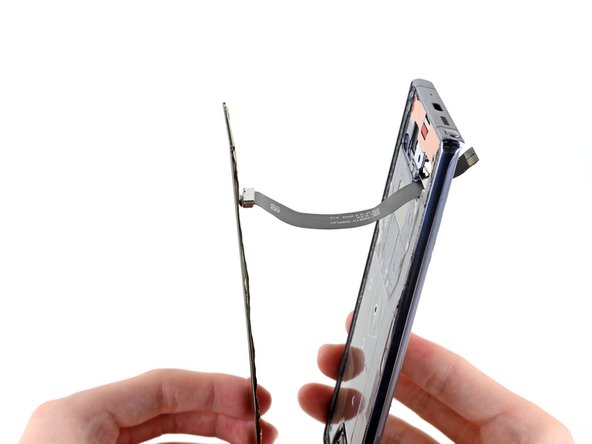
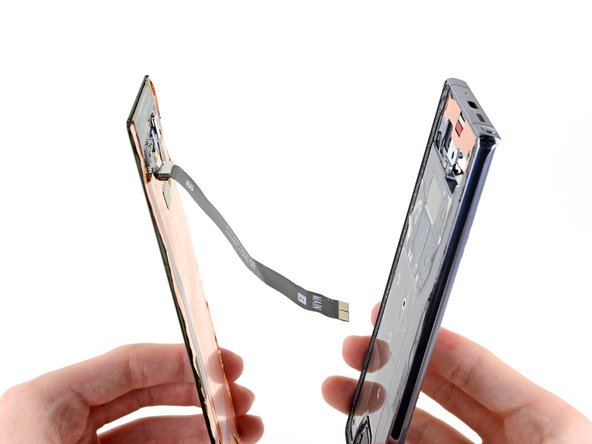
- Thread the display cable and touch layer cable through their cutouts in the frame as you remove the screen.
- During reassembly, remember to thread the display cable and touch layer cable back through their cutouts in the frame.
- The display cable has two clips near the screen that secure it to the metal bracket on the frame. When threading the display cable into its cutout, make sure to align the clips so they hang over the edge of the bracket.
- Remove the screen.
- Remove any leftover adhesive before installing a new screen.
- If there's any alcohol solution remaining in the phone, carefully wipe it off or allow it to air dry before installing your new screen.
- Be sure to test your repairs before installing new adhesives.
- If you are using a custom-cut adhesive, follow this guide for instructions on how to apply adhesive to the replacement screen.
- If you are using a pre-cut adhesive card, follow this guide.