Samsung Galaxy A20e Battery Replacement
ID: 142658
Description: Use this guide to replace a worn-out or dead...
Steps:
- Before starting repairs, take your Galaxy A20e off the charger and power it down.
- Insert a SIM card eject tool, a SIM eject bit or a straightened paper clip into the hole on the SIM tray located on the left side of the phone.
- Press your SIM card eject tool firmly into the hole in order to eject the SIM card tray.
- Remove the SIM card tray.
- When reinserting the cards, make sure to properly orient them in the tray.
- The back cover is held in place by plastic clips.
- Insert an opening pick between the screen and the back cover on the left edge next to the hole for the SIM-eject tool.
- Slide the opening pick around the bottom left corner to unclip the plastic clips.
- Slide the opening pick along the bottom edge to unclip the plastic clips.
- Slide the opening pick along the right edge to the top right corner to unclip the plastic clips.
- Separate the phone assembly from the back cover.
- Use an opening pick to pry up and disconnect the fingerprint sensor.
- Push against the left edge of the fingerprint sensor with an opening pick to slide the sensor to the right and separate it from the motherboard cover.
- Remove the fingerprint sensor.
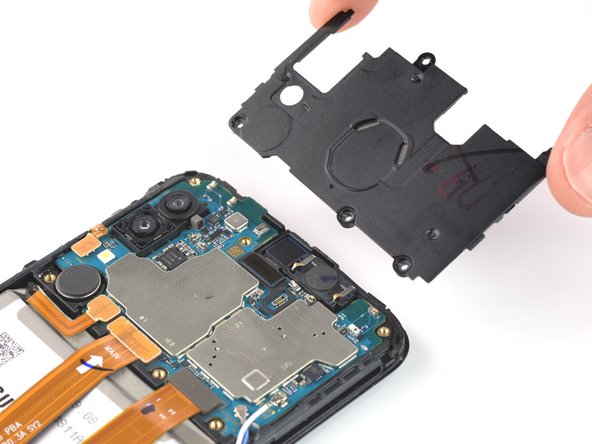
- Use a Phillips screwdriver to remove the six 3.5 mm-long screws securing the motherboard covers.
- Slide an opening pick under the upper motherboard cover.
- Use the opening pick to unclip the plastic clips, which are holding the upper motherboard cover in its place.
- Remove the upper motherboard cover.
- Remove the lower motherboard cover.
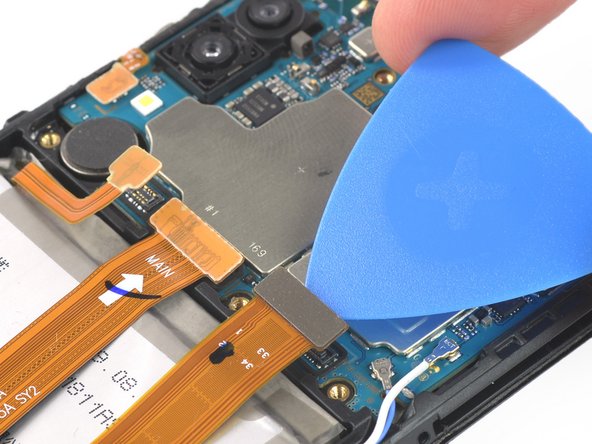
- Use an opening pick to disconnect the battery by prying the connector straight up from its socket.
- Use the opening pick to disconnect the interconnect and display flex cables by prying the connectors straight up from their sockets.
- Bend the two flex cables toward the bottom of the phone and out of the way of the battery.
- Take care not to crease the cables.
- Follow these preparation steps before using adhesive remover.
- Apply a few drops of adhesive remover or high-concentration (90% or higher) isopropyl alcohol into the gap at the left edge of the battery.
- Lift the bottom of your phone up to tilt it in the direction of the rear facing camera to let the adhesive remover spread out underneath the battery.
- Let the adhesive remover penetrate the battery adhesive for at least 1 minute.
- Try your best not to deform the battery during this process. Soft-shell lithium-ion batteries can leak dangerous chemicals, catch fire, or even explode if damaged. Do not use excessive force or pry at the battery with metal tools.
- Insert a plastic card underneath the left edge of the battery.
- Carefully slide it underneath the battery to loosen the adhesive.
- Continue sliding the plastic card underneath to pry up the battery from its recess.
- The battery should come off easily. In case the battery is still sticky, repeat the previous adhesive remover procedure.
- Remove the battery.
- During reassembly, follow this guide if you are using a pre-cut adhesive card.