Xiaomi Redmi Note 7 Screen and Metal case Replacement
ID: 144548
Description: You can find both an already assembled metal...
Steps:
- Apply a heated iOpener to the rear glass to loosen the adhesive underneath. Apply the iOpener for at least two minutes.
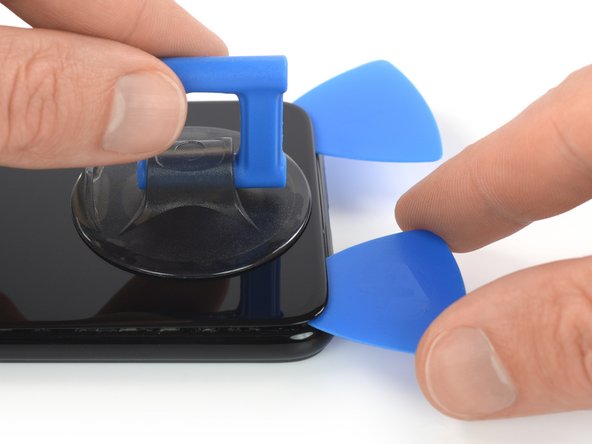
- Secure a suction handle to the bottom edge of the rear glass, as close to the edge as possible.
- If your rear glass is badly cracked, covering it with a layer of clear packing tape may allow the suction cup to adhere. Alternatively, very strong tape may be used instead of the suction cup. If all else fails, you can superglue the suction cup to the rear glass.
- Lift the rear glass with the suction handle to create a small gap between the glass and the frame.
- In case you have trouble creating a gap, apply more heat to further soften the adhesive. Follow the iOpener instructions to avoid overheating.
- Insert an opening pick into the gap.
- Slide the opening pick to the bottom right corner to slice the adhesive.
- Insert a second opening pick and slide it to the bottom left corner to slice the adhesive.
- Leave the opening picks in place to prevent the adhesive from resealing.
- If the adhesive becomes hard to cut, it has most likely cooled down. Use your iOpener to reheat it.
- Insert a third opening pick at the bottom left corner.
- Slide the opening pick along the left edge of the phone to slice the rear glass adhesive.
- Leave the opening pick in its place at the top left corner to prevent the adhesive from resealing.
- Insert a fourth opening pick under the top left corner of the rear glass.
- Slide the opening pick along the top edge of the phone to slice the rear glass adhesive.
- Leave the opening pick in the top right corner to prevent the adhesive from resealing.
- Insert a fifth opening pick at the top right corner of the phone.
- Slide the opening pick along the right edge to slice the remaining adhesive.
- Don't try to remove the rear glass all the way yet. The fingerprint sensor is still connected to the motherboard.
- Carefully fold the rear glass to the left side of the phone assembly like you'd open the front cover of a book.
- Avoid tensioning the fingerprint flex cable during this process.
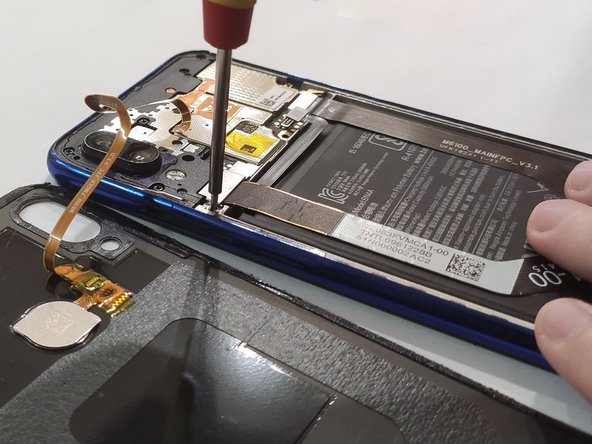
- Locate the screws of the protective metal plate placed on the connector on the left and on the two connectors on the right
- As shown use a philips screwdriver to remove the highlited screws
- Then remove the metal plates with a pair of tweezers or with your finger.
- With a prying tool gently pull up the cable connector to disconnect it from the board
- Now do the same for the battery and power cables on the right
- You have to unscrew the seven highlighted screws with a philips screwdriver
- Note that one of the screws may be hidden under a Xiaomi Label sticker
- Now with a pair of tweezers or with a prying tool you can gently lift up the plastic shell from the phone. Try not to force any junction but gently move it until you find it loose.
- After removing the plastic shell you can also unplug the ribbon cable of the touch sensor. Do it as shown in previous step.
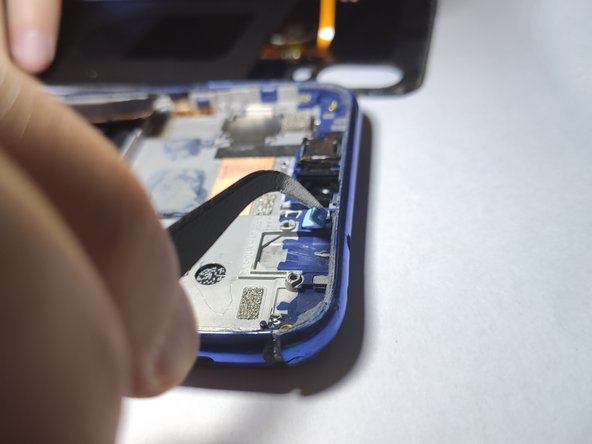
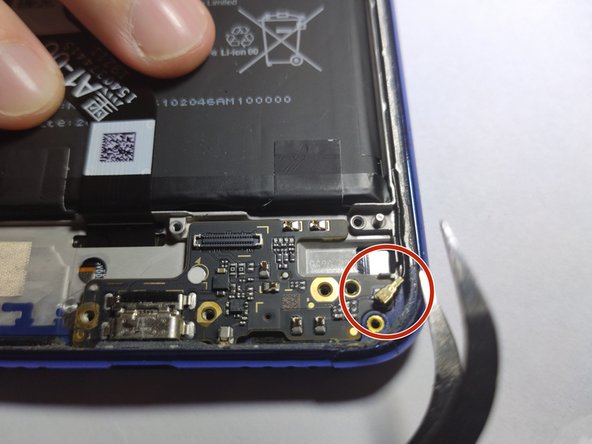
- First unplug the antenna with a pair of tweezers as shown in the first picture.
- now you can gently lift off all the electronics from the housing. Beware that it is attached with thermal paste and glue so you might want to apply some jiggling movement to favour the removal.
- Beware where you place your prying tool! It may damage or inadvertently break an electronic component!
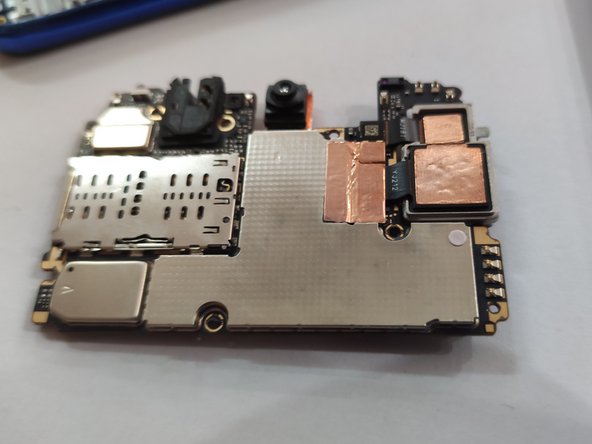
- Once the motherboard is removed you want to clean it with isopropil alchool before applying the new thermal compound to the new case
- You can use an ear stick soaked with alchool to remove the old paste or any greasy residue
- You now have to remove the proximity sensor from the case
- You can lift it with a pair of tweezers or with your bare fingers
- do the same thing with the blue plastic component highlighted in the picture
- First you have to unscrew the eight highlighted philips screws
- then with your fingernails or a prying tool you can lift the speaker module from the bottom part of the phone
- As last step remove the ribbon cable from the connector and put it aside
- The bottom module is secured by a single screw
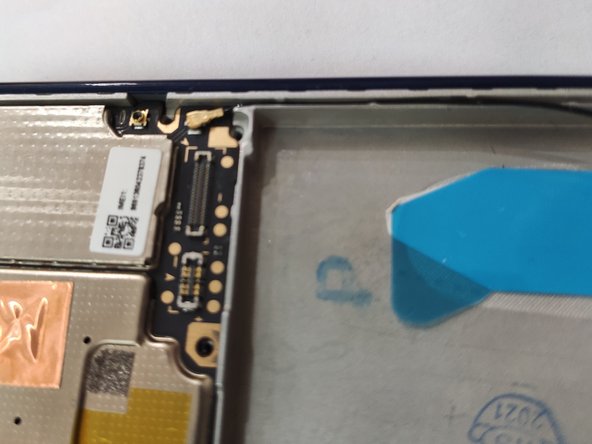
- please remove the antenna connector as shown in the second picture
- To remove this module use a prying tool under the edges of the module to gently jiggle it until you can lift it
- The module is held in place by glue, you need to move it a little until the adhesive loosens and NOT to simply try to lift it
- Remember not to place your tweezer or prying tool under any electronic component, use parts of the pcb that look flat, please prefer plastic tools to metal ones
- Now you have to put all the components back in the new case, to do that please refer to the following steps
- Replace the proximity sensor and the blue plastic piece back in the new case, first remove any protective film that may be present
- Now peel off any eventual protective film, one may be placed on a copper heater sink
- Now you have to apply a new thermal paste on the heat sink as in picture
- Please use very little amount of paste for this operation
- Then you can place back the motherboard and gently push it in place with your fingers until you find it very firm in its position
- Now attach back the fingerprint sensor cable connector to its housing
- Then insert back the plastic shell on top of the circuitry until you find that it falls in the groove
- now you can screw back in place the seven screws as highlighted
- then plug back the antenna cable
- Depending on what parts you buy, you may want to take the antenna cable from the old phone
- Before placing back the board you may want to remove a plastic film that protects new glue for the components
- Put the board back in place until it sits firmly standing in the groove, the glue should also keep that in place
- connect back the ribbon cable
- place the speaker back and secure it with the eight screws as in step seven.
- As you can see from the picture if there are cables or films that are in the way while you assemble your phone, you can use tape to help you out
- Depending on the part you buy also the highlighted plastic piece may be not present so you have to take it from the old phone. This piece is crucial, it helds in place the volume and power buttons. To place it simply insert the button (if them have fallen off) and place it in the only direction possible
- Peel of the adhesive film and place the battery as in picture
- Then connect the battery ribbon cable with the Screen and Power ribbon cables back in place
- Then you have to mount back the protective metal shells both on the left and right connectors as shown in the last picture
- At this time you can use a new battery for the phone
- If you damaged your battery during removal (not shown in this guide) please throw it away and use a new one, this could be very incautious
- Before trying to close your phone, try to turn it on, to charge it and to check if it works correctly. Like this you can solve any issue without the need of opening it back
- To close your phone you could use the original adhesive if you were careful enough during removal, though this could lead to later unsealing of the case; hence I suggest you to use a specific glue like the B-7000 glass glue
- Put either the adhesive or the glue around the perimeter of the phone (not the rear glass) in the most homogeneous way possible
- After application gently close the rear glass and apply some pressure
- You should apply even pressure on the whole screen for many hours, you should use the screen clamps to guarantee perfect adhesion
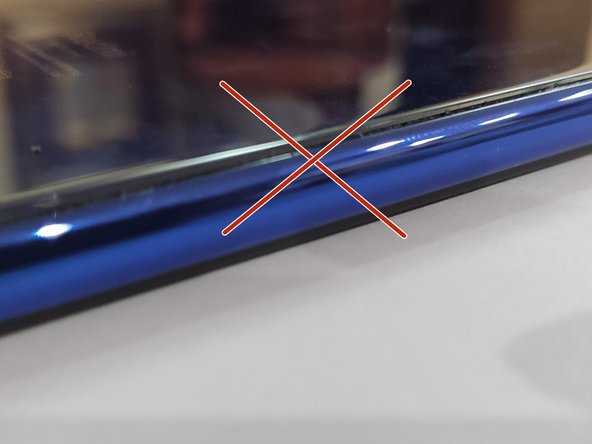
- If your phone looks like the last picture simply heat it up again and remove all the adhesive with isopropil alchool and start again. otherwile it could open at any moment
- Don't worry if some glue pops out from the borders, you'll be able to remove it once dried either with your fingernails or isopropil alchool