Guitar Hero World Tour Guitar Strummer Replacement
ID: 145473
Description: This guide will demonstrate how to clean or...
Steps:
- Remove the battery cover.
- Remove the two AA batteries.
- Move the switch from "Locked" to the "Unlocked" position.
- Remove the neck from the body of the guitar.
- This will likely take two hands.
- Ensure the face-plate lock is in the "Unlocked" position.
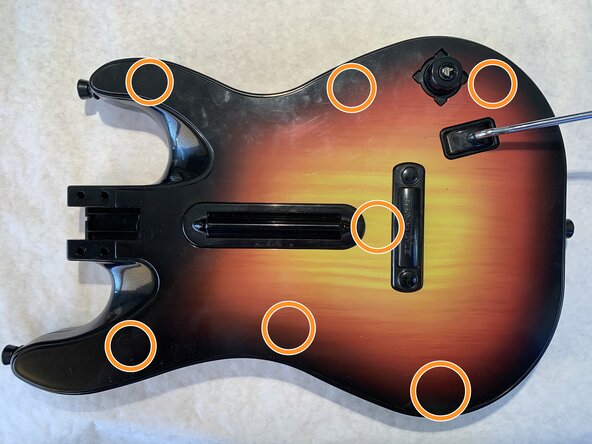
- Pry the face plate off of the body by gently prying with an opening tool near the marked locations. The face plate should not be difficult to remove.
- You can pry the face plate away with your fingers, or with any plastic/wooden tool.
- Avoid using metal tools to pry the plastic face plate away, as it can lead to marring the plastic and ruining the finish.
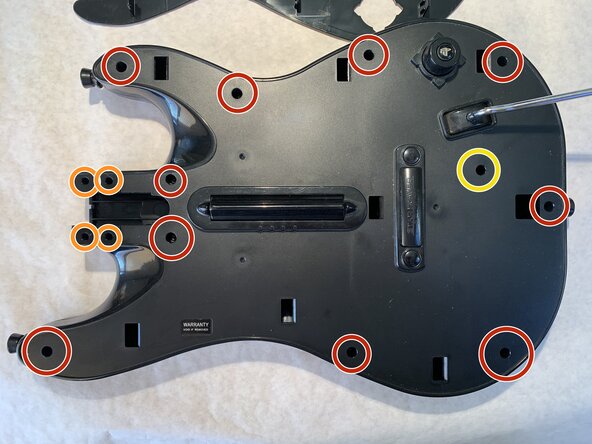
- Remove the eleven Torx T10 screws.
- Remove the four Phillips #0 screws. T6 screws on the Xbox controller.
- Not included on the Xbox 360 controller.
- There is an additional Torx T10 screw located behind the "Warranty Void" sticker.
- Separate the two halves of the guitar body.
- Disconnect the ribbon cable connecting the strummer circuit board to the main control board.
- Remove the eight Phillips #0 screws holding the strummer circuit board to the body.
- Ensure that the switches have a solid clicking action.
- Debris can often block the switches from actuating.
- Remove four Phillips #0 screws holding the strum bar assembly. T6 screws on the Xbox 360 controller.
- Remove the strum bar assembly from the body. Ensure that both springs are present and in good condition.
- Check the joint between the strum bar and its mounting brackets. Ensure there are no foreign objects jamming the hole. Ensure the joint is well lubricated.