Xiaomi Redmi Note 8 Pro Battery Replacement
ID: 146588
Description: Use this guide to remove or replace the battery...
Steps:
- Prepare an iOpener and apply it to the rear glass for at least two minutes to loosen the adhesive underneath.
- A hair dryer, heat gun, or hot plate may also be used, but be careful not to overheat the phone—the display and internal battery are both susceptible to heat damage.
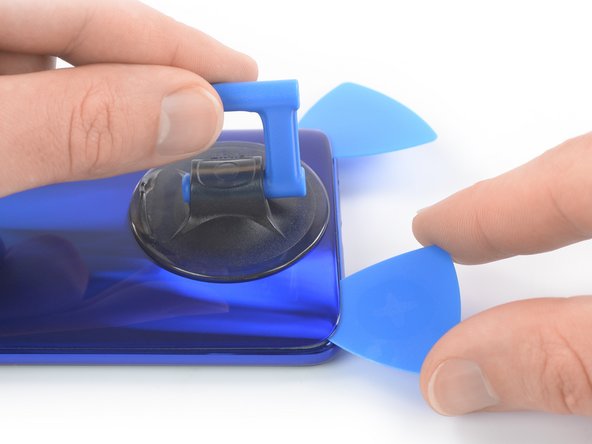
- Secure a suction handle to the bottom edge of the rear glass, as close to the edge as possible.
- If the rear glass is cracked, the suction handle may not stick. Try lifting it with strong tape, or superglue the suction handle in place and allow it to cure so you can proceed.
- Lift the rear glass with the suction handle to create a small gap between the rear glass and the frame.
- In case you have trouble creating a gap, apply more heat to further soften the adhesive. Follow the iOpener instructions to avoid overheating.
- Insert an opening pick into the gap you created.
- Slide the opening pick to the bottom right corner to slice the adhesive.
- Leave the opening pick in place to prevent the adhesive from resealing.
- Insert a second opening pick at the bottom edge of your phone.
- Slide the opening pick to the bottom left corner to slice the adhesive.
- Leave the opening picks in place to prevent the adhesive from resealing.
- If the adhesive becomes hard to cut, it has most likely cooled down. Use your iOpener to reheat it.
- Insert a third opening pick at the bottom left corner of your phone.
- Slide the opening pick along the left edge of your phone to slice the adhesive.
- Leave the opening pick in the top left corner to prevent the adhesive from resealing.
- Insert a fourth opening pick underneath the top left corner of your phone.
- Slide the opening pick along the top edge to slice the adhesive.
- Leave the opening pick in the top right corner to prevent the adhesive from resealing.
- Insert a fifth opening pick underneath the top right corner.
- Slide the opening pick along the right edge of the rear glass to slice the remaining adhesive.
- Don't try to remove the rear glass all the way yet. The camera cover and fingerprint assembly is still adhered to its back.
- Carefully lift to rear glass upwards whilst pressing down the camera cover with a finger.
- The camera cover and fingerprint assembly should separate from the rear glass during this procedure. In case the adhesive is too strong, you can apply a heated iOpener to the camera cover for one to two minutes to loosen its adhesive.
- Remove the rear glass.
- Apply new adhesive where necessary after cleaning the relevant areas with isopropyl alcohol (>90%).
- Secure the new rear glass with pre-cut adhesive or double-sided adhesive tape. After installing the rear glass, apply strong, steady pressure to your phone for several minutes to help the adhesive form a good bond—a stack of heavy books works well.
- Insert the pointed end of a spudger into the gap next to the fingerprint connector cover.
- Use the spudger to pry up the connector cover by tilting the spudger downwards. This might require some force.
- Use a pair of tweezers to remove the fingerprint connector cover by pulling it out of its routing and in the direction of the power and volume buttons.
- Use a spudger to disconnect the fingerprint reader cable by prying the connector straight up from its socket.
- Use a Phillips screwdriver to remove the ten 3.9 mm-long screws securing the motherboard cover.
- Slide an opening pick underneath the black foil covering the battery and interconnect cable.
- Use the opening pick to carefully separate the black foil from the battery and the interconnect cable.
- Insert the tip of an opening pick underneath the bottom right corner of the motherboard cover.
- Slide the opening pick along the right edge of the motherboard cover to unhinge the plastic clips and pry it up.
- Insert the opening pick underneath the top edge of the motherboard cover and pry it up.
- Remove the motherboard cover.
- Use a spudger to disconnect the battery cable by prying the connector straight up from its socket.
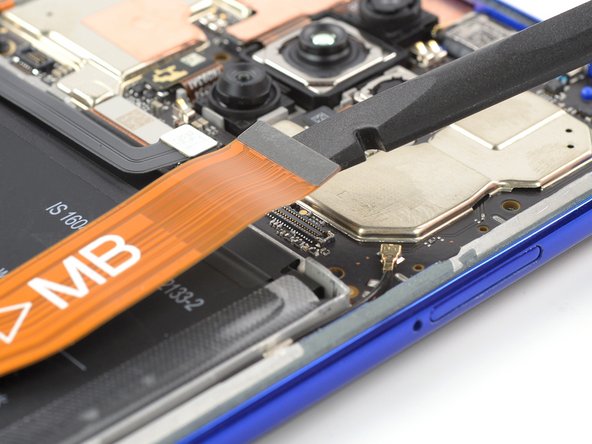
- Use a spudger to disconnect the interconnect cable by prying the connector straight up from its socket.
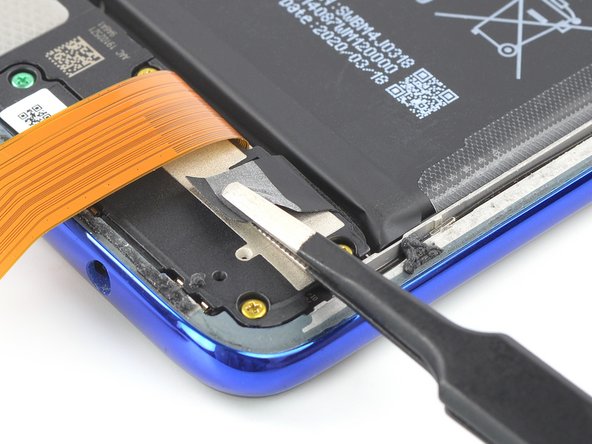
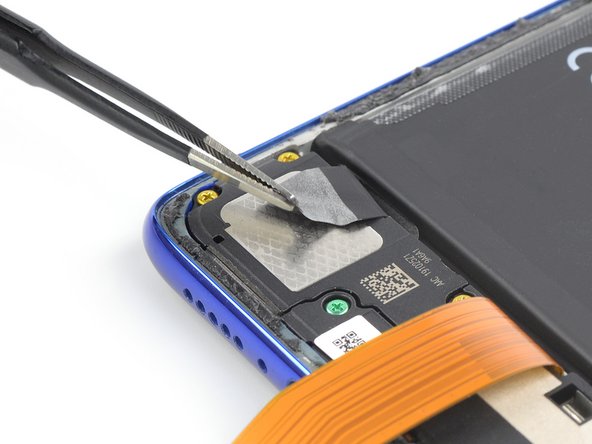
- Carefully slide an opening pick underneath the black foil covering the battery and the loudspeaker assembly to loosen its adhesive.
- Remove the black protective foil.
- During the following step do not fold the cable sharply and only bend it to avoid cable damage.
- Fold the interconnect flex cable towards the charging port in order to get free access to both battery pull tabs.
- You might want to use a small piece of tape to temporarily stick the cable onto your working surface to avoid accidentally damaging it during the battery removal.
- The battery is secured to the rear case with two pieces of stretch-release adhesive.
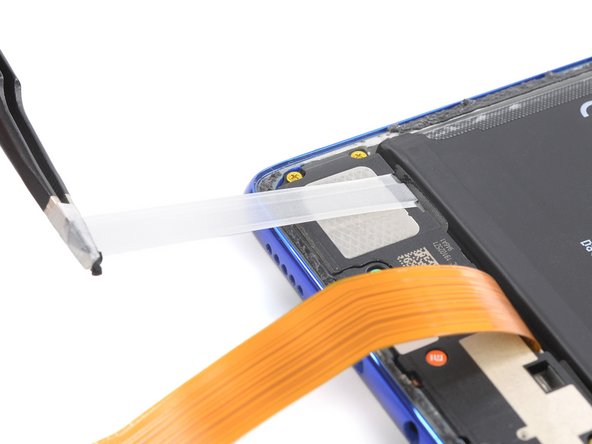
- Use a pair of tweezers or a clean fingernail to peel down both battery adhesive pull-tabs to un-stick them from the bottom edge of the battery.
- Don't jab the battery with any sharp tools. A punctured battery may leak dangerous chemicals or catch fire.
- Grab the first pull-tab with a pair of tweezers or your fingers and slowly pull it away from the battery and towards the bottom edge of your phone.
- Pull hard enough to maintain tension on the strip, but don't force it. Give it plenty of time to stretch and un-stick from under the battery.
- Don't press down on the battery. Hold the phone firmly by its sides.
- Keep the strip flat and unwrinkled. Try to pull evenly on the whole strip, rather than pulling mainly in the middle or on one side.
- Pull at a low angle so the strip doesn't snag on the edge of the battery.
- If the adhesive strip breaks off, try to retrieve it using your fingers or blunt tweezers, and continue pulling—but do not pry under the battery.
- If the adhesive breaks off underneath the battery and can't be retrieved, continue with the next step.
- Repeat the previous pull-tab removal procedure on the second pull-tab.
- Follow the same procedure as with the previous strip: don't press down on the battery, keep the strip flat and unwrinkled, and pull at a low angle.
- If the adhesive breaks off underneath the battery and can't be retrieved, apply a few drops of high concentration (over 90%) isopropyl alcohol under the edge of the battery in the area of the broken adhesive strip(s).
- Wait about one minute for the alcohol solution to weaken the adhesive.
- Use the flat end of a spudger to gently lift the battery.
- Don't try to forcefully lever the battery out. If needed, apply a few more drops of alcohol to further weaken the adhesive. Never deform or puncture the battery with your pry tool.
- Remove the battery.
- Do not reinstall a damaged or deformed battery, as doing so is a potential safety hazard.
- If there's any alcohol solution remaining in the phone, carefully wipe it off or allow it to air dry before installing your new battery.
- During reassembly, temporarily reconnect the battery to the motherboard to help align it correctly. Disconnect the battery after it is seated.