Sony WH-1000XM3 Battery Replacement
ID: 147364
Description: Use this guide to remove or replace the battery...
Steps:
- Before beginning any repairs, turn off your headphones.
- The earcup cushions of the Sony WH-1000XM3 are held in place by small plastic clips and it's the same removal procedure for both, the left and the right cushion.
- In case you want to replace the battery you're required to remove the RIGHT earcup cushion.
- Insert a spudger into the gap between the earcup cushion and the earcup frame.
- A screwdriver or a flat pencil will also do the job but might scratch your headphone housing or damage the cushions.
- Pry up the earcup cushion by tilting the spudger downwards to release the plastic clips.
- Repeat the previous step around the perimeter of the earcup cushion to release the remaining clips.
- Remove the earcup cushion.
- The foam liner covering the speaker is held in place by two small pieces of mild adhesive.
- Avoid separating the different foam layers during the following procedure.
- Carefully peel the foam liner off the earcup frame.
- Remove the foam liner.
- Use a Phillips screwdriver to remove the four 10.4 mm-long screws securing the plastic cover of the earcup frame.
- Turn the headphones over.
- Insert an opening pick into the gap between the plastic cover and the earcup frame.
- Use the opening pick to pry up the plastic cover until you can get a good grip to it.
- Don't try to remove the plastic cover all the way yet. The electrodes inside the cover which sense gesture controls are still connected to the headphone assembly.
- Avoid straining the gesture control cable during the following procedure.
- Carefully fold the right earcup cover to the left like you would open the front page of a book and place it next to the earcup frame.
- Use a pair of blunt nose tweezers or your fingers to disconnect the gesture control ribbon cable by pulling it straight out of its socket.
- Don't jab the battery with any sharp tools. A punctured battery may leak dangerous chemicals or catch fire.
- Use a pair of tweezers to carefully peel the protective foam sticker off the battery and the thermal sensor.
- Use a pair of tweezers or your fingers to carefully remove the protective cloth sticker.
- Use a pair of tweezers to carefully bend the thermal sensor to the side to get free access to the battery.
- The black and red battery cables are routed underneath a little plastic hook on the battery frame.
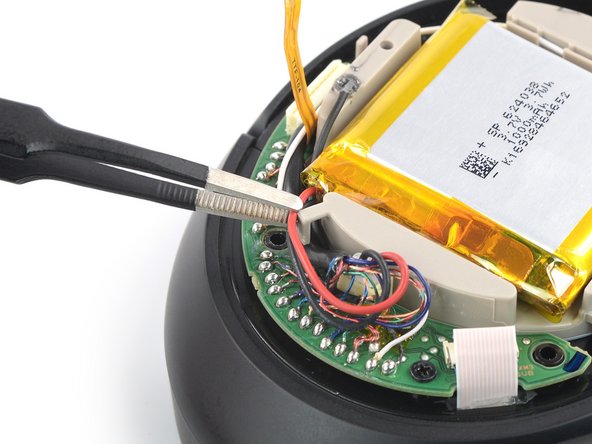
- Use a pair of tweezers to carefully free the battery cables.
- Use the flat end of a spudger or an opening pick to carefully fold the cables blocking the battery connector to the side until you get free access to the connector.
- Use a pair of blunt nose tweezers to grasp the sides of the battery connector.
- Pull the connector up and out of its socket, gently rocking it back and forth to loosen the clips securing it.
- Always pull cables by their connectors and not the wires themselves.
- Insert the tip of an opening pick into the gap between the right edge of the battery and the battery housing.
- Rotate the opening pick to insert one of its long edges into the gap.
- Slide the opening pick underneath the battery.
- Pry up the battery intermittently to work it away from its adhesive.
- Remove the battery.
- Do not reuse the battery after it has been removed, as doing so is a potential safety hazard. Replace it with a new battery.
- Remove old adhesive backings before installing new adhesive and clean the relevant areas with isopropyl alcohol (>90%).
- If your replacement battery doesn't come with replacement adhesive, secure the new battery with pre-cut adhesive or double-sided adhesive tape (OEM adhesive is a 32x32 mm square). In order to position it correctly, apply the new adhesive into the device at the place where the old adhesive was located, not directly onto the battery. Press the new battery firmly into place.


