How to fix SteelSeries Stratus Duo trigger button (L2/R2)
ID: 151462
Description: I can't find any tutorial on fixing Stratus...
Steps:
- A screwdriver with...
- a Y 2.0 sized Tri-wing screwhead for the case
- and Phillips head for the motherboard.
- Some kind of pry (Prolly your nail 🤣, or your broke-ass credit card might do 💵)
- Pair of tweezers for delicate tasks
- Pair of dry, steady hands. (No caffeine for you!)
- There are 5 screws in the case, one of them is under the sticker (Circled in red)
- Pry open from the bottom (Red line) . don't pry from the top (orange line), otherwise, the fastening slot will be damaged. (photo showed in next step)
- Shown in red line
- The weight (yellow) is not fixed and can easily drop. Don't lose them.
- There's a non-functional plastic plug (green circle) that'll fall easily too. Be careful.
- You will find 2 connections. (red circle)
- The white strip is the data line. To disconnect, use a tweezer to (1) slide open the black button from both sides , then (2) pull the blue part.
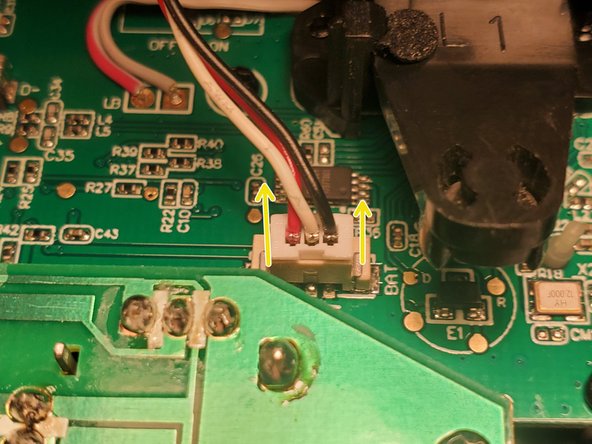
- The tri-colored wire is the power line. Simply pull it up. (Don't forget it's orientation)
- Seperate the upper and lower controller case
- Your magnet won't rattle because it's attached somewhere else inside your controller.
- Find the bastard and pick it up with tweezers
- In this step, you may attempt to stick it back to the black encasement. But if you fail so, continue to the next step.
- Unscrew the 6 screws,
- Separate the lower analog motherboard first. Beware of the connection (Yellow)
- And then seperate the upper motherboard.
- Unscrew these 2 screws (red circle) to detach the trigger button. (From behind, duh!) (P.S. I was lazy and I didn't take photos of the disassembled button and motherboard 😶)
- You should have good access here. Now yell "GET BACK INTO THE F**KING MACHINE!!! MAGNET!!!" (If you know the reference😏)
- Reassemble it like lego.
- Reconnect the cables and try out the buttons with some controller testing site before screwing it back in
- Did I save the day for you? If yes, have a great day! If not, maybe you missed some steps. ¯\_(ツ)_/¯