Battery Blocking
ID: 152816
Description: This is a prerequisite-only guide! This guide...
Steps:
- While your iPad looks uniform from the outside, there are delicate components under portions of the screen. To avoid damage, follow instructions exactly as written and note the following areas as you open your iPad:
- Camera module, ambient light sensors, proximity senor, and front microphone
- Display cables
- Screen magnets
- LCD edges
- Apply a heated iOpener to the right edge of the screen for two minutes.
- You can also use a hair dryer, heat gun, or hot plate—but extreme heat can damage the screen and/or internal battery, so proceed with care.
- The next three steps demonstrate the Anti-Clamp, a tool we designed to make the opening procedure easier. If you aren't using the Anti-Clamp, skip down three steps for an alternate method.
- For complete instructions on how to use the Anti-Clamp, check out this guide.
- Pull the blue handle backward to unlock the Anti-Clamp's arms.
- Place an object under your iPad so it rests level between the suction cups.
- Position the suction cups near the middle of the right edge—one on the top, and one on the bottom.
- Hold the bottom of the Anti-Clamp steady and firmly press down on the top cup to apply suction.
- If you find that the surface of your iPad is too slippery for the Anti-Clamp to hold onto, use tape to create a grippier surface.
- Pull the blue handle forward to lock the arms.
- Turn the handle clockwise 360 degrees or until the cups start to stretch.
- Make sure the suction cups remain aligned with each other. If they begin to slip out of alignment, loosen the suction cups slightly and realign the arms.
- Wait one minute to give the adhesive a chance to release and present an opening gap.
- If your screen isn't getting hot enough, you can use a hair dryer to heat along the right edge of the iPad.
- For complete instructions on how to use a hair dryer, check out this guide.
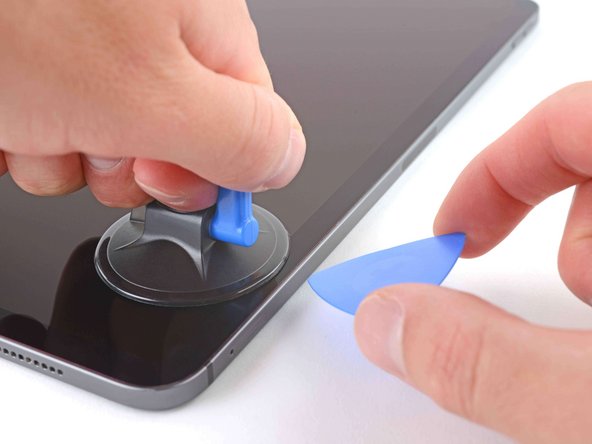
- Insert an opening pick under the screen when the Anti-Clamp creates a large enough gap.
- If the Anti-Clamp doesn't create a sufficient gap, apply more heat to the area and rotate the handle clockwise half a turn.
- Don't crank more than a half a turn at a time, and wait one minute between turns. Let the Anti-Clamp and time do the work for you.
- Skip the next step.
- If your screen is badly cracked, covering it with a layer of clear packing tape may allow the suction cup to adhere. Alternatively, very strong tape may be used instead of the suction cup. If all else fails, you can superglue the suction cup to the broken display.
- Apply a suction handle to the right edge of the display, about 5 cm from the bottom edge.
- Pull up on the suction handle with firm, constant pressure to create a gap just small enough to insert an opening pick.
- Only create a gap small enough to insert an opening pick. Overbending the screen will damage it.
- Insert the tip of an opening pick into the gap.
- Don't insert the opening pick more than 5 mm or you'll damage the LCD.
- Insert a new opening pick in the gap you just created.
- Slide the pick along the right edge to separate the adhesive.
- When sliding near the volume buttons, don't insert the pick more than 2 mm or you'll damage the screen magnets.
- Leave the pick in the top right corner to prevent the adhesive from re-sealing.
- Apply a heated iOpener to the top edge of the screen for two minutes.
- The top edge of the iPad contains the camera module, two ambient light sensors, the proximity sensor, and front microphone. These components are fragile and easily damaged if an opening pick is inserted too far. Only separate the adhesive in the marked locations to avoid damage.
- The two ambient light sensors can be hard to see and can be located using a flashlight or by placing the iPad under a bright light.
- Don't insert an opening pick more than 2 mm near the top left and right edges or you'll damage the ambient light sensors.
- Don't insert an opening pick more than 1 mm near the middle of the top edge or you'll damage the camera module, proximity sensor, and front microphone.
- Insert a new opening pick in the gap you just created.
- Slide the pick along the top right edge, stopping when you reach the right ambient light sensor.
- Don't insert the opening pick more than 5 mm.
- Leave the pick to the right of the sensor to prevent the adhesive from re-sealing.
- Insert a new opening pick to the right of the ambient light sensor.
- Slide the pick along the middle section of the top, stopping when you reach the left ambient light sensor.
- Don't insert the pick more than 1 mm or you'll damage the proximity sensor and front microphone.
- Leave the pick in to prevent the adhesive from re-sealing.
- Insert a new opening pick to the left of the ambient light sensor.
- Slide the pick along the top left edge, stopping when you reach the left ambient light sensor.
- Don't insert the opening pick more than 5 mm.
- Once the top edge adhesive has been separated, you can remove the two picks near the ambient light sensors.
- Apply a heated iOpener to the bottom edge of the screen for two minutes.
- Insert a new opening pick in the bottom right corner below the existing pick.
- Don't insert the opening pick more than 2 mm when sliding on the right edge.
- Slide the pick around the bottom right corner to separate the adhesive.
- Slide the opening pick along the bottom edge, stopping at the USB-C port.
- Don't insert the opening pick more than 5 mm when separating the bottom edge adhesive.
- Leave the pick in to prevent the bottom edge adhesive from re-sealing.
- Insert a new opening pick to the left of the USB-C port.
- Separate the remaining bottom edgeadhesive.
- Don't insert the opening pick more than 5 mm when separating the bottom edge adhesive.
- Leave the pick in the bottom left corner to prevent the bottom edge adhesive from re-sealing.
- Apply a heated iOpener to the left edge of the screen for two minutes.
- The left edge of the iPad contains several display cables. These cables are extremely fragile and easily damaged if an opening pick is inserted too far or at the wrong angle. Follow the instructions exactly as written to avoid damage.
- The display cables are located within small indents of the frame and require an opening pick to be inserted at a 45° angle.
- There are flat sections of the frame which require an opening pick to be inserted horizontally.
- Insert an opening pick at a 45˚ angle just above the bottom left corner.
- Don't insert the pick more than 5 mm or you'll damage the display cables.
- Carefully slide the pick along the left edge, stopping when you reach the flat section of the frame.
- Lower the opening pick so it is horizontal to the display.
- Don't insert the pick more than 5 mm.
- Continue separating the left edge adhesive until you reach the next indented section of the frame.
- Separate the remaining adhesive, making sure to follow the instructions exactly as written.
- Slide the pick at a 45˚ downward angle and don't insert the pick more than 5 mm.
- Slide the pick horizontally and don't insert the pick more than 5 mm.
- Grab two opposing corners of the screen and gently separate the rest of the adhesive.
- Don't fully remove the screen as it is held in place by several ribbon cables underneath.
- Shift the screen towards the bottom right corner of the frame until the ambient light sensor ribbon cable near the top edge is uncovered.
- Throughout this repair, keep track of each screw and make sure it goes back exactly where it came from.
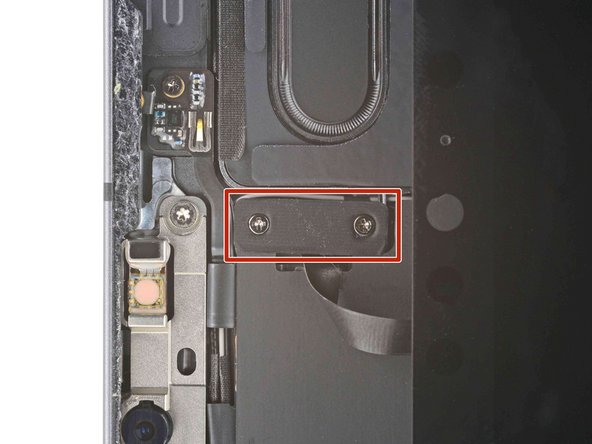
- Use a Phillips screwdriver to remove the two screws securing the ambient light sensor cable bracket to the logic board:
- One 1.3 mm screw
- One 2.0 mm screw
- During reassembly, this is a good point to power on your iPad and test all functions before sealing it up. Be sure to power your iPad back down before you continue working.
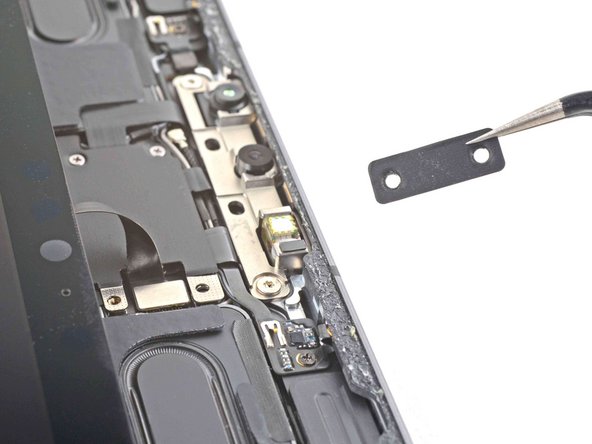
- Use a pair of tweezers or your fingers to remove the bracket.
- Use the flat end of a spudger to disconnect the ambient light sensor cable by lifting straight up on the press connectors.
- To re-attach press connectors like this one, carefully align and press down on one side until it clicks into place, then repeat on the other side. Do not press down on the middle. If the connector is misaligned, the pins can bend and cause permanent damage.
- Don't try to remove the screen yet, as it's still attached by delicate ribbon cables.
- Grip the right edge of the screen and fold it open like a book.
- Lay the screen down over the left edge of the iPad.
- Use a Phillips screwdriver to remove the three 1.2 mm screws securing the lower cable shield to the logic board.
- Use tweezers, or your fingers, to remove the lower cable shield.
- Use a Phillips screwdriver to remove the 1.8 mm screw securing the battery connector to the logic board.
- These photos show what the battery connector looks like underneath the logic board. Use these photos as a reference while you safely disconnect the battery.
- Notice that the battery connector has cantilever springs on the logic board that press against the battery contact pads. Since both the logic board and battery are glued down, you'll need to slide something thin and flexible between the contact points to disconnect the battery.
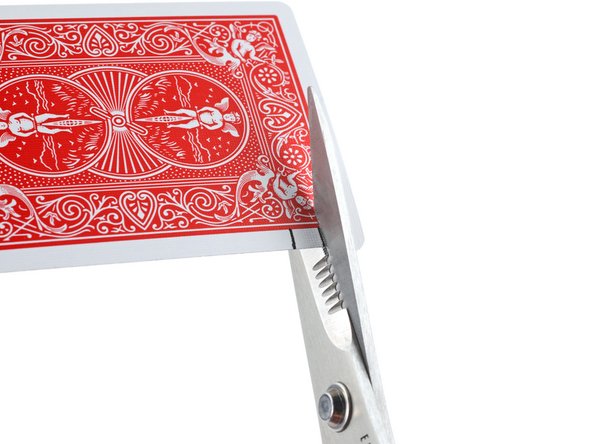
- Cut two 6 mm wide strips from a playing card or cardstock to use as a battery blocker.
- The strips should be about 4 cm long so you can easily grip them.
- Insert the card strips on each side of the battery connector until they stop.