How to Replace a Battery for a Solinst LevelLogger
ID: 152906
Description: According to Solinst their loggers are not...
Steps:
- Remove the plastic screw on cap and remove the green O-ring.
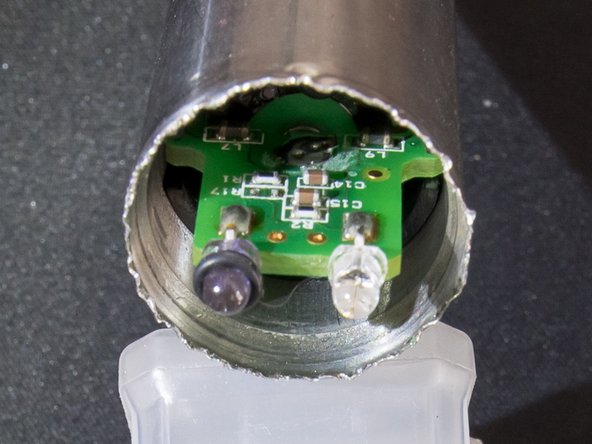
- Pry open the rounded edge that is part of the main steel tube (right behind the O-ring) until you can pull out the head (item on the bottom left of the image). The center item shows the pried open logger tube with the head removed.
- Alternatively you can grind off the bend edge. The logger will still be water tight upon re-assembly as there are 1-2 O-rings on the inside and grinding away the edge will not interfere with the O-rings. However it won't be easy to secure the head in place without the metal edge.
- Do not twist the cap when pulling it out as it could break off the IR diodes in the process
- Remove the plastic end cap that protects the pressure and temperature sensor. The sensor is not attached to the end cap and it might be necessary to use quite a bit of force to get it off. I had to use vice grips and a bench vice for some loggers. You can also stick a screw driver through the holes and pull it off that way.
- Take the logger PCB and sensor out of the outer housing. Take a flat screw driver and push on the edge of the sensor on the solid outer steel ring (see picture). This is somewhat obstructed by a flange inside the outer tube casing but with a little care you can get between the flange and the sensor ring.
- Simultaneously pull on the PCB by the IR diodes. Don't twist the PCB when pulling on it as this will just result in twisting the wires connecting the PCB and the sensor.
- DO NOT push on the thin metal film of the sensor (wave like pattern in first picture). Instead make sure to only push on the outer solid ring.
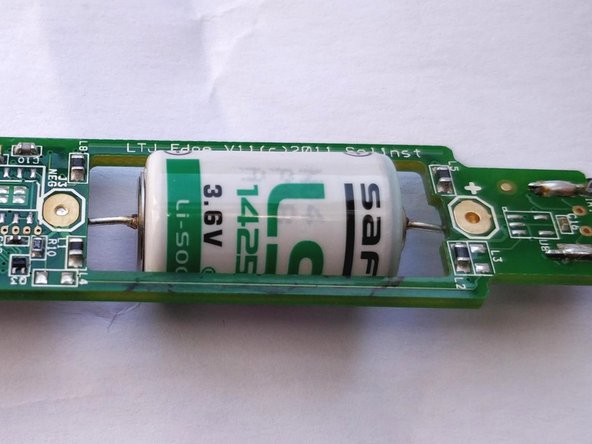
- De-solder the old battery. You can just gently push on the whole battery while applying heat to the solder joints.
- Don't apply too much pressure as you can rip off the contact plate on the PCB.
- The loggers come with a 3.6V non-rechargeable Lithium battery. The size is a 2/3 AA battery. You can also purchase a 1/2 size AA battery with the same voltage (shown in images) which will in most cases have a lower capacity and lifespan. To avoid the need for spot welding I would recommend getting a battery with pre-fitted leads.
- The original battery is from Tadiran, model SL-561 and has a rated temperature ranger of -55 to 130 °C. These batteries are pricey but worth it in the long run. I have a logger that has a battery that is over 12 years old and still works!
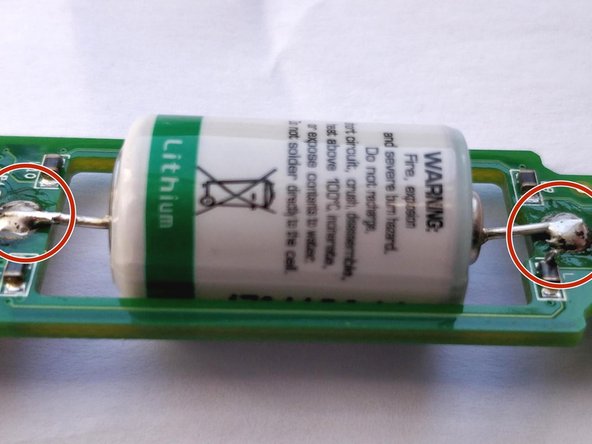
- The loggers can get very hot when left lying in the sun. It is recommended to use the same battery as a replacement as most other batteries have a much lower temperature range and will probably start leaking when the logger is left in the sun and the battery temperature range is exceeded.
- Solder the new battery to the large solder pads. Make sure you don't reverse the polarity.
- Clean logger tube and all O-rings before reassembly.
- Replace the desiccation pack.
- When re-fitting the logger cap with the three holes (IR-diodes and orientation pin) make sure to orient the head in the right direction so that the darker IR diode meets the transparent IR diode of the reader device and vice versa.
- When re-assembled crimp previously pried open edge slightly to secure logger metal cap in place.
- Connect to the logger using the Solinst Levellogger Software. The power loss appears to wipe the internal clock and all data from the logger. If you need recover data from the logger I would recommend to supply just over 3 V to the logger while the old battery is still connected and then perform a data download.