Mitsubishi 3000GT Engine Assembly (6G72 DOHC)
ID: 155415
Description: This guide covers the assembly of the...
Steps:
- Clean and inspect all parts, removing paint, rust, gunk, and grit. This is very important for internal components.
- Reusing worn or damaged parts may result engine failure. Your local machine shop or engine builder can usually recondition worn parts rather than replace them.
- Assemble the engine in a clean and dust free work area. Place oiled parts on a lint-free rag to avoid picking up debris from the work surface.
- Use a tap to clean out threads before assembling parts.
- Use a cylinder hone and drill to prepare the cylinder walls. First clean the walls, then lubricate with diesel fuel or engine oil before honing.
- Vary the drill speed and up/down motions to achieve a 30 degree cross hatch pattern on the walls.
- This process removes any glazing and restores the correct surface finish needed for the piston rings to seal.
- Make sure to clean the cylinder walls and remove all grit created by the honing process.
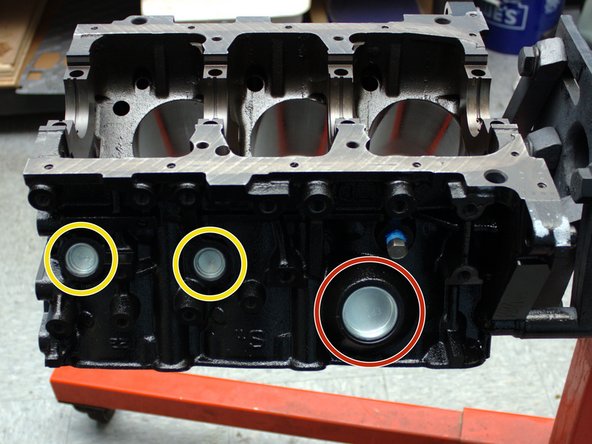
- Install the following expansion plugs using a socket and hammer:
- One 41.5mm plug (right side)
- Two 35mm plugs (rear)
- Five 25mm plugs (left and right sides)
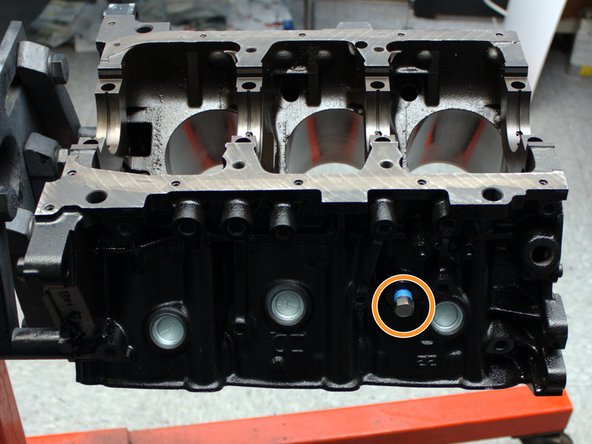
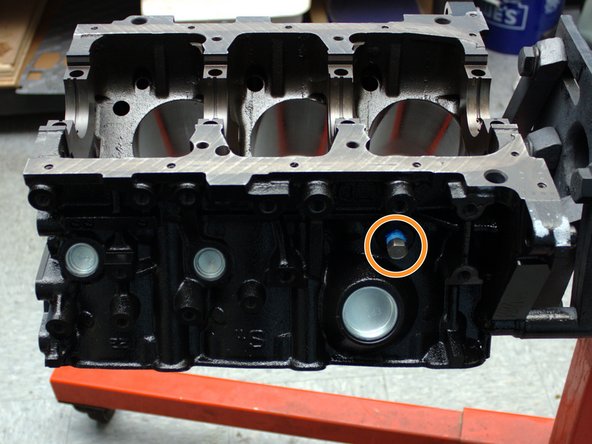
- Install the two threaded hex plugs (front and rear) using an 8mm hex wrench.
- Install the two threaded coolant plugs (left and right side) using a 14mm wrench.
- Apply sealant or pipe tape to the plug threads.
- This step is for turbo engines only.
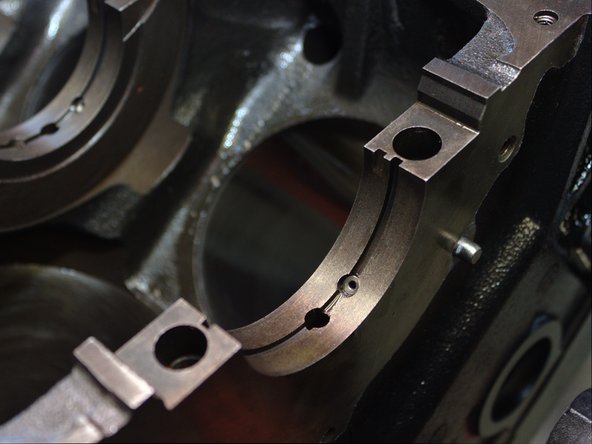
- Install the six oil squirters into the angled holes in the main bearing journals using a punch and hammer.
- Make sure each oil squirter is fully seated and below the bottom of the oil feed groove.
- Do not install oil squirters in the center oil feed holes.
- Install the main bearings into the block and girdle.
- Install the grooved bearings in the block side.
- Make sure the journal surfaces underneath are clean and dry.
- Carefully install the crankshaft into the block.
- Make sure the bearings are clean and dry.
- Do not rotate the crankshaft after it is installed.
- Add a small length of Plastigauge to each bearing journal.
- Carefully set the girdle onto the crankshaft. Line it up perfectly with the bearing journals on the block.
- The girdle fits very tightly into the block and will not be fully seated until the next step.
- Apply engine oil to the main bolt threads and underside of the head.
- Do not dip the bolt in engine oil. Too much oil may damage the block.
- Install the main bolts. Evenly tighten until snug using a socket wrench and 17mm socket.
- Tap the girdle with a soft-faced hammer while continuing to snug the main bolts until the girdle is fully seated.
- Install the main cap bolts and tighten them by hand.
- Two-bolt blocks will have eight bolts total.
- Four-bolt blocks will have 16 bolts total.
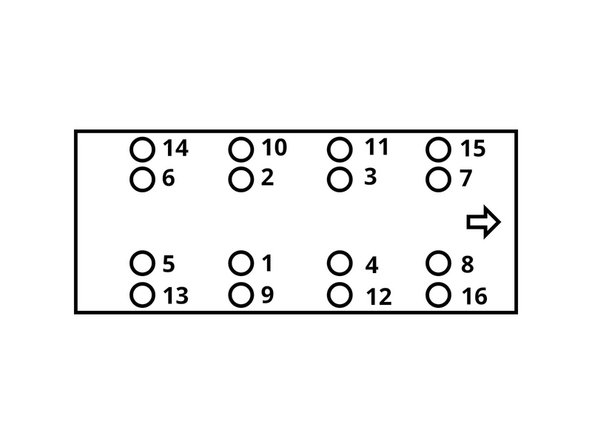
- Use a torque wrench and a 17mm socket to tighten the main bolts to the specified torque:
- Two-bolt blocks: 67 ft-lbs (93 Nm)
- Four-bolt blocks: 54 ft-lbs (74 Nm)
- Tighten bolts in the sequence shown.
- Loosen the main bolts and carefully remove the girdle.
- Measure the width of the Plastigauge to determine the bearing clearance of each journal.
- Main bearing clearance should be 0.0008-0.0020 in (0.020-0.050 mm).
- Do not continue if bearing clearances are out of spec. Double check that the main bearings, crankshaft, and girdle are installed correctly and that the crankshaft isn't excessively worn.
- Remove the crankshaft.
- Apply assembly lube to the smooth side of the thrust washers.
- Stick the thrust washers onto the sides of the #3 journal on both the block and girdle.
- The thrust washer grooves face away from the bearing journals.
- Apply assembly lube or engine oil to the main bearings and thrust washers.
- Reinstall the crankshaft and girdle.
- Be careful not to knock the thrust washers out of position.
- Reinstall the main bolts and repeat Step 8.
- Spin the crankshaft one complete rotation. It should spin smoothly throughout.
- Attach a dial indicator to the nose of the crankshaft to measure end play.
- Use a large flathead screwdriver to carefully move the crankshaft side to side. Zero the indicator at one extreme, then take a measurement at the other extreme.
- Crankshaft end play should be 0.0020-0.0098 in (0.050-0.250 mm).
- Do not continue if the end play is out of spec. Double check that the thrust washers are installed correctly and of the correct thickness.
- This step is for two-bolt turbo engines only.
- Install the four girdle side stays.
- One stay is shaped differently and goes in the front-right position.
- Install the eight side stay bolts. Apply engine oil to the threads and underneath the bolt head.
- Do not dip the entire bolt in engine oil. This may damage the block.
- Use a 14mm wrench to snug all bolts.
- Use a torque wrench and 14mm socket to tighten the girdle-side bolts, followed by the block-side bolts.
- The torque is 35 ft-lbs (48 Nm).
- Insert wisdom here.
- Insert wisdom here.
- Insert wisdom here.
- Insert wisdom here.
- Install the head gaskets on the cylinder block.
- Install heads onto block, being careful the head gasket stays in position.
- Install head bolts and hand tighten.
- Use a torque wrench to tighten the head bolts in three even steps:
- N/A Engines: 26, 52, 80 ft-lbs (36, 72, 110 Nm)
- Turbo Engines: 30, 60, 90 ft-lbs (41, 82, 125 Nm)
- Tighten all bolts to the specified torque before increasing to the next torque step.
- Tighten bolts in the sequence shown.