Razer Kraken Ultimate Motherboard Replacement
ID: 155662
Description: The following the guide is how to remove the...
Steps:
- Grab the ear piece from one of the sides and lightly pull it outwards.
- Ideally, do not pull the ear piece directly away from the speaker; it may damage the piece.
- Once you have taken off one side, you can then remove the whole piece by slowly prying the pad away from the headphones.
- Repeat steps on the other side.
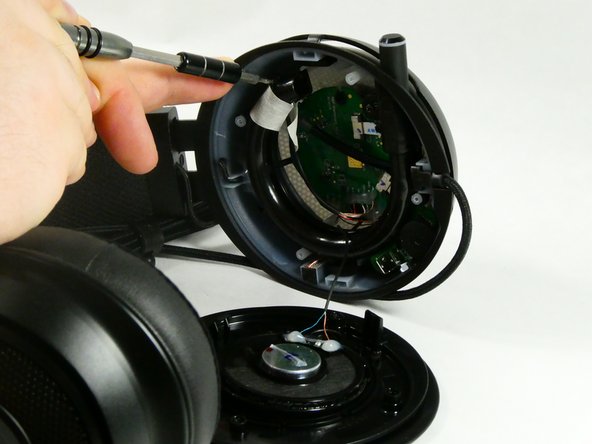
- Remove the four 10 mm Phillips #00 screws securing the right speaker.
- Be sure the device is unplugged before attempting to remove any of the screws.
- Remove the 10 mm Phillips #00 screws securing the left speaker.
- Note that one of the screws is hidden behind the product information sticker. Use your screw driver to punch a hole in the sticker.
- To fully detach the speakers cut the wires as close as possible to the connection point, leaving plenty of room to solder the new speaker on.
- Remove the two 10 mm Phillips #00 screws securing the microphone.
- Gently pry the bottom connection away from the casing with the iFixit opening tool.
- Pull the microphone down and out of the casing.
- Open up the casing the microphone retracks into.
- Cut the cable as close to the microphone as possible, leaving behind enough to solder the new microphone to.
- The casing the microphone if removed correctly in the previous step is easily opened by hand
- Remove the two 6 mm Phillips #00 screws that secure the motherboard.
- One of the screws is located near where many cables connect; take care not to disconnect them.
- Gently lift the motherboard from the case, with care not to damage any of the connected cables.
- There are two ribbon cables that must be removed.
- To remove these cables pull the gray connecting piece out about 0.5mm to unlock the cable.
- Then simply pull the cable out.
- Repeat previous step with second cable.
- Once screws are removed and ribbon cables are disconnected, lift the motherboard out.
- Some wire connections are secured to the motherboard with hot glue. To completely remove the motherboard all wires must be disconnected. Removing such connections goes beyond the scope of this guide.