HidrateSpark PRO LED Bluetooth Sensor Puck Rechargeable Battery Replacement
ID: 157346
Description:
Steps:
- Ensure your puck is not fully charged. Preferably, do this when your puck is discharged and your smart bottle ask you for recharge
- Unscrew Bluetooth Sensor Puck from your bottle (obviously)
- Remove three Philips 1 screws and place them somewhere where you will not accidentally loose.
- You will have to put a bit of a force to remove those screws, rotate your screwdriver counterclockwise. When done, all screws will fall out of a puck, when you rotate it upside down and give a bit of shake.
- You might want to use your thumb when shaking those screws out of your puck to avoid premature separation of its lid in process
- Now, when you've removed those screws, you can easily pop the lid of your puck
- There are no latches nor adhesive to hold the lid.
- The battery is located on the lid, but the cable is long enough for you to open a puck safely without breaking them.
- The battery cable itself has a small white connector.
- Disconnect battery cable by holding a puck (side with motherboard) in one hand and pulling white connector using the other hand. No tweezers necessary here, use your fingernails and grab the upper part of a connector, which has small bumps on both left and right side for that purpose.
- Do not pull that connector by red and black cables, you may break those
- If you can't pull out the battery connector, try doing so again by adding a small left-right shake of your hand when pulling up. This will connector's grip a bit.
- Be careful not to bend small pogo-pins in process, those are responsible for delivery power from external magnetic connector to the board, so you could charge the device
- The battery is held in place by one piece of double-sided tape and has a cardboard piece attached to its top in a same way, probably for additional insulation
- Use something plastic to remove the battery, or cut the adhesive using dental floss.
- Be careful not to puncture the battery
- Battery inside consists of two lithium-ion 3.7v batteries taped together. Overall capacity is 420 mAh or 1.55 Wh, and size is around 10x12x30mm
- The battery compartment is slightly bigger than the battery itself, so you may use a new battery of slightly bigger dimensions.
- I haven't seen any battery with this connector available, so you will have to do a bit of soldering
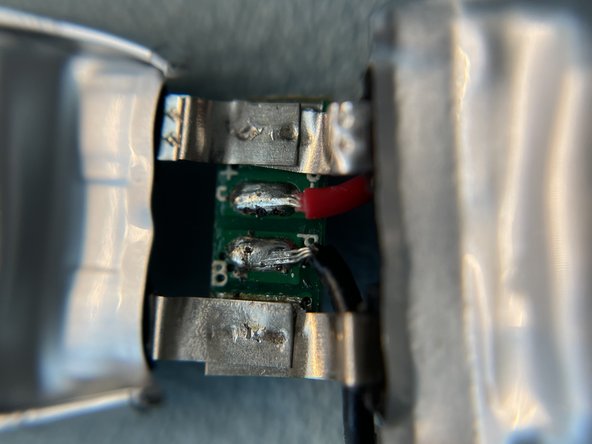
- Mind the polarity of battery connector. Note that the red wire should be on outer side of the puck, while the black one in the inner side.
- Messing with polarity may force you to replace this puck entierly and the new one costs 48$
- After you connect a new battery, your puck will flash a few times, this is expected
- You will have to recalibrate the sensor puck after full reassembly. In fact, the application on your phone will remind you of this.
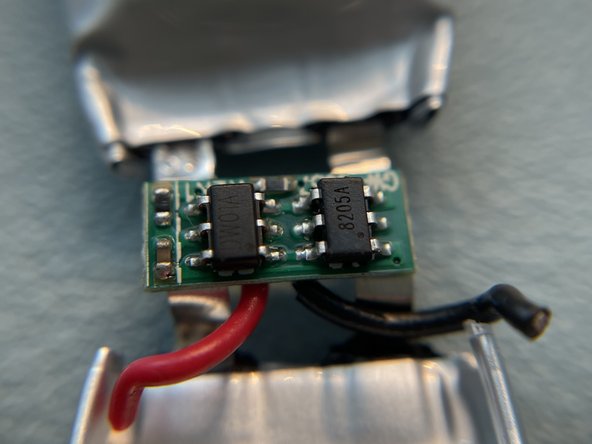
- An original 3.7V battery consists of two batteries stitched together in parallel and a protection board
- Protection board itself has two chips:
- 8205A — a Dual N-Channel MOSFET
- DW01A — a "lifetime" battery protection IC (over-charge, over-discharge, over-current). Funny, the datasheet on this states that it is designed for a single cell, but we do see that here it is connected to two of them. I presume this has implications on a life time in the long run.
- The battery leads are not welded, they're soldered — so you can detach the BMS board from cells easily by clipping out the leads first, to avoid any possibility of short-circuit, heating those leftovers a bit and pushing them to side. Thus you wll have a clean spot to solder a new battery leads to.
- I was not able to find the exact match by size and capacity
- Any 3.7V Li-Ion/Li-Pol battery you can fit will work.
- You can use a few smaller batteries like the original did.
- You can use a smaller battery, or a bigger battery like I did
- Use a replacement battery only if it has a protection board. I have no idea if a puck PCB has any kind of protection circuit built in. Better safe than sorry.
- I ended up using a rechargeable 3.7V battery from a disposable vape (Elfbar 800).
- This battery did not fit the puck case without modification, thus, I had to remove some plastics that held the original battery in place