How to Remove the Lint Filter Housing on Your Whirlpool WED87HED Prereq
ID: 160377
Description:
Steps:
- Before you begin your repair, unplug your dryer.
- Your power cord may have four prongs rather than three. The additional prong is a ground connection.
- Throughout this guide, keep track of each screw and reinstall it exactly where it came from.
- Use a 5/16 inch nut driver to remove the two 15.7 mm-long screws securing the top panel to the rear panel bracket.
- Grasp the top and slide it 1/2 to 1 inch toward the rear of the machine.
- Lift the top panel upward to separate it from the chassis.
- Remove the top panel from the machine.
- Disconnect the control panel cable from the main board.
- Disconnect the drum light connector.
- Use a 1/4 inch nut driver to remove the two 16.3 mm‑long sheet metal screws located at each end of the control panel.
- Lift the control panel up and tilt it away from the chassis to remove it.
- Make sure to thread the cable through the hole in the chassis.
- During reassembly, thread the cable through its proper hole before reinstalling the control panel.
- Use a small flat blade screwdriver or a spudger to unlatch both sides of the door switch connector.
- Unplug the connector.
- Use a 1/4 inch nut driver to remove the three upper front panel 16.4 mm-long sheet metal screws.
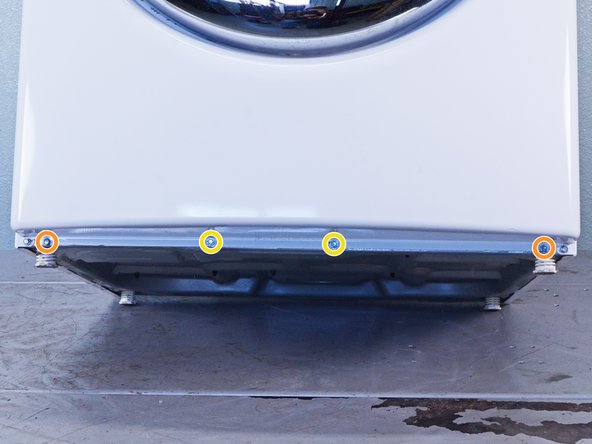
- Tilt the machine backwards and prop it securely, or have a friend hold it.
- Use a 1/4 inch nut driver to remove the four sheet metal screws on the bottom edge of the panel:
- Two 16.4 mm screws
- Two 13 mm screws
- Use a Phillips driver to remove the two 15.8 mm‑long screws inside the door area below the drum opening.
- The panel is heavy and awkward. You may want to have a friend help you with this step.
- Pull the bottom of the panel away from the chassis about two to three inches.
- Lift the front panel off the small tabs on the chassis near the top of the panel and remove it.
- Make sure you don't snag the door switch wire harness as you remove the panel.
- Pull the lint filter up out of the lint filter slot to remove it.
- These photos show the front panel in place, but the procedure is the same if the front panel is already removed.
- Use a 1/4 inch nut driver to remove the 16.4 mm‑long mounting screws securing the lint filter housing.
- Pull the filter housing outward from the chassis and down to remove it.