Razer Blade 15" (2018) Screen Replacement
ID: 161245
Description: Use this guide to replace a broken screen on...
Steps:
- Allow your laptop's battery to drain below 25% before starting this repair—a charged battery may catch fire if damaged.
- Unplug all cables, fully shut down your laptop, and close the lid.
- Rotate your laptop so the screen hinge is farthest from you.
- Use a Torx T5 driver to remove the ten 3.8 mm-long screws securing the back cover.
- Depending on the age and condition of your laptop, the back cover may come off sooner than this guide instructs. If the cover feels loose, remove it at any time.
- Apply a suction handle to the right edge of the back cover, between the middle screws and the screws closest to you.
- Pull up on the suction handle to create a small gap between the back cover and the frame.
- Insert an opening pick into the gap.
- Angle your opening pick upward, away from the frame. Keep it angled upward as long as it's between the back cover and the frame.
- Insert your pick up to 10 mm (0.4 in) deep.
- Slide your opening pick around the bottom right corner of the back cover to free it from the frame.
- Slide your opening pick along the front edge and around the front left corner of the back cover to free it from the frame.
- Remove the back cover.
- Lay the back cover down on its rubber feet to avoid damaging the gray thermal pads on its underside.
- Apply a heated iOpener to the battery cable tape for one minute.
- You can also use a hair dryer—but be careful, as overheating the battery may damage it or create a fire hazard.
- Be careful not to damage the battery with your tool.
- Use blunt nose tweezers or your fingers to peel the battery cable tape away from the cable.
- Use the point of a spudger to press on alternating sides of the battery connector and walk it out of its socket.
- In the next steps, you'll disconnect and move the Wi-Fi cables to access other components.
- The antenna cables look very similar. Label one of them with a piece of tape or marker. Do the same to its socket on the Wi-Fi card.
- Insert one arm of angled tweezers under the metal neck of each antenna cable and pry up to disconnect it.
- Use tweezers or your fingers to move the antenna cables to the left, away from the charging connector.
- Use your spudger to push on alternating sides of the charging port connector to "walk" it out of its socket.
- Use a Phillips screwdriver to remove the three 6.7 mm screws securing the right hinge cover.
- Remove the cover.
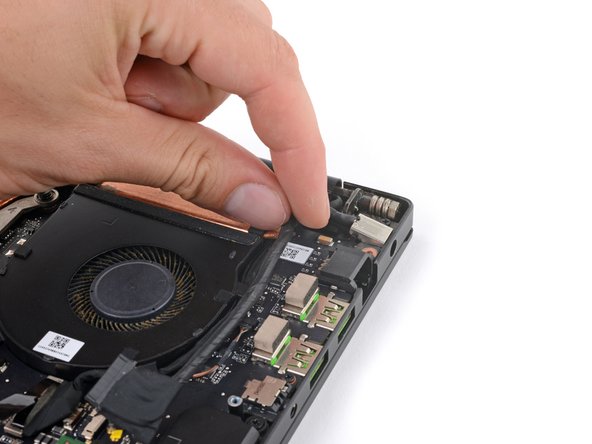
- Tilt the charging port up and remove it.
- Grab the pull tab on the screen connector, to the left of the Wi-Fi card.
- Pull up to disconnect the connector from its socket.
- During reassembly, align the press connector over its socket and press down until it clicks into place. If it doesn't connect, re-align it and try again.
- Guide the screen cable you just disconnected out from the tabs on the left fan.
- Move the cable to the right, away from the laptop.
- Grab both antenna cables and guide them out from the tabs on the left fan.
- Use your Phillips screwdriver to remove the two 6.8 mm screws securing the left hinge cover.
- Remove the hinge cover.
- Use the point of your spudger to push on alternating sides of the left screen connector, just under the right fan, to "walk" it out of its socket.
- Guide the left screen cable out from the tabs on the right fan.
- Open the screen and stand the laptop on its side, with the motherboard facing you.
- If you prefer to lay the laptop flat while you work, lay it on a table with the screen hanging off for the next two steps.
- Hold the laptop steady with one hand.
- Use your Phillips screwdriver to remove the five 4.8 mm screws securing the screen hinges.
- Hold both halves of the laptop steady during this step, as they might fall unexpectedly.
- Slide the screen hinges away from the frame to free them from their recesses.
- Remove the screen.