Preventive Cleaning for Samsung Refrigerator: Condenser Coil and Condensate Tray
ID: 163155
Description:
Steps:
- Preventative maintenance for SAMSUNG refrigerator (fridge or freezer) with a trapped grid compressor. This maintenance should be carried out once a year to avoid blockages in and outside the ventilation grids for the refrigerator to function properly.
- The same maintenance can apply to similar refrigerators from other manufacturers.
- Remove the fridge from its space, in this case it is installed between the left wall and a piece of furniture on the right.
- Unplug the fridge to not cause accidents, remember that a refrigerator cannot be plugged in again until 5-10 minutes has passed since the compressor can still be hot and not start again.
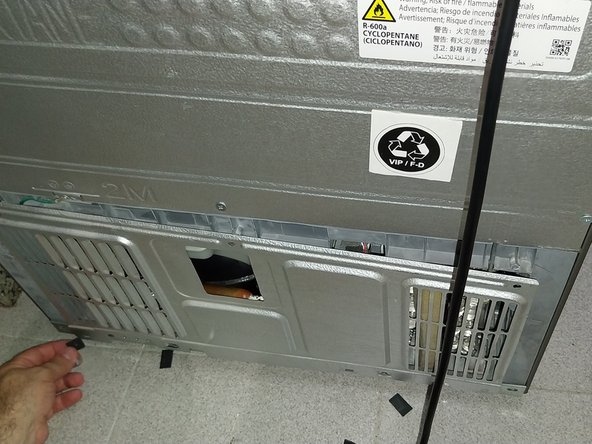
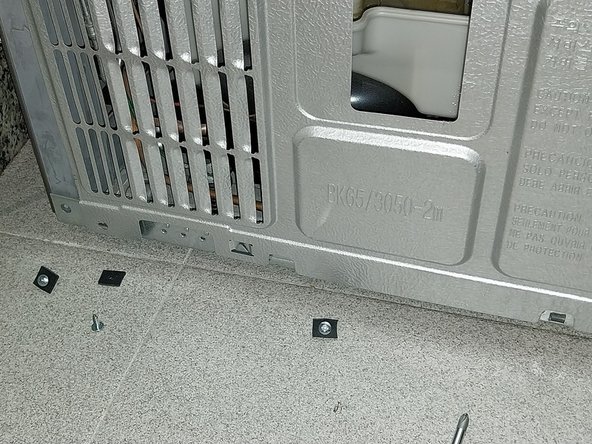
- Proceed to remove the screws from the bottom protective cover and clean the cover with a damp cloth.
- In this case, this fridge has not been cleaned for more than 2 years. There is a large amount of dust and lint that has obstructed the air vent.
- Check the exit on the other side. My fridge was not in bad condition.
- It accumulates this much lint because the fridge has a forced ventilation system with a fan.
- With a vacuum and brush, proceed to clean the air vent.
- Continue to clean the air outlet on the side port.
- Clean the coil area using a vacuum and a brush. BE VERY CAREFUL WITH THE ALUMINUM PANELS, do not touch them with your hands as they are sharp and can cause cuts if brushed against.
- NOTE: In the photo. the fan is running because it was taken before unplugging, with the cover already removed.
- During the cleaning process, take time to clean the fan blades and wipe them down with a damp cloth if necessary.
- Part 2 of Cleaning : Condensate Tray
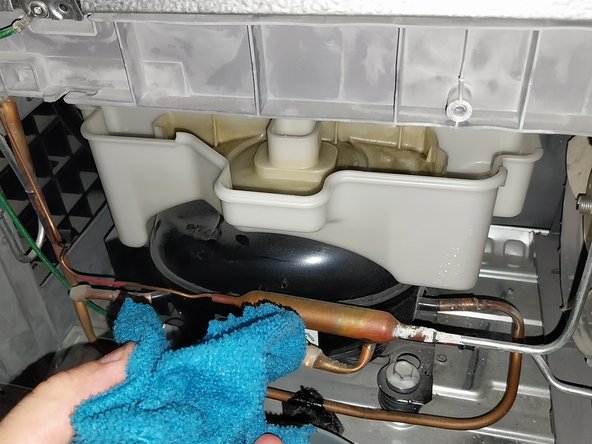
- This is the well-known tray where the tube from the back wall of the fridge carries the water produced by the defrosting process it operates every few hours to prevent ice buildup.
- The tray collects a small amount of water which evaporates with the compressor's own heat; it is normal that it is never completely dry. Generally, a sticky residue will build up that should be cleaned from time to time.
- NEVER REMOVE THIS TRAY. Trays are fitted or stuck in place. Forcing the tray out can cause damage and must be replaced if it is ripped. It will be time-consuming to do so.
- To avoid any problems, clean the tray with a gentle cloth as best as you can without removing it.
- As mentioned in Step 6, this is a photo of the tube that leads to the condensate tray. In some fridges, this tube can be seen at the back, but in this model, it is internal to the fridge and has a plug with a removable rubber cap.
- Once the condensate tray is dry, you can add a teaspoon of bleach to minimize bacteria and odors if it is an issue.
- Clean any remaining dust, such as on the tubes and compressor.
- Once everything is clean, reassemble the rear vent.
- This type of ventilation grille will not make noise if left untouched, but if you remove it, it will produce sounds and vibrations.
- To avoid these noises, you can place rubber washers on each screw.
- The photo shows the rubber stoppers mentioned, made from a 2-3 mm thick piece of rubber. For example, a bicycle tire can suffice.
- Once maintenance is complete, plug the fridge back in and relocate it to its designated space. Repeat this task once a year.