Melitta Caffeo Barista T Replace grindstones
ID: 163379
Description: These instructions may also help with other...
Steps:
- Never forget: Remove the cable from the powerplug
- Remove all the parts
- The backside is fixed with seven Torx T10 screws. Unscrew them
- Get the Backside of. It should be a bit stuck.
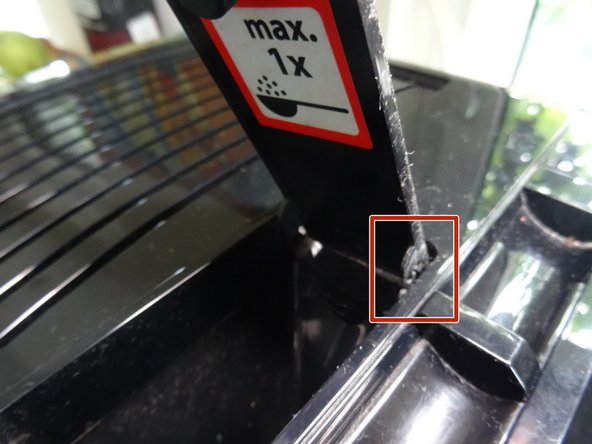
- Pull the powder compartment up.
- Pull one of the sides of the Powder compartment out of the hinge and loosen the lid.
- Remove the powder compartment
- In the powder compartment, you should see a rubber cover. Loosen the rubber cover with the appropriate tools.
- There should also be a Torx T10 screw. Unscrew it
- The upper cover with the brewing unit is held up from three clamps. These can be reached through a slit.
- Press these clams with a flat scredriver in and pull the upper cover up, until the clamps loosen.
- On the side that has a a watertank you can find 2 other clamps
- Press these clamps with a flat scredriver in and pull the cover up until they loosen
- Lift the upper cover and the backside up, hook it on the front edge and remove them
- Push the right and the left side panel back, then pull the lower edge out and pull the side panel out.
- This could be a bit stuck
- On the side panel with the watertank, there should be a supply hose attached to a cable that connects the water-level sensore. loosen them
- Hint: the side panel doesn't have to be removed completely for each repair.
- Unscrew the 3x Torx T10 screws that secure the bean compartment.
- Remove the bean compartment upwards.
- When assembling, make sure that the slider for setting the bean type engages properly.
- Take out the two foam dampers and the black rubber bean feeder.
- Unscrew the Torx T10 screw that secures the powder chute.
- Lift out the powder chute.
- The grinder is fixed with 3x Torx T10 screws. Unscrew them.
- Now the grinder is loose. Press it inward a little so that the previously mentioned adjustment lever is free and lift the grinder upward a little.
- If you want to replace it completely, you still need to disconnect the two cables, if you just want to clean it or replace the grinding stones, it is not necessary.
- Now the grinder is free. Again take a picture, then pull out the axis of the adjuster with moderate force.
- This adjuster may not be present on some models.
- Depending on the model you will find a silicon sealing on top of the grinder ring, remove it.
- Watch the fabrication signs , here green. This alignment must be restored later. Now turn the great black gear about 90 degrees counterclockwise. The grinder ring is free and can be lifted off.
- In the next step be very careful not to loose these three springs, balls and cartridges.
- The grinding cone is fastened with a long Torx T20 screw. The screw head is often covered with remnants of coffee beans. Expose the head and turn the screw out counterclockwise.
- Now the bean feeder (the small white snail) can be removed. The grinder cone and drive can now also be lifted up carefully.
- The grinder is usually filled with old, sticky coffee grounds. Clean everything carefully for an excellent coffee aroma.
- Gently lift the felt ring around the drive shaft with a needle, then wipe it clean with a damp cloth. Do not attempt to wash it, as there is a risk that it will swell. When first used, turn it over with the clean side up.
- Clean the inside of the grinder with a brush and damp cloth, and the blades with a dishwashing brush. Ensure it is properly dried before use.
- Push both of the small latches alternately. Then the ring cover should come out.
- Two clamps hold the grinder ring in its place, push them aside and it should come free.
- Again clean everything. Press the new ring and cover in its place. With that the grinder ring is exchanged.
- First insert the cleaned driver, then the three sleeves, springs and balls. Now fit the grinding cone on the three balls.
- Then fit the auger, screw in central screws. When screwing in, push the cone downwards and make sure that everything meshes.
- This screw turns into plastic. If it doesn't fit properly, the thread will be damaged. So first turn the screw counterclockwise until you feel that the first thread is engaged. Then tighten it turning clockwise.
- Insert grinding ring. The black gear is turned to the right again until the three marks are aligned. Then reinstall the adjuster drive shaft as it was originally.
- The adjustment oft the new grinder burrs musst not necessarily be the same as the old ones. You can approximately find the mean position, which was marked before, by turning the outer ring as far as possible clockwise, then turning it fourteen clicks backwards.
- It is a good idea to check if the grinder rotates freely. You can remove the meal hopper and look at the millstones from the side.
- Then install the remaining parts in reverse order.
- You can set the grinding degree nicely by placing an empty roll of toilet paper perpendicular to the open mill and filling it with a few coffee beans. Plug in the plug (be careful!), choose a cup of coffee and watch as the coffee grounds fall out of the grinder.
- These two pictures are no fake: Before repairing the grinder the coffee is thin and transparent. With new stones the coffee is strong and has a fine crema. The repair was a real success!