2014-2019 Toyota Highlander Tail Light Replacement
ID: 167037
Description: If your taillight bulb for the 2016 Toyota...
Steps:
- There are 2 panels on both the left and right sides of the trunk, depending on which taillight bulb needs to be replaced.
- The panel to replace the left taillight bulb should look like this, and have a small opening located on the top right
- And the panel for the right-side taillight bulb should look like that, having a small opening on the top left.
- Remove the panel, or both if replacing both taillight bulbs, by using a flat head screwdriver or a plastic spudger and putting it in the small crack in-between the trunk and the panel.
- Lift the panel up from the side you put the flat head screwdriver in. Use some force to pull the rest of the panel off completely.
- There are 2 bulbs inside the panel: the taillight bulb is the one above the reverse light bulb.
- The lower bulb, which is for the reverse light.
- The bulb that is above the reverse light is for the taillight bulb. Which is what we are looking for to replace.
- Remove the taillight bulb from the hole, by grabbing the bulb and twisting it counter-clockwise.
- Pull it out when you hear a click.
- The hole from which you pull the taillight bulb out of should have a red glow inside, so that is how you can tell if you have pulled the right bulb out.
- Take out the bulb by gently pulling it out of the plastic it is currently in.
- Take the new taillight bulb and just slide it back into the plastic holder.
- Ensure that the bulb doesn’t move around loosely or fall. Otherwise, it has not been put back properly.
- Insert the new bulb back into the hole of the panel, by inserting it into the hole and turn it in the clockwise (towards the right) direction until it locks into place.
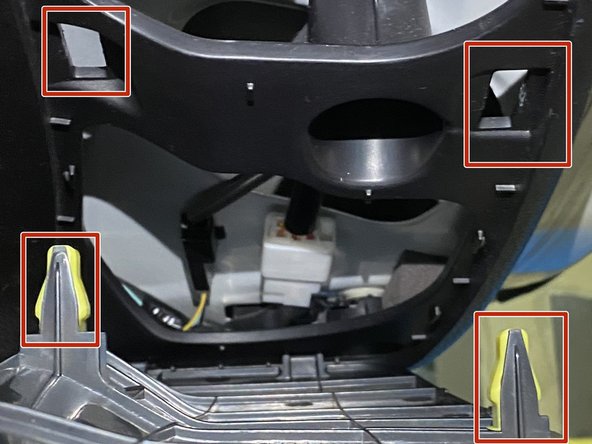
- To put the panel back, put the 2 clips at the bottom of the panel into the locks.
- Put the middle clips into their place, you will hear a click when the middle two clips are in place.
- Put the top 2 remaining clips of the panel into their locks.
- Once you get the bottom 2 clips in their locks, all the other clips will start to align with their lock locations. Once all clips are in their locks make sure to push in the panel to ensure it is locked in completely.