Razor Hovertrax 2.0 Wheel Hub Replacement
ID: 167308
Description: Use this guide to replace the wheel hub of the...
Steps:
- Use a #2 Philips screwdriver to remove the eight 18.5 mm screws from the bottom of the Hovertrax 2.0.
- To remove the led connector from the board, press the clip in with your fingers and gently pull up.
- The connector you are removing is black and has two pins.
- If it does not want to come out, gently wiggle the connector side to side while pulling up.
- Disconnect the battery connector by grabbing the black side with one hand and the yellow side with the other hand and gently pull apart. (Try not to pull on the wires, it could damage them)
- If you are replacing other parts, leave the battery disconnected until the end.
- Remove the two 17.2 mm hex head bolts using the 4 mm hex screwdriver that secures the battery in place.
- The battery should be able to be lifted up out of the device now.
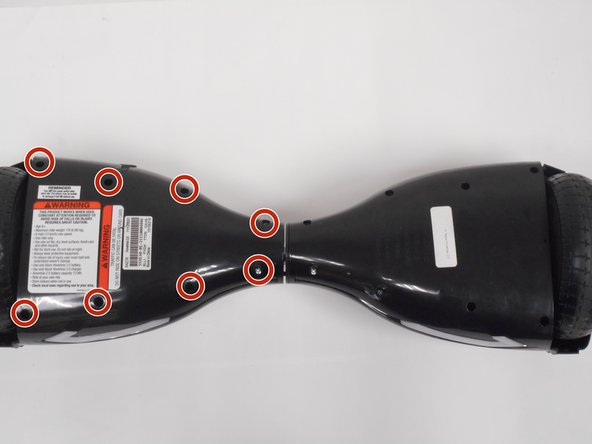
- After disconnecting the battery, depending on which wheel hub needs replacing, you may need to take off the cover for the other side of the hoverboard. Using the #2 Phillips screwdriver, remove the eight 18.5 mm screws that are circled)
- Be careful when removing the cover, there will be wires connected to the components in the cover.
- Once all of the screws are removed, gently lift the cover up and angle it up.
- There are 2 wires that have to be disconnected before we can set the cover aside
- To remove the connectors, press and hold the clip with your fingers and gently pull up (if it is not coming out, gently wiggle the connector side to side while pulling up)
- Set the cover aside
- 4 connections must be removed before we can take out the motherboard covering the screws holding in the wheel hub.
- To remove the connectors, press and hold the clip/connector and gently pull up (if the connector does not want to come out, gently wiggle it side to side while pulling up)
- Using the #2 Phillips screwdriver, remove these four 11.6 mm screws
- The measurement of the screw is the average length of all screws!
- When lifting the board up, try not to touch the bottom, there is a capacitor that may be holding a charge.
- Lift the board up by grabbing it by the edges and set it aside.
- Using the 5 mm hex screwdriver, remove the 4 (22 mm) hex bolts (no need to be gentle here, they are tight and need some force to be removed)
- Use an 10 mm socket or wrench to remove the 2 bolts (13.6 mm).
- After all of the bolts are removed, take the wheel hub out and set the hoverboard aside.
- Now the wires must be gently pulled through the bracket so the wheel hub and bracket are separate.