Framework Laptop 16" Speakers Replacement
ID: 169761
Description: Use this guide to replace the speakers, aka " l...
Steps:
- Unplug all cables and fully shut down your laptop.
- If your repair requires a spudger, a T5 Torx, or a Phillips screwdriver, you can use the included Framework screwdriver. Whichever works best for you!
- Framework recommends that you put your laptop into battery disconnect mode in the BIOS whenever removing the battery. Read how to do that here.
- To disable this mode, click here.
- Use your fingernail to pull out the two Input Module latches and unlock them.
- The latch will show red if it's unlocked.
- Use your fingers to slide the touchpad spacer toward the bottom edge of the laptop and unclip it.
- If you're having trouble, check if the corresponding Input Module latch is properly unlocked.
- Lift the touchpad spacer off the laptop and remove it.
- Repeat the same procedure for the other touchpad spacer.
- Use your fingers to slide the touchpad toward the bottom edge of the laptop and disconnect it.
- If you're having trouble, check if the Input Module latches are properly unlocked.
- Lift the touchpad and remove it.
- During reassembly, perform the following:
- Place the touchpad flat on its cutout so its clips are properly aligned.
- Press the touchpad down and slide it into place so it lines up evenly with the bottom edge of the laptop.
- The keyboard is held in place with strong magnets. Apply gradually increasing force to avoid having the keyboard violently eject.
- Grip the two pull tabs along the bottom of the keyboard.
- Lift the pull tabs until the keyboard magnets release.
- Remove the keyboard.
- During reassembly, make sure the keyboard is seated properly on its alignment pegs and sits evenly with the edges of the laptop.
- The numpad is held in place with strong magnets. Apply gradually increasing force to avoid having the numpad violently eject.
- Grip the pull tab at the bottom of the numpad.
- Lift the pull tab until the numpad magnets release.
- Remove the numpad.
- During reassembly, make sure the numpad is seated properly on its alignment pegs and sits flush with the edges of the laptop.
- Grip the black pull tab on the midframe cable press connector.
- Lift up to disconnect the midframe cable.
- The midframe screws are ordered from 2–17 (number 1 is the press connector). You don't have to follow the order, but you can use it to help keep track of the screws you've loosened.
- Use a T5 Torx screwdriver to loosen the 16 captive screws securing the midframe.
- During reassembly, follow the order (starting with 2) to reinstall the screws across the midframe evenly.
- Use your fingernail to lift the bottom edge of the midframe enough to grip it with your fingers.
- Lift the midframe off the laptop and remove it.
- During reassembly, make sure the midframe sits evenly on its alignment pegs before tightening the screws.
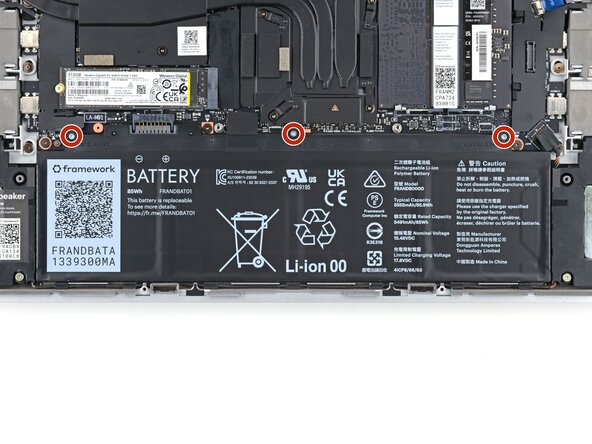
- Use a T5 Torx screwdriver to loosen the three captive screws securing the battery.
- Grip the black pull tab at the top of the battery.
- Lift the pull tab to disconnect the battery connector.
- Remove the battery.
- Lift the speaker cable connector by its black pull tab and disconnect it.
- The speaker cable is routed along the bottom edge of the laptop. The next three steps will demonstrate how to unclip it.
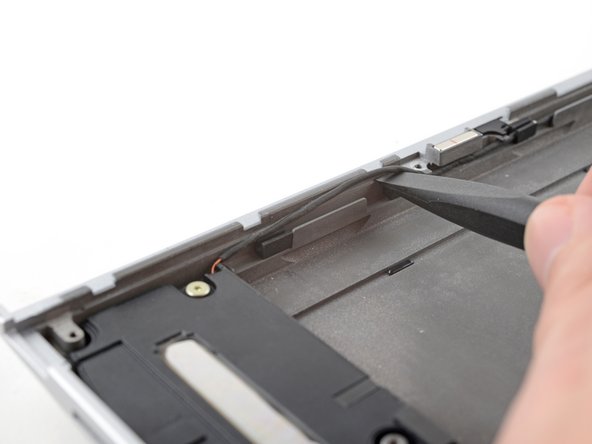
- Starting at one speaker, use the flat end of a spudger, or your fingers, to lift the speaker cable out of its rubber clips.
- Slide the speaker cable out from under its screw hole peg in the frame.
- Repeat the last two steps across the length of the speaker cable until it's completely unclipped.
- Use a T5 Torx screwdriver to remove the two 2 mm‑long screws securing each speaker (four in total).
- During reassembly, be very careful replacing these screws, as it's easy to damage their posts and prevent the screws from fully tightening. Don't overtighten the screws—just tighten them until they're snug.
- Lift the speakers off their alignment pegs and remove them.