Petcube Play 2 Microphone Replacement
ID: 171966
Description: The Petcube Play 2 (model number PP2OUS) has a...
Steps:
- Flip over the Petcube so the rubber bottom faces you.
- Pull up the rubber layer with an iFixit opening pick to expose the screws underneath.
- Remove the four 3.5mm screws from under the rubber cover using a Phillips #1 screwdriver.
- The glue may cause slight resistance, but the screws should come out with minimal effort.
- Carefully pry off the glass front panel using an opening pick or a spudger.
- Do not force the front panel off, as it may crack and break.
- Slide off the two covers, starting with the top plastic cover.
- Slide out the internal assembly from the aluminum casing.
- Once the internal assembly is removed, a brass cylinder in one corner of the cube's front face will be visible. A screw will be attached to it.
- Remove the screw with a Phillips #1 screwdriver.
- Flip the cube onto its side to locate the pull tabs.
- Using an opening tool, lift each of the five tabs to separate the two halves of the Petcube 2.
- Gently disconnect the cable connectors to separate the two halves of the device.
- Avoid pulling on the wires to prevent damage to the connectors.
- Use a Phillips #1 screwdriver to remove the two 1mm screws.
- Carefully release each of the tabs on the sides of the cube and remove the motherboard.
- Be gentle with the tabs. They will break under too much pressure.
- Use a Phillips #1 screwdriver to remove the screws from the plates behind the motherboard, separating the two plates.
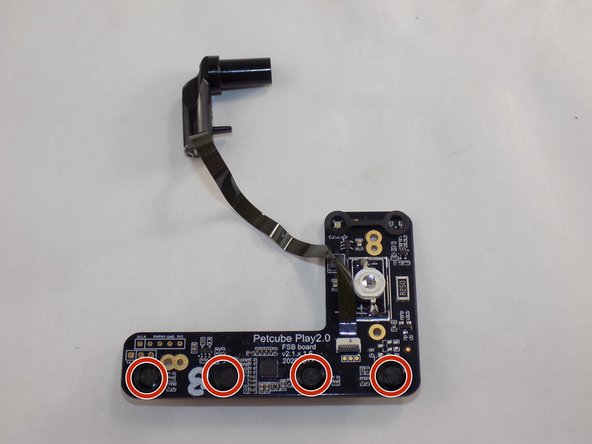
- Detach the PCB with the microphones from the plastic.
- Using a soldering iron, desolder the microphones from the PCB.
- Be careful! The soldering iron becomes hot! Avoid touching the device for too long, as this may damage the components.
- To Avoid burning yourself or damaging the device, follow the IFixit soldering instructions