PYE Portable Stereo Radio Cassette Recorder Teardown
ID: 175670
Description: This is a teardown of the PYE Portable Stereo...
Steps:
- Radio weight: 1.343kg. Radio plays cassette tapes and picks up radio signals.
- Length: 340mm
- Width: 80mm
- Height: 124mm
- Cord Weight: 89g. Cord powers radio.
- Cord Length: 1,883mm
- Plug width: 41mm
- Plug height: 27mm
- Removed battery case lid. Weight: 25g. Covers batteries, protecting them.
- Length: 209mm
- Width: 2.5mm
- Height: 38mm
- Unscrewed the 4 medium length back screws. Phillips head, pointed tip. Weight: <1g. Holds back case to front case.
- Length: 26mm
- Diameter: 5.5mm
- Unscrewed long length back screw. Phillips head, pointed tip. Weight: <1g. Holds back case to front case.
- Length: 37mm
- Diameter: 5.5mm
- Took handle off using a screwdriver to push down the plastic holding it in place. Weight: 37g. Allows user to carry radio.
- Length: 303mm
- Width: 16mm
- Height: 64mm
- Separated the front and back cases revealing the components inside.
- Undid the radio station picker by pulling it out. This comprised of the radio station wheel, the radio station string, the radio station yellow marker and the radio station spring.
- Radio station wheel weight: 6g. User can rotate wheel to pick a different radio station.
- Diameter: 40mm
- Width: 21mm
- Radio station picker yellow marker weight: <1g. Signals to user what radio station it’s picking up.
- Length: 16mm
- Width: 9.5mm
- Height: 12.5mm
- Radio station picker spring weight: <1g. Tensions radio station picker to the front case so it doesn’t fall out.
- Length:12.5mm
- Diameter: 3mm
- Radio station picker string weight: <1g. Pulls the radio station yellow marker across.
- Length between two red arrows: 413mm
- Diameter: 1mm
- Unscrewed the 5 screws holding the speakers to the front case. Phillips head, pointed tip. Weight: <1g. Holds the speakers to the front case.
- Length: 9mm
- Diameter: 6mm
- While the radio was clamped to the table I used a plier to pry the two speakers off, they were still connected to the back case with the wires.
- Then I used the plier to remove the speaker brackets. Weight: <1g. Allows the speaker screws to hold the speaker to the front case without ruining the speakers.
- Length: 18mm
- Width: 13mm
- Height: 1mm
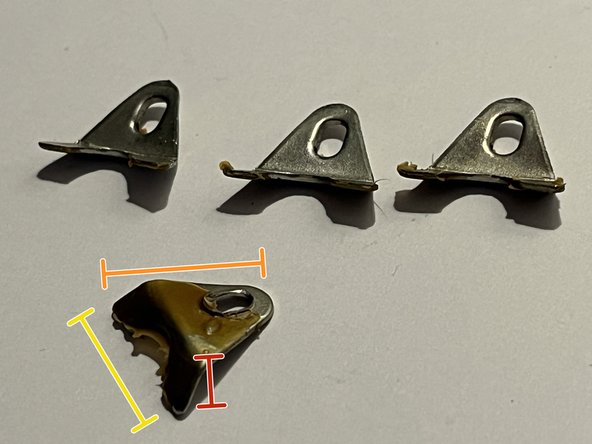
- Took off both speaker meshes from the front case using a plier to straighten out the mesh tabs. Weight: 26g. Protects speakers and dissipates sound.
- Length: 10mm
- Width: 97mm
- Height: 11mm
- There was soft material behind the speaker meshes that just fell out. Weight: <1g. Dissipates sound.
- Length: 10mm
- Width: 10mm
- Height: 0.5mm
- I took out the door wire using pliers as it was hard to reach. It ended up flinging across the room because it was actually a spring. Weight: <1g. Allows door to lift up and down on its own.
- Length: 28mm
- Width: 3mm
- Height: 6mm
- Pulled off the front case foam which was easy to do as it wasn't stuck on very well. Weight: <1g. Holds the small PCB to the back case and stops it from moving out of place.
- Length: 15mm
- Width: 10mm
- Height: 11mm
- Pried off the door. Weight: 41g. Protects cassette tape and internals.
- Length: 126mm
- Width: 88mm
- Height: 24mm
- Pried off the two door metals. Weight: <1g. Hold cassette in place when inside radio.
- Length: 25mm
- Width: 5mm
- Height: 0.5mm
- Poked out the door plastic. Weight: 5g. Allows the cassette tape name to be read whilst in the radio and gives information about tape direction.
- Length: 111mm
- Width: 22mm
- Height: 1mm
- The front case is now free. Weight: 123g. Protects inside components and keeps everything in place. Has aesthetic value as well.
- Length: 345mm
- Width: 30mm
- Height: 123mm
- Undid the 2 screws on the thermal coil using a screwdriver. Phillips head, pointed tip. Weight: <1g. Holds thermal coil to back case.
- Screw length: 11mm
- Screw diameter: 5mm
- This also released the 2 washers. Weight: <1g. Height: 1mm. Distributes load from the thermal coil screws onto the thermal coil. Protect against damage.
- Washer diameter: 12mm
- Pulled out thermal coil, but it was still connected to the back case with two more screws. I couldn't unscrew these, so I applied WD40 to the 2 screws and waited 10 minutes for it to seep it. But I still couldn't remove the screws so I just left them.
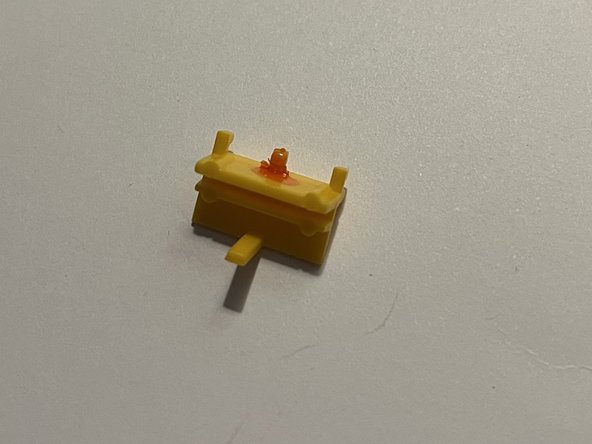
- Took off the volume sliders with pliers. Weight: <1g. Allows user to change the volume and tone of the audio.
- Length: 17mm
- Width: 5mm
- Height: 6mm
- Undid the 4 tape screws with a screwdriver. Phillips head, pointed tip. Weight: <1g. The tape was still stuck to the back case with wires, but now I can get to the PCB screws. Holds tape to the back case.
- Length: 9mm
- Diameter: 6mm
- Ripped the wires off the PCB and the other components to free them (speakers, tape, etc.)
- Unscrewed the 2 PCB screws. Phillips head, pointed tip. They had different diameters. Green screw weight: <1g. Holds PCB to the back case.
- Length: 9mm
- Diameter: 5mm
- Blue screw weight: <1g. Holds PCB to the back case.
- Length: 8.5mm
- Diameter: 6mm
- Pulled off the 2 buttons to release the PCB. Weight: <1g. Allows user to turn the radio off and on.
- Length: 32mm
- Width: 13mm
- Height: 9mm
- Pulled the 6 wires off the speakers. All the wires have a diameter of 1mm and a weight of <1g. The wires carry electric current to both speakers and the PCB.
- Length: 442mm
- Length: 255mm
- Length: 214mm
- Length: 236mm
- Length: 380mm
- Length: 377mm
- The speakers are now free. Weight: 60g. Produce audio and amplify it.
- Diameter: 77mm
- Height: 22mm
- Pulled off the thick tape wire. Diameter: 1mm. Length: 229mm. Carries electric current to the tape and the PCB.
- Pulled off the other tape wires. The tape is now free.
- Tape. Weight: 221g. Play, stop, pause, rewind, skip and record on a cassette tape.
- Length: 315mm
- Width: 14.5mm
- Height: 21.5mm
- Pulled the 7 wires off the thermal. All the wires have a diameter of 1mm and a weight of <1g. The wires carry electric current to the thermal wire and the PCB
- Length: 315mm
- Length: 305mm
- Length: 215mm
- Length: 239mm
- Length: 273mm
- Length: 175mm
- Length: 96mm
- Took wire tube off the wires. Weight: <1g. Length: 41mm. Hold the thermal wires together.
- Diameter: 7mm
- Wire metal. Weight: <1g. Length: 38mm. Hold the thermal wires together.
- Width: 6mm
- Height: 0.5mm
- Wire metal tube weight: <1g. Ensures no electric current is transferred to the wire metal from the wires or vice versa.
- Length: 31mm
- Diameter: 3mm
- Pulled apart the PCB subassembly into PCB big, PCB small, bread wire, metal, rubber, & the 8 PCB wires.
- PCB big weight: 129g. Controls the operations of the radio.
- Length: 150mm
- Width: 112.5mm
- Height: 26.5mm
- Bread wire weight: <1g. Length: 68mm. Hold the PCB wires together.
- Width: 2mm
- Height: 1mm
- Metal weight: <1g. Diameter: 9mm. Connects the PCB wires to the PCB.
- Height: 7mm
- Rubber weight: <1g. Diameter: 12.5mm. Ensures no electric current is transferred from the PCB to the other radio components.
- Height: 8mm
- The 8 PCB wires. They all have a weight of <1g and a diameter of 1mm. Length: 294mm. The wires carry electric current to the two PCBs
- Length: 259mm
- Length: 299mm
- Length: 176mm
- Length: 298mm
- Length: 255mm
- Length: 215mm
- Length: 238mm
- PCB small weight: 10g. Controls the volume and tone of the radio audio.
- Length: 66mm
- Width: 40.5mm
- Height: 19mm
- Back case is done. Weight: 540g. Protects inside components and keeps everything in place. Has aesthetic value as well.
- Length: 340mm
- Width: 63mm
- Height: 124mm