LG Air Conditioner Deflector/Flap Motor Replacement
ID: 176482
Description:
Steps:
- Replacing the air deflector/flap motor for air outlet flow orientation in an LG Air Conditioner.
- To get to the point you see in photo 3, the previous step is to disassemble the casing. This is indicated in Guide 1: Casing Disassembly.
- Guide 2: Problem Diagnosis
- In Photo 3, we see the motor on the right side of the unit.
- View of the original motor and the replacement motor (purchased on Aliexpress). The replacement has a shorter cable and a different connector, so you'll need to reuse a piece of cable and the connector from the faulty motor.
- Photo 3: We see that the new motor's cable does not reach the PCB.
- ATTENTION: WE WILL WORK SAFELY, WITH THE EQUIPMENT TURNED OFF AT THE ELECTRICAL PANEL.
- Using a medium-sized Philips (+) screwdriver, loosen the two screws holding the motor and its connector to the PCB.
- Comparison: Faulty vs. Replacement Motor Here's a comparison between the faulty motor and the replacement motor. The latter has a different connector and a shorter cable. This means the purchased motor isn't a direct fit and needs to be adapted. This is likely due to the equipment's age, making it difficult to find an exact replacement part.
- You'll need to grab your soldering iron, solder, wire cutters (or scissors), and either heat-shrink tubing or electrical tape.
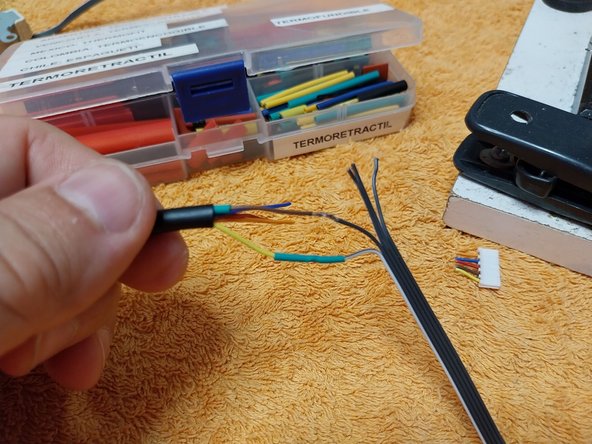
- We'll reuse about 10 cm of cable plus the connector from the faulty motor. Cut the cable with the connector from the faulty motor, then cut the connector off the replacement motor. Finally, splice the cable from the faulty motor to the cable of the replacement motor.
- Views of the cable joining process.
- ATTENTION: The order of the wires, starting with the yellow wire on the connector, matches the order of the flat cable's wires, starting with the white wire. YELLOW = WHITE, etc.
- First, cut the connector off the replacement motor, leaving a small piece of cable so you can see the color order.
- Second, cut the cable from the faulty motor, leaving about 10 cm of cable plus the connector.
- VERY IMPORTANT NOTE: The order of the motor's wires, starting with the yellow wire, is the one you must follow when splicing one cable to the other. YELLOW - WHITE
- We'll strip about 0.5 to 1 cm from the ends of the wires, insert the heat-shrink tubing, solder the two wires together, slide the tubing over the solder joint, and then heat the heat-shrink tubing. We'll repeat this cable by cable.
- This time, since I don't have a heat gun handy, I'm using a lighter to heat and shrink the heat-shrink tubing.
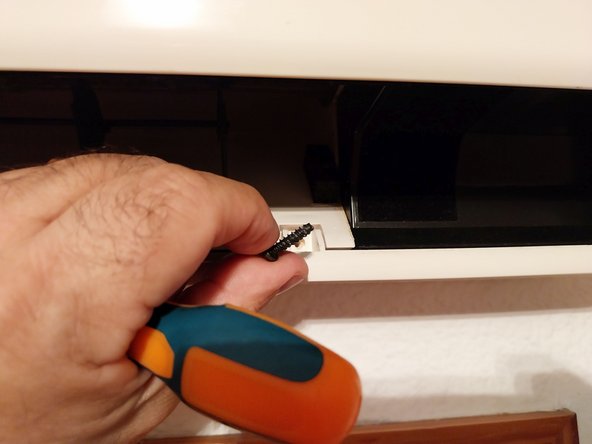
- We'll reinstall the motor in the unit. Replace the two mounting screws and insert the connector into the PCB.
- View of the connector inserted.
- Now it's time to check if the motor is working correctly.
- We'll place the deflector or FLAP. It won't engage with the motor normally, so we'll just "present it without inserting it in front of the motor's shaft." As soon as we power up the unit from the electrical panel, the motor will activate and search for its REST - CLOSED position, causing it to insert itself into the FLAP.
- At the other end of the house, after resetting the circuit breaker in the electrical panel, when I returned to the room where the unit is installed, the Flap had already closed and positioned itself, as we can see. It was in the CLOSED position.
- Once the motor has been replaced, we'll test it to ensure it functions correctly: Video.
- Once you've confirmed it's working, you can try to reattach the cover without disassembling the Flap, but it's a bit complicated. It's more worthwhile to remove the Flap again and then reattach the cover without it.
- To insert the cover, it's easier to disassemble the FLAP again.
- Once the casing is in place, reinstall its two screws and then reattach the flap.
- To insert the flap, you'll need to bend it slightly on the motor side.
- View of the FLAP inserted. We'll re-check its operation: turn the unit on with the remote, and the flap will open. If you press off, it'll return to the closed position.
- End of Guide.