Teufel IP 42 CR CD-Drive repair
ID: 177943
Description: The CD-Drive of my Teufel Stereo had the...
Steps:
- Disclaimer: This Manual is intended for professionals only.
- Risk of electric shock! This device contains exposed capacitors. It might carry a voltage even if unplugged. Always check the device to be free of voltage before working on it.
- Risk of eye damage! This device contains an IR-Laser. It is only considered Class 1 when the device is fully closed. Do not power on the device when opened.
- Read the safety instructions on the device and inside the device's user manual. Proceed at your own risk.
- Turn of the device and unplug it.
- Unplug all other cables like speakers and other external devices.
- (4x) Remove the case screws at the back
- (4x) Remove the case screws at the left and right side
- Slightly bend the lower parts of the outer shell outwards
- Lift up the outer shell
- Pull the outer shell back and fully remove it
- Check the device for any remaining voltage using a multimeter. Only proceed if it's safe. If you're unsure on what to do, close the device and consult a professional.
- The CD-Drive is embedded tightly into the device. This step helps to create some space for removing it later.
- (2x) Remove the screws at the front left
- (2x) Remove the screws at the front right
- (2x) Remove the screws at the front bottom
- Now pull out the front a little (~1-2cm) on both sides
- The front is connected to other circuit boards by some cables. Do not pull it out too far and do not use any force
- When reassembling: Make sure that the cables on the right side of the device are not getting pinched.
- (2x) Remove the screws from the laser cover
- Lift the laser cover off the CD drive and set it aside
- From this step on, the laser lens is exposed! To avoid damaging it, do not touch it with your fingers or any objects.
- Carefully slide out the CD tray
- The first few centimeters can be very stiff. If this is the case, try to gently push the mechanism under the drawer to the right, or turn the drawer motor a little.
- (2x) Carefully release the clips of the CD tray by pushing them inwards with a tool
- Pull out the CD tray completely and set it aside
- Reassembly: The CD carriage has a guide on the underside for a plastic pin of the underlying mechanism. Slide this pin so that it fits into the guide.
- If you want to replace the toothed drive belt of the CD motor, you can do this now.
- (4x) Remove the mounting screws from the CD drive
- It is best to use a magnetic screwdriver to remove the screws
- Carefully take out the CD drive by pushing it forward slightly and slightly angle the left side upwards. Be careful not to damage the cables in the upper left corner!
- Attention: The disk drive is still connected to the circuit boards by some wires. Try not to damage them.
- Release both cables from their cable guides under the CD drive
- Carefully remove the drive and place it next to the stereo.
- If necessary, you can disconnect some or all of the cables from the CD drive, completely separating the drive from the device. However, since the plugs were glued on my device, I can only recommend this to a limited extent. Be careful with the ribbon cable, it is easy to damage!
- (2x) Remove the screws on the underside of the drive at the back
- Hold the reader module firmly, otherwise it will fall out by itself.
- (2x) Remove the plastic holding pins from the gears. To do this, gently press against the pins from the back of the drive and pull them out from the other side.
- This may take a lot of force. Be careful not to break the holding pins when loosening them.
- Remove the plastic sled by sliding it away from the gears and lifting it out.
- In my case the plastic sled was stuck and prevented the CD drive from closing completely. If you have the same problem, you can lubricate it with a little silicone grease at the contact points.
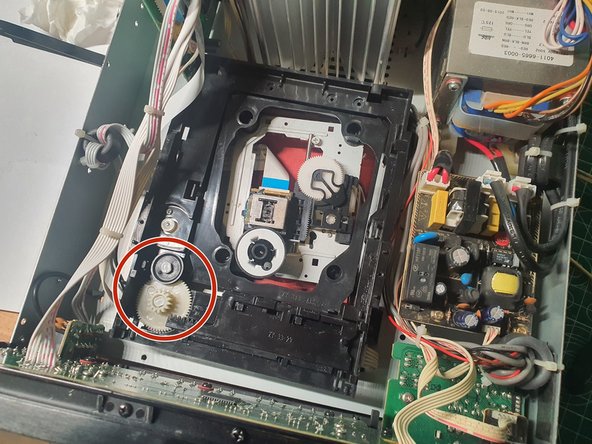
- Now you can remove both gears and clean them of dirt, as well as lubricate them with silicone grease.
- Do not lubricate the teeth of the gears themselves, but only the contact points with the housing and the inside of the axes of rotation.
- When reassembling: a blue switch is located under the carriage. It must be pressed into the correct position by hand when the carriage is reinstalled.