Lenovo ThinkPad Yoga 11e Gen 6 Hinges Replacement
ID: 179161
Description: The hinges allow the Lenovo ThinkPad Yoga 11e...
Steps:
- Wearing the anti-static wrist strap will prevent a static shock from damaging the components in the laptop.
- Disconnect the laptop from power and make sure it is completely powered off.
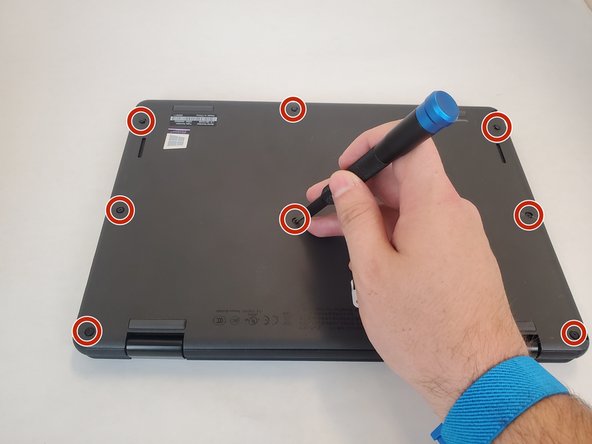
- Turn the laptop facing down.
- Loosen the eight captive screws using a JIS #0 screwdriver.
- The screws are attached to the panel and cannot be removed.
- Carefully remove the panel.
- Carefully disconnect the two sliding connectors in the left and right corner.
- Disconnect the sliding connector on the Wi-Fi board.
- Loosen the four 9.7 mm screws on the hinges in the top left and right corners using a Phillips #0 screwdriver.
- Carefully lift the closest part of the laptop away from the screen side of the laptop.
- Using tweezers, gently pry and remove the covers on the LCD strip.
- Remove the two 3.3 mm screws that were previously under the covers on the LCD strip using a Phillips #0 screwdriver.
- Carefully lift and remove the LCD strip.
- Remove the two 3.3 mm screws from the silver panels using a Phillips #0 screwdriver.
- Remove the two 3.3 mm screws from the LCD panel using a Phillips #0 screwdriver.
- Carefully lift the screen towards you. You may use the spudger to assist lifting the screen. There will be one more connector on the side of the screen.
- Carefully remove the ribbon connectors by gently pulling with your fingers.
- Remove the four 3 mm screws that are closest to you using a Phillips #0 screwdriver.
- Remove the two 4 mm screws that are further from you using a Phillips #0 screwdriver.
- Grab the stopper and pull it out of the right hinge.
- Remove the wire from the hinge.
- Grab the stopper and pull it out of the left hinge.
- Remove the wire from the hinge.