Opening the Voigtländer 55mm f/1.4 and adjusting the aperture
ID: 186285
Description: How to open the Voigtländer 55mm f/1.4 and fix...
Steps:
- First, release the three screws (red circle) on the back of the lens using a 2.5 screwdriver.
- After that, carefully (!) lift off the aperture.
- If you accidentally pull out the pin that releases the aperture (yellow circle), the spring underneath (red arrow in the second image) may also be pulled out; this is very delicate and therefore incredibly difficult to find if it happens to fall out.
- Carefully remove the pin and spring.
- Now adjust the lens spanner to the distance between the two blue-marked holes on the back, lock it in place, and carefully unscrew the ring.
- The aperture ring is now exposed and can be carefully removed.
- Image two shows the ball (red arrow) which sits on a spring and the indentations (blue rectangle) in the aperture ring that secure the detents or clicks for each aperture step.
- This ball is also spring-loaded and can fly off if you remove the aperture ring too quickly.
- The ball and spring can then be easily removed.
- After the aperture ring has been removed, we can now expose the actual aperture control unit.
- To do this, remove the 3 PH000 screws that were previously covered by the aperture ring.
- Now move the exposed brass slider all the way to the left; this corresponds to aperture 1.4.
- Now that we are removing the aperture ring, the brass ring remains on the lens group for the time being. One of the potential sources of error is now located in the aperture ring.
- If the lever (red circle in the 2nd image) is not in the correct position, the aperture cannot be set on the lens when assembled, and the aperture ring will not click properly into place at f/1.4 or f/16.
- Image 3 shows the position the small lever must be in when the lens pin (step 1, yellow circle) is pressed in.
- Now we will reassemble the lens.
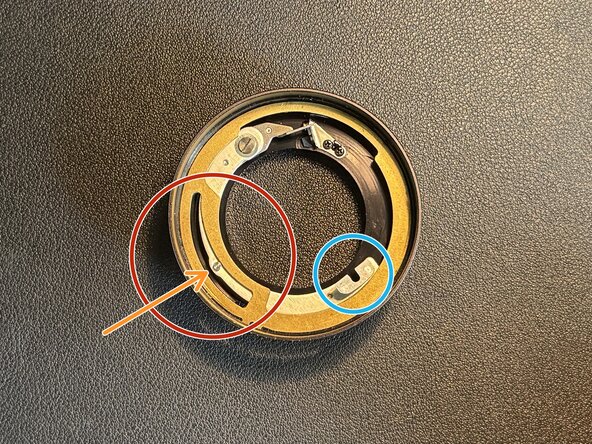
- It is important that the brass ring is positioned correctly as shown in the first image.
- Furthermore, make sure that the small pin (orange arrow) is correctly seated in the track, as this adjusts the aperture via the gripper (blue circle) accordingly.
- Images 2 and 3 show the aperture in two different settings.
- During reassembly, ensure that the pin for the aperture (see images 2 & 3 from step 6) aligns with the aperture adjustment ring. To do this, turn the brass slider all the way to the left (corresponds to maximum aperture).
- Reassembly is easiest to access from the side (image 2).
- Insert the aperture pin into the aperture adjustment claw (image 3).
- Reinstalling the PH000 screws automatically ensures the fine adjustment of the aperture.
- When you insert the aperture control pin (step 1, yellow circle), you can check the aperture's function (image 3)
- Now we will reinstall the spring and ball for the aperture detent,
- then replace the aperture ring. Make sure that the tab is correctly inserted into the brass slider.
- Now we will reinstall the cover. Here, ensure that the small groove is facing downwards, as shown in Image 2.
- Screwing it in is a bit fiddly, as you have to make sure the small lever stays under the ring. This is best accomplished by pressing it down with a spudger and carefully screwing the ring in by hand first.
- After that, tighten it again with the lens wrench.
- Now slide the spring back onto the thinner, longer side of the small pin and insert it.
- Now we will screw the rear panel back on.
- A test of the panel (image 2 & 3) shows that it works now.
- Now just clean up ;)