Disassembling HP Pavilion 14-dv0000xx Series Laptop
ID: 186338
Description: General look inside an HP Pavillion Laptop,...
Steps:
- Clean and clear your workspace as you will need room for tools, trays, parts and a clean, dust free environment for repairing electronics.
- Below is a list of tools and items needed for this repair job...
- Project screw tray (iFixit)
- Spudgers, spacers and pry bars (iFixit)
- ESD vacuum cleaner
- ESD/Rubber desk mat
- Start by removing the long rubber pads underneath the laptop to expose the case screws beneath.
- Use a metal or plastic pry bar to lift one end of the rubber strip, once you are underneath the sticky pad simply lift gently to peel away from the case.
- Using your hands you can slowly and gently pull the rubber strips away from the case being careful not to break them or separate the rubber layer with the sticky layer so they can be reattached.
- Carefully lay these to one side without letting them stick to anything or get dusty, otherwise they will not co back on without additional glue.
- Remove the 6 case screws attached to the plastic case panel before proceeding.
- With a plastic spudger/pry bar, carefully go around the top end of the laptop where the screen meets the case, between the two hinges.
- TIPS: When you get stuck at a section, you can use plastic spacers to hold the narrow gap of the case open while you readjust and start lifting another section.
- Do not pull the panel up or forcibly remove the panel as you can break the panel and/or the attachments!
- Do not use metal tools for this:
- The battery is not disconnected yet and is inside the case, risk of electric shock and/or short circuit if you use metal tools.
- Risk of panel, attachment or other kinds of aesthetic and functional damage to the case and components
- Gently insert the spudger in the gap in the frame and begin to run the spudger along the length of this area of the laptop. If you're doing it correctly, you should begin to see/feel the case lifting away
- Follow the steps above and continue around the outside of the case until you can lift the entire panel away, placing all screws into your project screw tray for safekeeping.
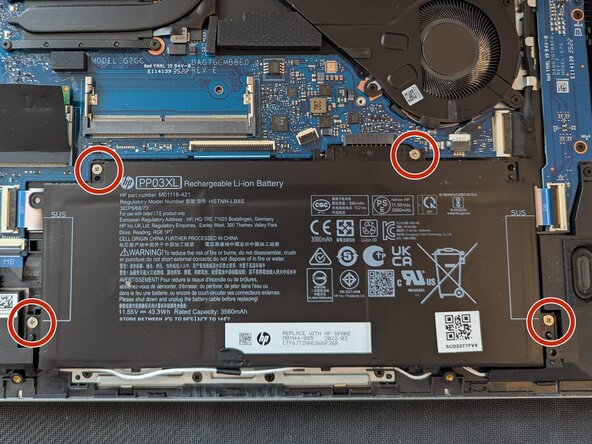
- Unscrew the battery locking screws with a small Phillips head driver and save the screws (x4).
- Unclip the thin white speaker cable that runs down the bottom edge of the battery cell.
- Gently pry underneath the battery with plastic spudgers to lift the battery out of it's housing, which will also disconnect the battery from the system.
- NOTE: There may still be charge left in the capacitors so wait a few minutes if you plan to tear down the device any further. Also, do not bend the battery at all, otherwise you will compromise it's integrity and could damage/brick your battery and/or device.
- You can see from the images the internal components of the laptop:
- 2 x SO-DIMM RAM slots, one of which is beneath a piece of protective plastic. Up to a max of 16GB RAM (2 x 8GB sticks)
- 1 x M.2 NVMe SSD - Supports 2280 size (80mm) M Key port
- 1 x M.2 slot - Standard 2230 size (30mm) A+E Key port for WiFi/BT card
- Various other components can be seen including: Heat Sink bar and heat spreader with fan assembly, USB port connections, speakers and connectors etc.
- Complete these steps in reverse from here to reassemble the components after the disassembly:
- Insert RAM, M.2 SSD and any other components you removed before moving forward.
- Lastly insert the battery being careful once it is disconnected not to use any metal tools and avoid electric shocks and shorts etc.
- Carefully reattach the bottom panel of the case to the laptop body, snapping the contact points back into place and screwing the case screws in.
- Carefully stick the rubber feet/strips back down and power the device back up.
- Power the device back up and it should work as normal.
- This should complete a basic breakdown for troubleshooting common issues but more detailed tear-downs with further steps are available online...