LG CF360 LCD Screen Replacement
ID: 19203
Description: This guide will help you replace the LCD screen...
Steps:
- On the back of the phone, place your thumb on the three raised bumps and slide the back cover upward.
- Lift and remove the battery.
- Remove the two screw covers at the top of phone with tweezers.
- Remove the six Phillips #000 (3mm) screws.
- Use the plastic opening tool to pry the back cover off. Insert the tool between the back cover and red mid section and go around the entire phone.
- The plastic side buttons fall out when you take the back cover off.
- The back cover is connected to the speaker by red and black wires.
- Use the tweezers to remove the red and black wires connecting the speaker to the green motherboard by pinching the sides of the plastic base near the motherboard.
- Set the back cover with the speaker aside.
- Use the plastic opening tool to gently lift the snapped-in motherboard from the front panel.
- An orange ribbon from the LCD is connected to the underside of the motherboard, so do not force the motherboard from the rest of the phone yet.
- Gently remove the blue transparent tape from the connector.
- With the plastic opening tool, gently pry the LCD connector from the motherboard.
- Set the motherboard aside.
- Take the front case and unscrew the four Phillips #000 (1mm) screws around the ribbon.
- Gently pull the orange ribbon from the number pad casing.
- Set the number pad case to the side once it is detached from the ribbon.
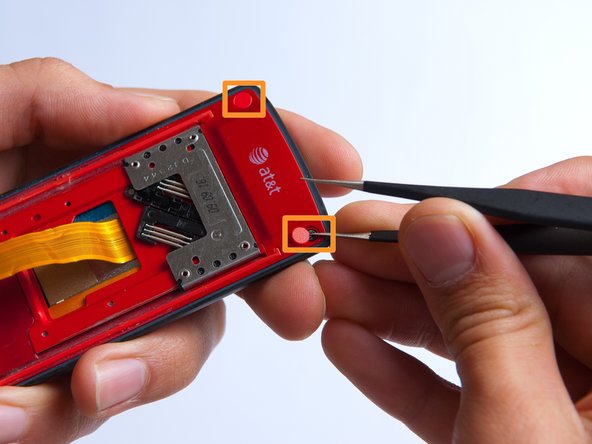
- Remove the two red sticker screw coverings at the top corners with tweezers.
- Unscrew the four Phillips #000 (3mm) screws at the corners of the phone.
- Pry the red sliding backing from the front cover by inserting the plastic opening tool in between the two sections and going around the entire phone.
- Set the red sliding backing and front cover to the side.
- Be very careful to not damage the green keypad board when using the plastic opening tool.
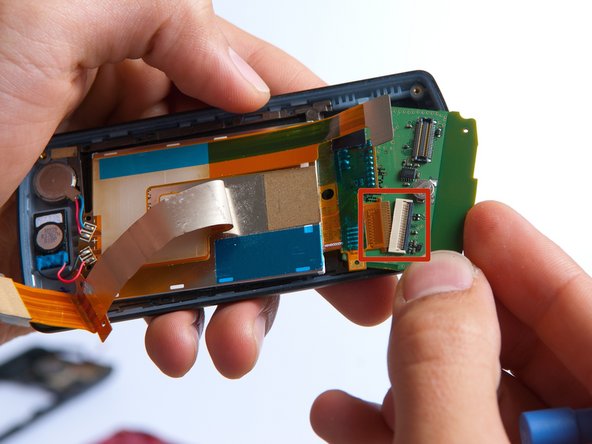
- Use a plastic opening tool to carefully disconnect the silver L-shaped LCD screen ribbon.
- At this point, an orange ribbon is still connected to the white and black Zero Insertion Force (ZIF) connector on the keypad board. Be careful to not damage the ribbon.
- Use tweezers to carefully pry up the black retainer on the connector.
- Lift the keypad board away from the phone casing using a plastic opening tool.
- Slowly rotate the keypad board towards you to disconnect the second orange LCD screen ribbon and remove the board.
- If you have never soldered before, or need a refresher, take a look at iFixit's soldering guide before starting this step.
- Use a soldering iron and a solder wick to de-solder the 4 wires connected to the LCD screen.
- The LCD screen can easily be removed at this point by lifting it from the phone casing.