Dyson HP02 / HP** / AM** / TP** / DP** Fan Motor Replacement
ID: 192218
Description: This guide will take you through the process of...
Steps:
- Make sure your machine is unplugged before proceeding
- Press the filter buttons in on both sides
- Then slide the filer shroud upwards and over the machine to expose the screws on either side
- Unscrew the screws on either side and place aside
- Hold the base of the machine and twist the loop counter clockwise until it comes to a stop
- Gently pull up on the loop until it comes away from the base
- Be careful of wires still connected to the loop assembly
- Place the loop assembly to one side as this doesn't need to be disconnected for this replacement.
- Remove the 3 screws on the outside of the assembly and place aside
- You can then lift up the bracket
- Ensure to use a magnetic screwdriver as screws will get lost in the abyss of this machine if they fall
- Remove the 4 screws on the inner component and set aside
- Remove the airflow smoother
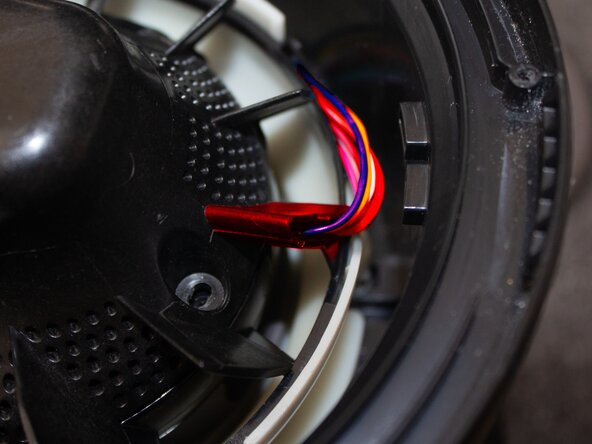
- This will give you access to the motor assembly loom
- Take the connector out of it's slot
- Remove it's shroud by unclipping the two clips
- Take the connector and press the pin in and pull apart to disconnect the motor assembly.
- It might take a bit of force to disconnect the cables
- To remove the motor assembly you must first unroute the wires of the loom
- Pull up on the rubber gromet holding the loom in place
- Then find the small clip holding the wires flat against the plastic bucket
- Press the small clip holding them in down then to the right to dislodge this clip and free the wires.
- This step can be difficult so it might be better to use a pair of tweezers or something similar
- Make sure the wires are out the way of the clip as stated in the previous step
- You can then remove the motor assembly freely
- Use either plyers or a wrench to remove the nut from the impeller
- This could take some force as this will have thread locker applied
- Use a hammer and tap the metal shaft while holding onto the impeller
- Tap this down until the shaft is level with the impeller. You should see the base black plastic being pushed down.
- Use care when doing this as you don't want to damage the impeller
- Pull the impeller from the motor shaft and place aside
- Unscrew the 3 screws holding the motor to the plastic housing
- Make sure to double check the model no of your motor and make sure it is appropriate for your region
- For 230V countries you'll need motor model no. LA034-040NN08A
- For 120V countries you'll need motor model no. LA034-040NN07A
- Screw the motor into the black plastic housing with the appropriate screws
- To place the impeller back onto the shaft make sure to align the notches on the shaft to the ones on the impeller
- Push the impeller down all the way
- Re attach the nut to the top of the motor shaft
- You can use some thread locker if you wish
- Place the motor assembly back into the motor bucket
- Re route the wiring loom into the clip
- Make sure the pegs that hold the motor bucket in place are in their small wells. This ensures the fan loop will attach properly again, and make sure the motor bucket is in the correct position.
- Reconnect the motor connector
- Attach the connectors casing and clip together
- It is a good idea at this point to plug the fan in again and check that the motor works. If any errors are displayed after the new motor is fitted, check the impeller is attached correctly. If the error was displaying before the motor replacement this might indicate another fault with your machine.
- Refit the connector into it's place and make sure the wire loom is placed around the motor
- When attaching the airflow smoother over the top of the motor, make sure the wires come out the side of one of the fins to avoid them being crushed as it's screwed in.
- Repeat steps 1 - 4 in reverse order to complete