Logitech Zone 300 Battery Replacement
ID: 192661
Description: Follow this guide to replace a worn-out or dead...
Steps:
- Power off the headset and unplug all cables.
- If you're replacing the headset battery, you only need to remove the right ear pad.
- With one hand, firmly hold the ear cup steady.
- With your free hand, slowly pull the ear pad away from the cup until it slides completely off its plastic lip.
- Remove the ear pad from the ear cup.
- Insert the point of an opening pick into the seam between the speaker plate and ear cup.
- Slide the pick along the seam to release the four speaker plate clips.
- Don't try to fully remove the speaker plate, as a wire connects it to the ear cup.
- Use your fingers to move the speaker plate towards the right side of the ear cup so you can access the screws.
- Use a Phillips screwdriver to remove the 7.1 mm‑long pancake screw securing the speaker housing.
- This step reattaches the speaker plate temporarily to keep it from wobbling during repairs.
- Align the speaker plate to the speaker housing and squeeze firmly to engage two of the four clips.
- Use your fingers to grab the speaker housing from the back.
- Pull firmly to pop the housing off from its ball joint.
- Be careful not to pull more than 1 cm apart—a speaker wire still connects the housing and the ear cup.
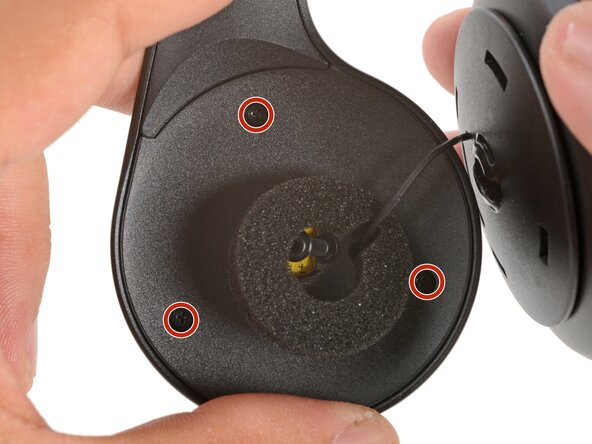
- Use a Phillips screwdriver to remove the three 5.3 mm‑long screws securing the midplate.
- Be careful not to strain the speaker and battery cables during this step.
- Use your fingers to swing the midplate away from the ear cup.
- The battery's lightly adhered to the midplate.
- Slide the tip of an opening pick under the battery and pry gently to separate it from the midplate.
- Use your fingers to peel and remove the foam pad covering the circuit board.
- Store this pad in a clean location for reassembly.
- Use angled tweezers to grip the edges of the battery connector.
- Gently rock the connector side-to-side and slide the battery connector out of its socket.
- This connector can be difficult to disconnect. Squeeze the tweezers close to the tips to help grip the connector.
- Push down on the socket with your finger while you rock the connector to prevent the socket from breaking off the circuit board.
- Remove the battery.
- Remove any adhesive residue from the battery well.
- The remaining instructions show how to reassemble the headset.
- Cut and attach a small strip of double-sided tape onto the battery.
- Remove the adhesive liner to expose the adhesive.
- Use your fingers to slide the battery connector fully into its circuit board socket.
- Place the foam pad over the circuit board and use your finger to press it in place.
- Align the battery in the midplate recess such that the battery cable reaches its circuit board connector.
- Use your fingers to press the battery onto the midplate.
- Swing the midplate back in place over the ear cup.
- Use a Phillips screwdriver to install the three 5.3 mm‑long screws to secure the midplate.
- Make sure the midplate isn't pinching any wires.
- At this point, you'll need to separate the speaker plate you partially reattached earlier to reinstall the pancake screw.
- Use your fingers to unclip the speaker plate from the housing.
- Align the speaker housing to the midplate such that the speaker wire threads through both parts without twisting.
- Align the foam piece so that it's centered around the ball joint.
- Align the ball joint to the speaker housing's center cutout.
- Use your fingers to firmly press the speaker housing onto the ball joint to pop it back in place.
- Use a Phillips screwdriver to install the 7.1 mm‑long pancake screw to secure the speaker housing.
- Use your fingers to move the speaker plate back over the speaker housing.
- The top clip is wider than the rest of the clips and is located above a set of vent holes. Use this to help align the speaker plate to the housing.
- Use your fingers to squeeze and engage the four clips to secure the speaker plate to the housing.
- Installing the ear pad can be tricky. Be patient and work slowly—it may take a couple tries.
- With one hand, firmly hold an ear cup steady.
- With your free hand, place the pad over the top of the cup, so the fabric flap slips over the cup's plastic lip.
- Thread the rest of the flap over the lip, working your way around the entire cup. Gently stretch the pad as necessary.
- Check the entire perimeter of the cup to make sure the ear pad is fully on. If any of the fabric flap is sticking out, try to push it over the lip or remove the ear pad and try again.