HP 15s-eq2047ns Laptop dead battery Replacement
ID: 194196
Description:
Steps:
- The HP 15s-eq2047ns laptop's dead battery began to reduce charging times while simultaneously reducing battery life, so it was time to look for a replacement.
- Search for the battery online by brand and model; there are a large number of sellers.
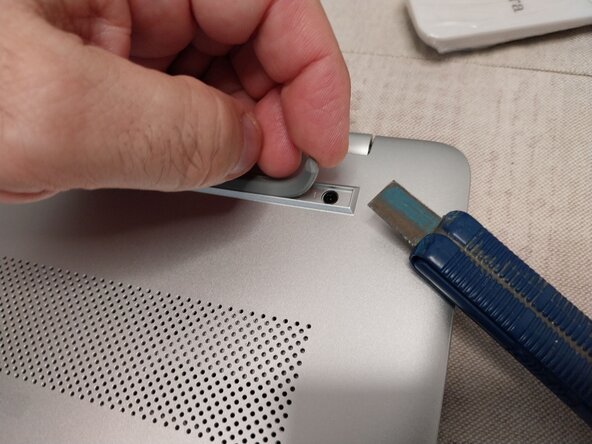
- For the teardown, first remove the triangular rubber foot near the hinge; use a hobby knife to gently pry it up, then pull it off to reveal the screws hidden underneath.
- There will be a strip of transparent film covering the screws; do not puncture it with the screwdriver. It can be removed and reused, just as I did with the triangular rubber support. Once the film is removed, take out the screws.
- Also remove the 2 side screws.
- To separate the lower casing from the upper one, we will use iFixit Opening Tool to pry little by little; the two casings will separate, and we will keep each section that separates apart with our fingers so that it does not close again.
- Once the lower case is removed, compare the replacement battery with the installed dead battery to ensure they are the same before proceeding to remove the screws from the installed one.
- We can observe the poor condition of the installed dead battery; the left cell is already severely damaged and the center cell is in a state of degradation.
- Optional: We will mark the date we install the new dead battery so that when it fails again, we know what its battery lifespan has been.
- You can proceed to install the dead battery's securing screws and replace the housing; position the housing and press down along all sides like a clamp.
- Once the housing is snapped into place, proceed to turn on the device. Note: in my case, it did not turn on; it was necessary to connect the power adapter to get it to turn on.
- Just as a side note, when I turned it on, a box appeared in the center of the screen indicating that there were changes to the BIOS and asking if I wanted to format the computer; I pressed the ESC key, the message disappeared, and it booted without any problems.
- Ensuring it works, I turn it off and proceed to replace the bottom cover screws.
- With the screws in place, I apply the adhesive film and the triangular support, which still retains its original adhesive.
- Views of the dead battery.
- View of the deformed dead battery.
- A related YouTube video, I do not recommend the MICROSYS program that is recommended in the video; it caused power-on issues for me on my PC, leaving it on standby. To turn it on, you had to press the power button repeatedly several times. Once I uninstalled it, the problem was resolved.
- END of the guide