Devialet Gemini Earbud Battery Replacement (not the housing)
ID: 199797
Description: This guide aims to extend the battery lifespan...
Steps:
- After first heating the surface with a hot water bottle or a heating tool (avoid a hair dryer), slide a very thin blade such as a hobby knife into the seam running along the surface of the earbud, between the molded shell and the surface with the D logo.
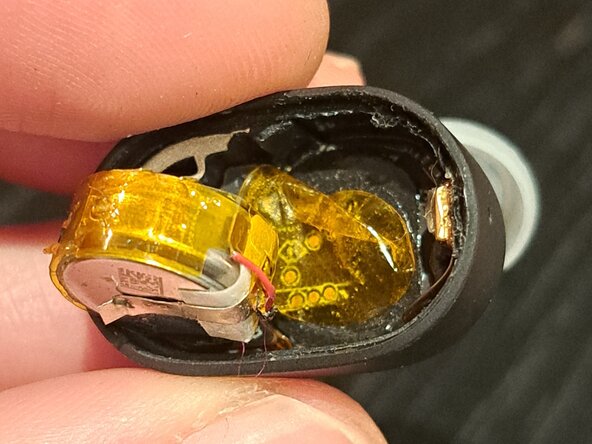
- Be careful not to insert the blade too deeply, as you risk severing the internal wiring (see the following photos).
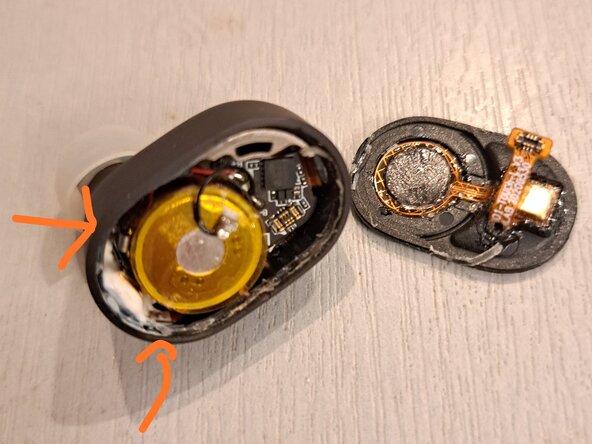
- Once the cover begins to peel away around the entire perimeter, slide a flat-tipped plastic tool to pop off the connection cable (see floating image 3).
- This allows you to set the cover aside and access the speaker.
- Insert a tool into one of the 2 locations indicated by the orange arrows to pry up the battery.
- Be careful not to apply too much pressure on the circuit board located at the top of the housing. There is adhesive under the battery holding it in place.
- Desolder the red and black wires from the battery contact points located on the side and face of the battery. You may need to remove the transparent orange protective film to do so. This clears the area to install the new battery.
- You must resolder the two red connections onto your replacement battery. Normally, replacement batteries are soldered in the same place; you just need to observe the indicated polarity: black = - and red = +.
- Once this is done, you must carefully reassemble the battery by tucking the wires to the side, taking care not to interfere with the closing of the cover.
- Once the battery is properly back in place, you must reconnect the cable and then clip it onto the earpiece shell. It is recommended to add a drop of super glue once you have tested that your earpiece is working correctly (it works with the cover connected but not glued).
- If the test is successful, all you have left to do is glue it and proceed with the same steps for your other earpiece.