iPad Pro 13" Transfer Screen Components
ID: 200174
Description:
Steps:
- The iPad screen has multiple small components mounted to the back of it:
- The top sensor assembly
- Two magnets along the top edge
- Three display cables
- If the replacement screen includes all of these components, skip to this step. Otherwise, only transfer the missing components.
- The top sensor assembly is composed of two sensors:
- Microphone
- Ambient light sensor
- If your replacement screen comes with a top sensor assembly pre‑installed, skip to this step.
- Heat an iOpener and apply it to the top sensor assembly for two minutes.
- You can also use a hair dryer or heat gun to heat the sensors until warm.
- Slide an opening tool between the ambient light sensor and the screen.
- Pry it up slowly to separate its adhesive. If it doesn't budge, apply more heat and try again.
- Use an opening tool to lift the microphone and separate the adhesive securing it to the screen.
- Lift the entire top sensor assembly to separate it from the screen.
- The iPad screen has two magnets along the top edge. These are used for accessories like cases.
- If the replacement screen comes with magnets pre‑installed, skip to this step.
- Mark the magnets with a marker so you know which orientation to install them in on the replacement screen—they won't work if installed incorrectly.
- Heat an iOpener and set it on one of the magnets for two minutes.
- You can also use a hair dryer or heat gun to heat it until warm.
- Insert the flat end of a spudger between the raised portion of the screen and the magnet.
- Push the magnet towards the top edge of the screen using slow, steady force until it's free.
- Set the first magnet to the side, ensuring it remains in the same orientation.
- Heat an iOpener and set it on the other magnet for two minutes.
- You can also use a hair dryer or heat gun to heat it until warm.
- Repeat this process to remove the second magnet from the screen.
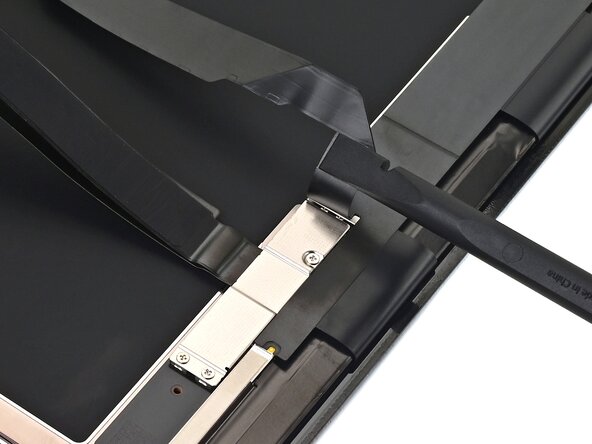
- The screen contains three cables on the back: one for touch, one for display, and one for power (with two press connectors).
- The touch and display cables are modular, and need to be transferred to the replacement screen in the following steps.
- If your replacement screen has all three cables pre‑installed, skip to this step.
- Use your finger or a spudger to lift the screen's power cable off the screen cable cover.
- Use a JCIS or JIS 00 screwdriver to remove the three 1.2 mm‑long screws screws securing the screen cable cover.
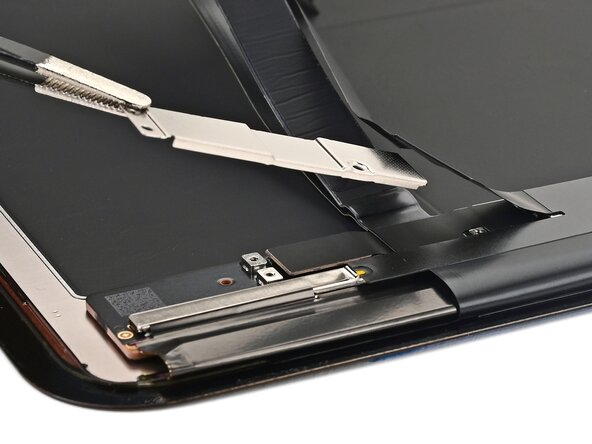
- Lift the screen cable bracket to a roughly 45‑degree angle and pull it off.
- Fold the screen's power cable out of the way.
- Use the point of a spudger to disconnect the screen's touch cable press connector.
- Use tweezers or your fingers to remove the touch cable.
- Use the point of a spudger to pry up and disconnect the display cable press connector.
- Remove the display cable.
- Align the display cable press connector over its socket on the replacement screen.
- Use your finger or the flat end of a spudger to press the connector into place.
- Repeat this process to connect the touchscreen cable press connector.
- Install the screen bracket at a roughly 45‑degree angle and set it onto the cables.
- Use a JCIS or JIS 00 screwdriver to install the three 1.2 mm‑long screws screws securing the screen cable cover.
- Fold the power cable down so it sits on top of the screen cable cover.
- Install 2 mm‑wide strips of thin, double‑sided tape to the underside of both magnets.
- Leave the adhesive backing in place for now.
- Use a marker to mark 23 mm from the left edge and 2 mm from the top edge of the screen.
- Remove the adhesive backing from the first magnet.
- Align the first magnet with the marks you made in the last step, and set it into place.
- Press on the magnet with your finger to help the adhesive bond.
- Repeat this process to install the second magnet 46 mm from the right edge and 2 mm from the top edge of the screen.
- Heat an iOpener and set it on top of both magnets for two minutes. This will help the adhesive bond.
- You can also use a hair dryer or heat gun to lightly heat each magnet to help the adhesive bond.
- Use tweezers to reposition any adhesive that may have covered the ambient light sensor (white circle) or microphone (black mesh). The adhesive should go around the sensors, not cover them.
- If the adhesive was damaged or stayed with the old screen, replace it with a 1 mm wide strip of thin, double-sided tape along the sensor's bottom border.
- If you applied fresh adhesive, or if your part came with new adhesive, remove the liners now.
- Align the microphone and ambient light sensor with their cutouts in the screen.
- Press the microphone and ambient light sensor down for 10 seconds each to give the adhesive time to bond.