Rowenta X-O 160 loose connection/contact problem fix
ID: 204350
Description: The LEDs on the Rowenta X-O 160 cordless vacuum...
Steps:
- Open battery compartment, remove battery.
- Remove hose (rotate counterclockwise, then pull).
- Remove dust container.
- Insert picks, open covers on carrying handle. Start at the top and slide the covers out towards the top to avoid snapping off the tabs at the bottom (image).
- Unclip LED board from cover. Be careful not to break the hook (yellow, right).
- Remove LED board from cable.
- Remove four T15 screws. Remove carrying handle.
- Remove two T15 screws. Remove wheel assemblies.
- Note: the cast-in text features help with reassembly if the device sits in front of you as shown. "GAUCHE" (French: "left") and "DROITE" (French: "right").
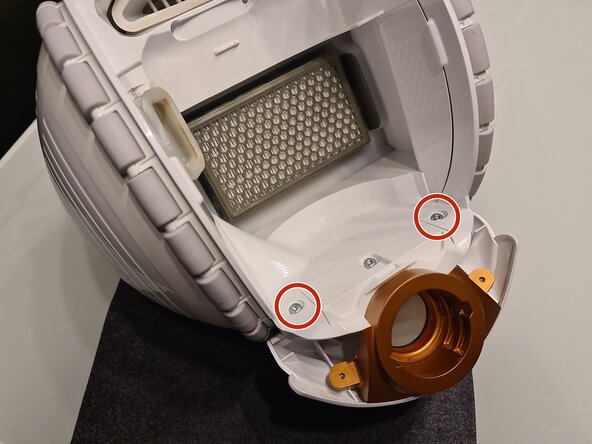
- Remove two T15 screws, one of which is easy to miss and requires a long and slim screw driver.
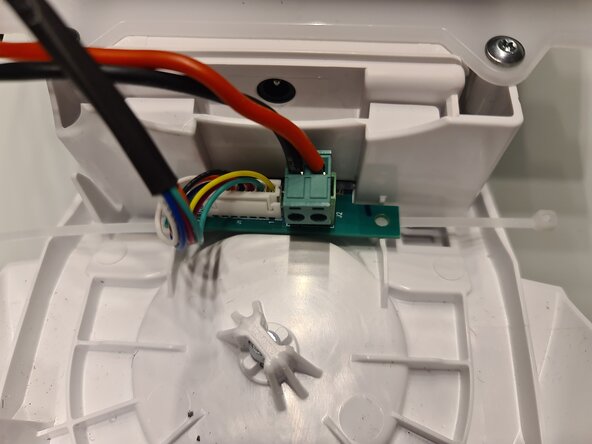
- The contact problem that this guide is supposed to help you fix occurs if the connector's pins are too high and only partially engage with the battery's contact pads.
- A battery can now be inserted to check the alignment of the battery's contacts with the connector. If the connector board's pins are not flush with the battery connector's top, then this is what is causing the problem.
- This is a Li-ion battery, which may explode or start a fire if short circuited. All protective covers have been removed in previous steps. DO NOT attempt to check the pin alignment by probing any contacts with a screwdriver or other conductive (metal) tool.
- Place a shim on the battery connector board's mounting surface. A piece of nylon zip tie (1 mm thick, 2.7 mm wide) will work perfectly.
- Again: this device uses a Li-ion battery, which may explode or cause a fire if any contacts are short-circuited. Make sure to use a non-conductive shim.
- Reinstall the battery connector board on top of the shim.
- Keep the shim (green) on "your" side of the screw holes (red) as shown. Reinstall the battery connector board, making sure that the shim is gently pushing the board into the correct direction. If necessary, reinsert the battery to check alignment.
- Be careful around the contacts with your screwdriver if you decide to reinsert the battery.
- GENTLY tighten the battery connector board's screws. Keep in mind that this is pretty much a hack and that the components are now mechanically loaded in an unintended way. Over-tightening the screws may easily cause damage.
- Thoroughly test the device before reassembly.
- Reassemble the device, following steps 1-6 in reverse order.